-
Bienvenidos al Foro de automecanico.com. Crea tu mensaje y especifica modelo de auto o vehiculo, tipo de motor, transmision y sintomas de su problema o falla. Aprendemos de las experiencias de mecanica automotriz de todos.
Estás utilizando un navegador obsoleto. Este u otros sitios web pueden no ser mostrados correctamente.
Debes actualizarlo o utilizar un navegador alternativo.
Debes actualizarlo o utilizar un navegador alternativo.
Torque De Un Motor Volkswagen jetta 2001
- Iniciador del tema ELIODJ
- Fecha de inicio
-
- Etiquetas
- diagramas jetta torque cabeza volkswagen


pulido2002
Miembro
VOLKSWAGEN, 4L, 2.0 Lts,8 Valv., SOHC, Num. BDC, A
0 Comments y 0 Reactions
VOLKSWAGEN 4L, 2.0 Lts.
Especificaciones del Motor
Armadora VOLKSWAGEN
Cilindros 4
Disposición de Cilindros L
Desplazamiento Lts 2.0
Desplazamiento CCD 1984
Desplazamiento PCD 121
Válvulas 8
Disposición Válvulas SOHC
Designación (clave) del Motor BDC
VIN 0
Diámetro (mm) -
Carrera (mm) -
Potencia (HP) -
Combustible Gasolina
Aspiración Natural
Años 1998-2003
Anotaciones 0
Especificaciones de Torques de Cabeza
Torques (lb/ft) 1er paso: Apriete a 30
2do paso: gire 90 grados
3er paso: gire 90 grados
Orden de Apriete
Tobe82
Experto
Especificaciones de Torques Jetta GL 2.0L L4AEG
años 2001/2003
Axle Shaft To Transaxle Flange Bolts 33
Axle Nut 195
Ball Joint To Suspension Arm Bolts 26
Camshaft Bearing Cap To Cylinder Head Nuts 15
Camshaft Sprocket To Camshaft Bolt 74
Clutch Pressure Plate (Driveplate) to Crankshaft 44 (1) (6)
Clutch Slave Cylinder 18 (5)
Connecting Rod Nuts 22 (1)
Crankshaft Pulley 30
Crankshaft Timing Belt Sprocket To Crankshaft Bolt 66 (1)
Cylinder Head Cover To Cylinder Head Bolts 84 Inch lbs
Cylinder Head Bolts (2)
Engine To Transaxle Bolts, M10 33
Engine To Transaxle Bolts, M12 59
Exhaust Pipe To Exhaust Manifold Bolts 30
Front Main Oil Seal Housing To Block Bolts 15
Front Engine Mount Bracket To Body 18
Front Engine Mount To Body 30 (1)
Front Engine Mount To Engine Bracket 44 (1)
Flywheel To Crankshaft Bolts 44 (1) (5)
Flywheel To Pressure Plate (Driveplate) Bolts 15 (6)
Intermediate Shaft Oil Seal Flange To Block Bolts 18
Intermediate Shaft Sprocket To Intermediate Shaft Bolt 48
Hub Nut 195
Lower Timing Belt Cover Bolts 84 Inch lbs
Main Bearing Cap Bolts 48 (1)
Oil Cooler To Oil Filter Bracket Nut 18
Oil Pan Drain Plug To Oil Pan 22
Oil Pan To Block Bolts 15
Oil Pressure Switch To Oil Filter Bracket 18
Oil Pump Cover To Oil Pump Housing Bolts 84 Inch lbs
Oil Pump Pickup To Pump Bolts 84 Inch lbs
Oil Pump To Block Bolts 15
Oil Spray Nozzle To Block Bolt 84 Inch lbs (5)
Pendulum Support To Engine 15 (1)
Pendulum Support To Transaxle 30 (1)
Power Steering Pump To Mounting Bracket Bolts 18
Pressure Plate (Driveplate) to Crankshaft 44 (1) (6)
Pressure Plate to Flywheel 15 (5)
Radiator Mounting Bolts 84 Inch lbs
Rear Engine Mount To Body 18
Rear Engine Mount To Transaxle 44 (1)
Rear Main Oil Seal Housing To Block Bolts 15
Rear Timing Belt Cover To Block Bolts 22
Rear Timing Belt Cover To Block Threaded Bolt 22 (3)
Thermostat Flange Bolts 84 Inch lbs
Timing Belt Tensioner Nut 33
Upper Intake Manifold Bolts 15
Upper Timing Belt Cover Bolts 48 Inch lbs
Vibration Damper (Pulley) To Crankshaft Timing Belt Sprocket Bolt 74
Water Pump Housing To Block Bolts 15
Water Pump Pulley To Water Pump Bolts 15
Water Pump To Water Pump Housing Bolts 84 Inch lbs
Leyenda
1 --Plus an additional 1/4 (90°) turn.
2 --Refer to "Cylinder Head, Replace."
3 --Coat threads with D6 locking compound, or equivalent.
5 --Models w/02A transaxle.
6 --Models w/020 transaxle.

Tobe82
Experto
Continuando con informacion para el mantenimiento de jetta 2.0L , comparto manual para cambio de banda de tiempo
NEW BEETLE & 1999-2006 GOLF & JETTA
On 1.7L models, this engine is classified as a free-wheeling engine. Because of this free-wheeling design, if the timing belt breaks or jumps timing, there is less chance of a piston contacting an open valve. To avoid belt breakage, replace the timing belt as recommended by the vehicle manufacturer timing belt replacement interval.
On 1.5L, 1.6L, 1.8L Non-Turbo & 2.0L models,these engines are classified as an Interference engine. If the timing belt breaks or jumps timing, a piston may contact an open valve. Piston to valve contact may cause damage to the valve, piston and other engine components. In some cases valve to valve contact may be experienced when the timing belt breaks or jumps timing. To avoid belt breakage, replace the timing belt as recommended by the vehicle manufacturer timing belt replacement interval.
With the timing belt removed, avoid turning the camshaft or crankshaft. If movement is required, exercise extreme caution to avoid valve damage caused by piston contact.
1.Wait until the engine has cooled down before installing the timing belt.
2.Obtain the radio anti-theft codes and record the station presets, then disconnect and isolate the battery ground cable.
3.Disconnect the RED voltage supply connector marked "Air Bag," located behind the instrument panel.
4.Wait 20 minutes to allow the air bag system capacitor to discharge prior to performing service.
5.Remove the engine appearance cover.
6.Remove the righthand insulation tray.
7.Rotate the engine accessory drive belt tensioner clockwise.
8.Lock the tensioner with VW locking tool No. 3090, or a 5/16 inch diameter pin approximately 2 1/8 inches long. An assistant may be required for this step.
9.Note the running direction, then remove the serpentine belt.
10.Remove the serpentine belt tensioner mounting bolts, then the tensioner.
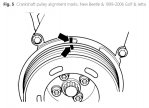
11.On models equipped with manual transmission,rotate the crankshaft in the normal running direction until the No. 1 cylinder reaches TDC compression stroke and the flywheel timing marks are properly aligned, Fig. 1.
12.On models equipped with automatic transmission,rotate the crankshaft in the normal running direction until the No. 1 cylinder reaches TDC compression stroke and the flexplate timing marks are properly aligned, Fig. 2.
13.On all models, remove the timing belt upper cover.
14.Ensure the camshaft sprocket timing marks are properly aligned, Fig. 3.
15.On Golf and Jetta models, install VW engine support tool No. 10-222A with legs 10-222A/1, or equivalents.
16.On New Beetle models, install VW engine support tool No. 10-222A with legs 10-222A/1 and adapter 10-222 A/8, or equivalents. A 12.5 MM hole will have to be drilled in the 10-222 A/21 guide approximately 7.9 inches in from the hole opposite the slotted end before the adapter can be used.
17.On Golf and Jetta models, proceed as follows:
a.Position the coolant expansion tank aside with the hoses attached.
b.Position the power steering fluid reservoir aside with the hoses attached.
c.Remove the six side engine support mounting bolts, then the mount.
18.On New Beetle models, remove the four engine mount bolts (1), Fig. 4, then loosen, but do not remove, bolt "A."
19.On all models, remove the crankshaft pulley retaining bolts, then the pulley.
20.Remove the timing belt center and lower covers.
21.Remove three engine mount bracket bolts, then the bracket. It may be required to raise the engine slightly to loosen the retaining bolts.
22.Rotate the timing belt tensioner counterclockwise to release the timing belt tension using VW wrench tool No. T 10020, or equivalent, then remove the belt.
23.Inspect the water pump and all nearby seals for leakage or damage. Replace as required.
24.Ensure all the timing marks are still properly aligned, Figs. 1 through 3. If alignment of the camshaft sprocket timing marks is required, turn crankshaft back slightly. If piston is at TDC, the valve could strike the piston. After aligning the camshaft sprocket timing marks, align the crankshaft timing marks.
25.Wait until the engine has cooled down before installing the timing belt.
26.Install the timing belt onto the crankshaft sprocket and the water pump pulley.
27.Insert the engine mount bracket retaining bolts into the bracket, then install the bracket onto the engine block. Torque the bolts to 33 ft. lbs.
28.Install the timing belt lower and center covers.
29.Install the crankshaft pulley. On New Beetle models, torque the bolts to 18 ft. lbs. On Golf and Jetta models, torque the bolts to 30 ft. lbs.
30.Ensure the crankshaft pulley timing marks are properly aligned, Fig. 5.
31.Install the engine mount with new bolts.
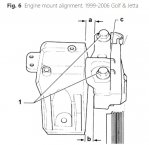
32.On Golf and Jetta models, ensure the mount is properly aligned, Fig. 6.
a.The bolt heads (1) must align with the edge of the mount "C."
b.Dimension "A" must be 0.55 inch.
c.Dimension "B" must be at least 0.40 inch.
d.Torque M6 bolts to 84 inch lbs.
e.Torque M8 bolts to 18 ft. lbs.
f.Torque M10 bolts to 30 ft. lbs.
g.Torque M12 bolts to 44 ft. lbs.
33.On New Beetle models, proceed as follows:
a.Torque the mount to body bolts to 30 ft. lbs., then rotate an additional 90°.
b.Torque the mount bracket to body bolt "A,"Fig. 4, to 18 ft. lbs.
c.Torque the mount to engine bracket bolt to 44 ft. lbs., then rotate an additional 90°.
34.On all models, remove the engine support tools.
35.Ensure all the timing marks are properly aligned, Figs. 1 through 3.
36.Loop the timing belt around the camshaft sprocket and tensioner roller.
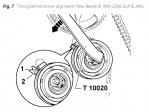
37.Rotate the timing belt tensioner counterclockwise until the notch (1) and indicator (2) are aligned using VW wrench tool No. T 10020, or equivalent, Fig. 7. Use a suitable mirror for this inspection. The angled retainer must also be securely located in the cylinder head cutout.
38.Torque the tensioner mounting nut to 15 ft. lbs.
39.Rotate the crankshaft two turns in the normal direction of rotation. The timing belt tensioner notch (1) and indicator (2) must move back into proper alignment, Fig. 7. It is important that the last 1/8 turn of rotation is made without interruption.
40.Install the timing belt upper cover.
41.Install the serpentine belt tensioner, then torque the bolts to 18 ft. lbs.
42.Lock the tensioner with VW locking tool No. 3090, or a 5/16 diameter pin approximately 2 1/8 inch long. An assistant may be required for this step.
43.Install the accessory drive belt. Refer to "Accessory Drive Belt Tension" for proper belt tension.
44.Install the righthand insulation tray.
45.Install the engine appearance cover.
46.Connect the battery ground cable, then arm the air bag system.
47.Start the engine and ensure it operates properly.
48.Reset the radio station presets and the clock.
NEW BEETLE & 1999-2006 GOLF & JETTA
On 1.7L models, this engine is classified as a free-wheeling engine. Because of this free-wheeling design, if the timing belt breaks or jumps timing, there is less chance of a piston contacting an open valve. To avoid belt breakage, replace the timing belt as recommended by the vehicle manufacturer timing belt replacement interval.
On 1.5L, 1.6L, 1.8L Non-Turbo & 2.0L models,these engines are classified as an Interference engine. If the timing belt breaks or jumps timing, a piston may contact an open valve. Piston to valve contact may cause damage to the valve, piston and other engine components. In some cases valve to valve contact may be experienced when the timing belt breaks or jumps timing. To avoid belt breakage, replace the timing belt as recommended by the vehicle manufacturer timing belt replacement interval.
With the timing belt removed, avoid turning the camshaft or crankshaft. If movement is required, exercise extreme caution to avoid valve damage caused by piston contact.
1.Wait until the engine has cooled down before installing the timing belt.
2.Obtain the radio anti-theft codes and record the station presets, then disconnect and isolate the battery ground cable.
3.Disconnect the RED voltage supply connector marked "Air Bag," located behind the instrument panel.
4.Wait 20 minutes to allow the air bag system capacitor to discharge prior to performing service.
5.Remove the engine appearance cover.
6.Remove the righthand insulation tray.
7.Rotate the engine accessory drive belt tensioner clockwise.
8.Lock the tensioner with VW locking tool No. 3090, or a 5/16 inch diameter pin approximately 2 1/8 inches long. An assistant may be required for this step.
9.Note the running direction, then remove the serpentine belt.
10.Remove the serpentine belt tensioner mounting bolts, then the tensioner.
11.On models equipped with manual transmission,rotate the crankshaft in the normal running direction until the No. 1 cylinder reaches TDC compression stroke and the flywheel timing marks are properly aligned, Fig. 1.
12.On models equipped with automatic transmission,rotate the crankshaft in the normal running direction until the No. 1 cylinder reaches TDC compression stroke and the flexplate timing marks are properly aligned, Fig. 2.
13.On all models, remove the timing belt upper cover.
14.Ensure the camshaft sprocket timing marks are properly aligned, Fig. 3.
15.On Golf and Jetta models, install VW engine support tool No. 10-222A with legs 10-222A/1, or equivalents.
16.On New Beetle models, install VW engine support tool No. 10-222A with legs 10-222A/1 and adapter 10-222 A/8, or equivalents. A 12.5 MM hole will have to be drilled in the 10-222 A/21 guide approximately 7.9 inches in from the hole opposite the slotted end before the adapter can be used.
17.On Golf and Jetta models, proceed as follows:
a.Position the coolant expansion tank aside with the hoses attached.
b.Position the power steering fluid reservoir aside with the hoses attached.
c.Remove the six side engine support mounting bolts, then the mount.
18.On New Beetle models, remove the four engine mount bolts (1), Fig. 4, then loosen, but do not remove, bolt "A."
19.On all models, remove the crankshaft pulley retaining bolts, then the pulley.
20.Remove the timing belt center and lower covers.
21.Remove three engine mount bracket bolts, then the bracket. It may be required to raise the engine slightly to loosen the retaining bolts.
22.Rotate the timing belt tensioner counterclockwise to release the timing belt tension using VW wrench tool No. T 10020, or equivalent, then remove the belt.
23.Inspect the water pump and all nearby seals for leakage or damage. Replace as required.
24.Ensure all the timing marks are still properly aligned, Figs. 1 through 3. If alignment of the camshaft sprocket timing marks is required, turn crankshaft back slightly. If piston is at TDC, the valve could strike the piston. After aligning the camshaft sprocket timing marks, align the crankshaft timing marks.
25.Wait until the engine has cooled down before installing the timing belt.
26.Install the timing belt onto the crankshaft sprocket and the water pump pulley.
27.Insert the engine mount bracket retaining bolts into the bracket, then install the bracket onto the engine block. Torque the bolts to 33 ft. lbs.
28.Install the timing belt lower and center covers.
29.Install the crankshaft pulley. On New Beetle models, torque the bolts to 18 ft. lbs. On Golf and Jetta models, torque the bolts to 30 ft. lbs.
30.Ensure the crankshaft pulley timing marks are properly aligned, Fig. 5.
31.Install the engine mount with new bolts.
32.On Golf and Jetta models, ensure the mount is properly aligned, Fig. 6.
a.The bolt heads (1) must align with the edge of the mount "C."
b.Dimension "A" must be 0.55 inch.
c.Dimension "B" must be at least 0.40 inch.
d.Torque M6 bolts to 84 inch lbs.
e.Torque M8 bolts to 18 ft. lbs.
f.Torque M10 bolts to 30 ft. lbs.
g.Torque M12 bolts to 44 ft. lbs.
33.On New Beetle models, proceed as follows:
a.Torque the mount to body bolts to 30 ft. lbs., then rotate an additional 90°.
b.Torque the mount bracket to body bolt "A,"Fig. 4, to 18 ft. lbs.
c.Torque the mount to engine bracket bolt to 44 ft. lbs., then rotate an additional 90°.
34.On all models, remove the engine support tools.
35.Ensure all the timing marks are properly aligned, Figs. 1 through 3.
36.Loop the timing belt around the camshaft sprocket and tensioner roller.
37.Rotate the timing belt tensioner counterclockwise until the notch (1) and indicator (2) are aligned using VW wrench tool No. T 10020, or equivalent, Fig. 7. Use a suitable mirror for this inspection. The angled retainer must also be securely located in the cylinder head cutout.
38.Torque the tensioner mounting nut to 15 ft. lbs.
39.Rotate the crankshaft two turns in the normal direction of rotation. The timing belt tensioner notch (1) and indicator (2) must move back into proper alignment, Fig. 7. It is important that the last 1/8 turn of rotation is made without interruption.
40.Install the timing belt upper cover.
41.Install the serpentine belt tensioner, then torque the bolts to 18 ft. lbs.
42.Lock the tensioner with VW locking tool No. 3090, or a 5/16 diameter pin approximately 2 1/8 inch long. An assistant may be required for this step.
43.Install the accessory drive belt. Refer to "Accessory Drive Belt Tension" for proper belt tension.
44.Install the righthand insulation tray.
45.Install the engine appearance cover.
46.Connect the battery ground cable, then arm the air bag system.
47.Start the engine and ensure it operates properly.
48.Reset the radio station presets and the clock.
Adjuntos
-
 volkswagen_jetta_golf_beetle_timingbelt1.jpg64,6 KB · Visitas: 612
 -
 volkswagen_jetta_golf_beetle_timingbelt2.jpg54,4 KB · Visitas: 723
 -
 volkswagen_jetta_golf_beetle_timingbelt3.jpg90,5 KB · Visitas: 4.007
 -
 volkswagen_jetta_golf_beetle_timingbelt4.jpg86 KB · Visitas: 738
 -
 volkswagen_jetta_golf_beetle_timingbelt5.jpg91 KB · Visitas: 1.192
 -
 volkswagen_jetta_golf_beetle_timingbelt6.jpg63,7 KB · Visitas: 701
 -
 volkswagen_jetta_golf_beetle_timingbelt7.jpg97,8 KB · Visitas: 1.094
Tobe82
Experto
Torque de culata Volkswagen, especificaciones de Torque y secuencia de apriete
https://automecanico.com/auto2009/volkswagen4Bcil.html
https://automecanico.com/auto2009/volkswagen4Bcil.html
Tobe82
Experto
VOLKSWAGEN, esquemas de MOTOR DE 4, 5, 6 y 8 CILINDROS...
VOLKSWAGEN | Orden de encendido | Firing order | Vehiculos - motores 4 y 6 cil. - mecanica automotriz
descripcion, esquemas del orden de encendido, motores de combustion interna, encendido por chispa, mecanica automotriz
www.autoelectronico.com
Última edición por un moderador:
Tobe82
Experto
Diagrama Sincronizacion correa para Volkswagen 1998 a 2006 sirve a los modelos:
Golf 2.0L, GTI 2.0L, Jetta 2.0L, New beetle 2.0L
Motor: AEG, APK, AQY, AVH, AZG, BDC, BEJ, BER, BEV, BGD, BHP
 www.foromecanicos.com
Golf 2.0L, GTI 2.0L, Jetta 2.0L, New beetle 2.0L
Motor: AEG, APK, AQY, AVH, AZG, BDC, BEJ, BER, BEV, BGD, BHP
banda de tiempo de jetta 2.0L 2001
hola necesito el diagrama de como instalar la banda de tiempo de jetta 2.0L 2001. debido que me faltas las marcas de tapas de la misma. espero su ayuda