me pueden ayudar por favor,necesito diagrama de las cadenas de tiempo de nissan frontier 2002,motor 2.4,lleva dos arboles de leva,automatico,4 cilindros,gracias mi correo es boni-751@hotmail.com gracias.
-
Bienvenidos al Foro de automecanico.com. Crea tu mensaje y especifica modelo de auto o vehiculo, tipo de motor, transmision y sintomas de su problema o falla. Aprendemos de las experiencias de mecanica automotriz de todos.
Estás utilizando un navegador obsoleto. Este u otros sitios web pueden no ser mostrados correctamente.
Debes actualizarlo o utilizar un navegador alternativo.
Debes actualizarlo o utilizar un navegador alternativo.
diagrama de cadena de tiempo de nissan frontier 2002,motor 2.4,lleva dos arboles de leva
- Iniciador del tema saul100
- Fecha de inicio
-
- Etiquetas
- nissan frontier
Re: diagrama de cadena de tiempo de nissan frontier 2002,motor 2.4,lleva dos arboles de leva
Si el motor es; KA24DE - 24 VALVULAS
Aqui te paso un enlace, espero sea el que ocupas.
http://www.foromecanicos.com/foro/showthread.php?t=5549
Tambien otro enlace, te puede ser util.
http://www.automecanico.com/auto2013/altima1.html
Saludos
Si el motor es; KA24DE - 24 VALVULAS
Aqui te paso un enlace, espero sea el que ocupas.
http://www.foromecanicos.com/foro/showthread.php?t=5549
Tambien otro enlace, te puede ser util.
http://www.automecanico.com/auto2013/altima1.html
Saludos
Tobe82
Experto
Dejo manual para cadena de tiempo Nissan Frontier 2.4L motor KA24DE años 1999/ 2004
TIMING CHAIN, REPLACE
Caution: With timing chain removed, avoid turning camshaft or crankshaft. If movement is required, exercise extreme caution to avoid valve damage caused by piston contact.
1.Relieve fuel system pressure as follows:
a.Remove fuel pump fuse from fuse panel.
b.Start and run engine until it stalls.
c.After engine stalls, crank starter two or three times to ensure fuel pressure is relieved.
d.Turn ignition Off and install fuel pump fuse.
2.Disconnect and isolate battery ground cable.
3.Drain coolant into a suitable container.
4.Drain engine oil into a suitable container.
5.Remove intake air duct.
6.Remove alternator and A/C compressor drive belts.
7.Remove radiator shroud.
8.Remove cooling fan.
9.Remove A/C compressor mounting bolts and position compressor aside.
10.Remove idler pulley and bracket.
11.Set No. 1 piston to TDC on its compression stroke, Fig. 1.
12.Remove distributor.
13.Remove rocker cover as follows:
a.Remove air cleaner assembly.
b.Remove spark plug wires.
c.Remove vacuum hoses, electrical harness connectors, and harness clamps.
d.Remove rocker cover, loosen and remove rocker cover bolts in sequence, Fig. 2.
14.Remove camshaft sprocket cover, Fig. 3.
15.Place paint marks on timing chain, matching them with timing marks on cam sprockets and idler sprocket, Fig. 4.
16.Remove cam sprocket bolts, cam sprockets and upper timing chain.
17.Remove rear plate and install tool to prevent crankshaft rotation.
18.Remove crankshaft bolt.
19.Remove crankshaft pulley using a suitable puller.
20.Remove engine under cover.
21.Remove front suspension member.
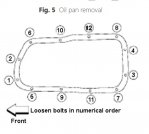
22.Remove oil pan bolts in numerical order, Fig. 5.
23.Remove oil pump, distributor drive shaft and oil pickup strainer.
24.Remove front cover.
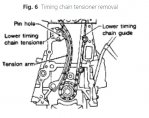
25.Release timing chain tensioner by pushing piston in and inserting a suitable pin into pin hole, Fig. 6.
26.Remove timing chain tension arm and guide.
27.Place paint marks on timing chain, matching them with timing marks on crankshaft sprocket and idler sprocket, Fig. 7.
28.Remove lower timing chain, crankshaft sprocket and idler sprocket.
29.Reverse procedure to install noting following:
a.When installing lower, ensure timing marks are aligned, Fig. 7.
b.When installing upper timing chain, ensure timing marks are aligned, Fig. 4.
c.Torque camshaft sprocket mounting bolt to 123-130 ft. lbs.
d.Torque lower timing chain tensioner attaching bolts to 56-66 inch lbs.
e.Torque upper timing chain tensioner attaching bolts to 56-66 inch lbs.
f.Torque crankshaft pulley mounting bolt to 105-112 ft. lbs.
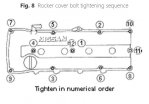
g.Torque rocker cover attaching bolts to 69-95 inch lbs. in sequence, Fig. 8.
h.Install accessory drive belt.
i.Inspect cooling system and fill to proper level with recommended coolant, as required.
j.Fill engine crankcase to proper level with recommended engine oil.
k.Connect battery ground cable.
l.Start engine and confirm proper operation, and ensure there are no leaks.
m.Clear DTC(s) using a suitably programmed scan tool.
TIMING CHAIN, REPLACE
Caution: With timing chain removed, avoid turning camshaft or crankshaft. If movement is required, exercise extreme caution to avoid valve damage caused by piston contact.
1.Relieve fuel system pressure as follows:
a.Remove fuel pump fuse from fuse panel.
b.Start and run engine until it stalls.
c.After engine stalls, crank starter two or three times to ensure fuel pressure is relieved.
d.Turn ignition Off and install fuel pump fuse.
2.Disconnect and isolate battery ground cable.
3.Drain coolant into a suitable container.
4.Drain engine oil into a suitable container.
5.Remove intake air duct.
6.Remove alternator and A/C compressor drive belts.
7.Remove radiator shroud.
8.Remove cooling fan.
9.Remove A/C compressor mounting bolts and position compressor aside.
10.Remove idler pulley and bracket.
11.Set No. 1 piston to TDC on its compression stroke, Fig. 1.
12.Remove distributor.
13.Remove rocker cover as follows:
a.Remove air cleaner assembly.
b.Remove spark plug wires.
c.Remove vacuum hoses, electrical harness connectors, and harness clamps.
d.Remove rocker cover, loosen and remove rocker cover bolts in sequence, Fig. 2.
14.Remove camshaft sprocket cover, Fig. 3.
15.Place paint marks on timing chain, matching them with timing marks on cam sprockets and idler sprocket, Fig. 4.
16.Remove cam sprocket bolts, cam sprockets and upper timing chain.
17.Remove rear plate and install tool to prevent crankshaft rotation.
18.Remove crankshaft bolt.
19.Remove crankshaft pulley using a suitable puller.
20.Remove engine under cover.
21.Remove front suspension member.
22.Remove oil pan bolts in numerical order, Fig. 5.
23.Remove oil pump, distributor drive shaft and oil pickup strainer.
24.Remove front cover.
25.Release timing chain tensioner by pushing piston in and inserting a suitable pin into pin hole, Fig. 6.
26.Remove timing chain tension arm and guide.
27.Place paint marks on timing chain, matching them with timing marks on crankshaft sprocket and idler sprocket, Fig. 7.
28.Remove lower timing chain, crankshaft sprocket and idler sprocket.
29.Reverse procedure to install noting following:
a.When installing lower, ensure timing marks are aligned, Fig. 7.
b.When installing upper timing chain, ensure timing marks are aligned, Fig. 4.
c.Torque camshaft sprocket mounting bolt to 123-130 ft. lbs.
d.Torque lower timing chain tensioner attaching bolts to 56-66 inch lbs.
e.Torque upper timing chain tensioner attaching bolts to 56-66 inch lbs.
f.Torque crankshaft pulley mounting bolt to 105-112 ft. lbs.
g.Torque rocker cover attaching bolts to 69-95 inch lbs. in sequence, Fig. 8.
h.Install accessory drive belt.
i.Inspect cooling system and fill to proper level with recommended coolant, as required.
j.Fill engine crankcase to proper level with recommended engine oil.
k.Connect battery ground cable.
l.Start engine and confirm proper operation, and ensure there are no leaks.
m.Clear DTC(s) using a suitably programmed scan tool.
Adjuntos
-
 nissanfrontier-timingchain1.jpg108,8 KB · Visitas: 2.065
 -
 nissanfrontier-timingchain2.jpg42,7 KB · Visitas: 856
 -
 nissanfrontier-timingchain3.jpg50,3 KB · Visitas: 764
 -
 nissanfrontier-timingchain4.jpg65,3 KB · Visitas: 5.113
 -
 nissanfrontier-timingchain5.jpg33 KB · Visitas: 886
 -
 nissanfrontier-timingchain6.jpg58,7 KB · Visitas: 2.251
 -
 nissanfrontier-timingchain7.jpg58,3 KB · Visitas: 2.558
 -
 nissanfrontier-timingchain8.jpg41,2 KB · Visitas: 831