Comparto instrucciones de cambio de banda de tiempo para Honda Civic 1996 a 2000 1.6L
This engine is classified as an Interference engine. If the timing belt breaks or jumps timing, a piston may contact an open valve. Piston to valve contact may cause damage to the valve, piston and other engine components. In some cases valve to valve contact may be experienced when the timing belt breaks or jumps timing. To avoid belt breakage, replace the timing belt as recommended by the vehicle manufacturer timing belt replacement interval.
With the timing belt removed, avoid turning the camshaft or crankshaft. If movement is required, exercise extreme caution to avoid valve damage caused by piston contact.
1.Disconnect and isolate the battery ground cable.
2.Remove the engine compartment lower splash shield.
3.Loosen the power steering pump lock and mounting bolts, then remove the power steering belt.
4.Remove the power steering pump mounting and lock bolts, then position the pump aside with the hoses attached.
5.Loosen the A/C compressor drive belt idler pulley center nut and adjusting bolt, then remove the drive belt.
6.Loosen the alternator adjuster lock bolt, then remove the alternator drive belt.
7.Remove the engine oil dipstick.
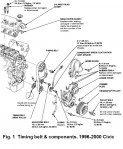
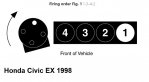
8.Remove the timing belt upper cover, Fig. 1.
9.Remove the drive belt idler pulley and bracket.
10.Support the engine by positioning a suitable jack and wooden block under the engine oil pan.
11.Remove the three upper engine mounting bracket retaining nuts, then remove the bracket.
12.Remove the crankshaft pulley retaining bolt, then the crankshaft pulley.
13.Remove the lower timing belt cover and the engine oil dipstick tube. Discard the O-ring.
14.Remove the crankshaft position sensor retaining bolts, then disconnect the electrical connector and remove the sensor.
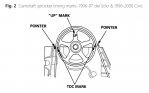
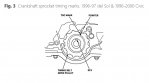
15.Align the crankshaft and camshaft sprocket timing marks, Figs. 2 and 3.
16.Loosen the timing belt tensioner pulley retaining bolt 180°.
17.Move the timing belt tensioner away from the timing belt and tighten the retaining bolt to hold the pulley in position.
18.Remove the timing belt.
19.Ensure the crankshaft and camshaft sprocket timing marks are aligned, Figs. 2 and 3.
20.Install the new timing belt tightly over the crankshaft sprocket, tensioner pulley, water pump pulley and the camshaft sprocket.
21.Loosen the timing belt tensioner pulley retaining bolt and allow the timing belt to tension.
22.After the timing belt has tensioned, tighten the tensioner pulley retaining bolt.
23.Install the crankshaft position sensor.
24.Install the timing belt lower and upper covers.
25.Install the crankshaft pulley and torque the attaching bolt to 14 ft. lbs., then tighten bolt an additional 90°. Do not use an impact wrench.
26.Turn the crankshaft pulley approximately 5-6 revolutions counterclockwise to position the timing belt on the sprockets and pulleys.
27.Remove the upper timing belt cover.
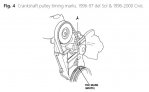
28.Position the No. 1 cylinder at TDC compression stroke, Figs. 2 and 4.
29.Loosen the timing belt tensioner pulley retaining bolt.
30.Rotate the crankshaft counterclockwise until the camshaft sprocket timing mark is located approximately three teeth of the from the front cover timing mark.
31.Torque the timing belt tensioner pulley retaining bolt to 33 ft. lbs., using care not disturb the timing belt adjustment.
32.Align the crankshaft pulley and camshaft sprocket timing marks. If the marks are not aligned, the timing belt must be removed and installed once again.
33.Install the engine oil dipstick tube with a new O-ring.
34.Install the upper engine mounting bracket. Torque the attaching nuts to 54 ft. lbs.
35.Remove the jack and wooden block from under the engine oil pan.
36.Install the drive belt idler pulley and bracket.
37.Install the upper timing belt cover, then the engine oil dipstick with a new O-ring.
38.Install the A/C compressor and alternator drive belts. Refer to "Accessory Drive Belt Tension" for proper belt tension.
39.Install the power steering pump.
40.Install the power steering pump drive belt. Refer to "Accessory Drive Belt Tension" for proper belt tension.
41.Install the engine compartment lower splash shield.
42.Connect the battery ground cable.