
-
Hola Invitado, Foromecanicos es el Foro de Automecanico y Autoelectronico - informacion sobre mecanica automotriz, computers, encendido y auto electronics, diagramas.
Estás utilizando un navegador obsoleto. Este u otros sitios web pueden no ser mostrados correctamente.
Debes actualizarlo o utilizar un navegador alternativo.
Debes actualizarlo o utilizar un navegador alternativo.
Ayuda con Sincronisación de los arboles de levas(2) del Aveo 2009 1.6 L

Tobe82
Experto
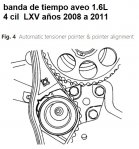
Mas info de apoyo para banda de tiempo aveo 1.6L 4 cil LXV años 2008 a 2011
TIMING BELT, REPLACE
This engine is classified as an Interference engine. If the timing belt breaks or jumps timing, a piston may contact an open valve. Piston to valve contact may cause damage to the valve, piston and other engine components. In some cases valve to valve contact may be experienced when the timing belt breaks or jumps timing. To avoid belt breakage, replace the timing belt as recommended by the vehicle manufacturer timing belt replacement interval.
With the timing belt removed, avoid turning the camshaft or crankshaft. If movement is required, exercise extreme caution to avoid valve damage caused by piston contact.
1.Disconnect and isolate the battery ground cable.
2.Disconnect the IAT (Intake Air Temperature) sensor electrical connector.
3.Disconnect the air intake tube from the throttle body.
4.Disconnect the breather tube from the valve cover.
5.Remove the air cleaner housing bolts, then the housing.
6.Loosen the righthand front wheel lug nuts.
7.Raise and safely support the vehicle with jackstands.
8.Remove the righthand front tire and wheel.
9.Remove the righthand front wheelwell splash shield.
10.Remove the accessory drive belts.
11.Remove the crankshaft pulley bolt, then the pulley.
12.Remove the timing belt upper front and lower front cover fasteners, then the covers.
13.Remove the power steering pump mounting bolts, but leave the hoses intact.
14.Install the crankshaft pulley bolt.
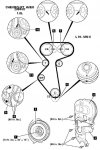
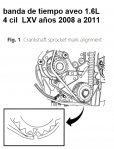
15.Rotate the crankshaft clockwise until the sprocket timing mark aligns with the timing belt lower rear cover notch, Fig. 1.
16.Loosen the coolant pump mounting bolts just slightly.
17.Rotate the coolant pump counterclockwise to release timing belt tension using GM timing belt adjuster tool No. J-42492-A, or equivalent.
18.Remove the timing belt behind the power steering pump.
19.Ensure the crankshaft sprocket timing marks are still properly aligned, Fig. 1.
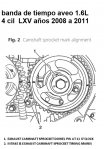
20.Align the camshaft sprocket timing marks, Fig. 2.
21.Note any running direction marks, then install the new timing belt behind the power steering pump.
22.Rotate the coolant pump clockwise until the automatic tensioner adjust arm pointer aligns with the notch in the tensioner bracket using GM timing belt adjuster GM tool No. J-42492-A, or equivalent, Fig. 3.
23.Tighten the coolant pump mounting bolts.
24.Rotate the crankshaft clockwise two full turns.
25.Loosen the coolant pump mounting bolts.
26.Rotate the coolant pump until the adjust arm pointer aligns with the pointer on the tensioner bracket, Fig. 4.
27.Torque the coolant pump mounting bolts to 89 inch lbs.
28.Remove the crankshaft pulley bolt.
29.Install the power steering pump mounting bolts. Torque to 18 ft. lbs.
30.Install the timing belt lower front and upper front covers. Torque the bolts to 89 inch lbs.
31.Install the crankshaft pulley. Torque the bolt to 70 ft. lbs., then, using GM angular torque gauge tool No. J-45059, or equivalent, rotate the bolt another 30°, then an additional 15°.
32.Install the accessory drive belts.
33.Install the splash shield.
34.Install the tire and wheel, then lower the vehicle.
35.On 2008-09 models,torque the lug nuts to 88 ft. lbs.
36.On 2010 models,torque the lug nuts to 92 ft. lbs.
37.On 2011 models,torque the lug nuts to 103 ft. lbs.
38.On all models, install the air filter housing. Torque the bolts to 71 inch lbs.
39.Connect the air intake tube to the throttle body.
40.Connect the breather tube to the valve cover.
41.Connect the IAT sensor electrical connector.
42.Connect the battery ground cable.
43.Start the engine and ensure it operates properly.
TIMING BELT, REPLACE
This engine is classified as an Interference engine. If the timing belt breaks or jumps timing, a piston may contact an open valve. Piston to valve contact may cause damage to the valve, piston and other engine components. In some cases valve to valve contact may be experienced when the timing belt breaks or jumps timing. To avoid belt breakage, replace the timing belt as recommended by the vehicle manufacturer timing belt replacement interval.
With the timing belt removed, avoid turning the camshaft or crankshaft. If movement is required, exercise extreme caution to avoid valve damage caused by piston contact.
1.Disconnect and isolate the battery ground cable.
2.Disconnect the IAT (Intake Air Temperature) sensor electrical connector.
3.Disconnect the air intake tube from the throttle body.
4.Disconnect the breather tube from the valve cover.
5.Remove the air cleaner housing bolts, then the housing.
6.Loosen the righthand front wheel lug nuts.
7.Raise and safely support the vehicle with jackstands.
8.Remove the righthand front tire and wheel.
9.Remove the righthand front wheelwell splash shield.
10.Remove the accessory drive belts.
11.Remove the crankshaft pulley bolt, then the pulley.
12.Remove the timing belt upper front and lower front cover fasteners, then the covers.
13.Remove the power steering pump mounting bolts, but leave the hoses intact.
14.Install the crankshaft pulley bolt.
15.Rotate the crankshaft clockwise until the sprocket timing mark aligns with the timing belt lower rear cover notch, Fig. 1.
16.Loosen the coolant pump mounting bolts just slightly.
17.Rotate the coolant pump counterclockwise to release timing belt tension using GM timing belt adjuster tool No. J-42492-A, or equivalent.
18.Remove the timing belt behind the power steering pump.
19.Ensure the crankshaft sprocket timing marks are still properly aligned, Fig. 1.
20.Align the camshaft sprocket timing marks, Fig. 2.
21.Note any running direction marks, then install the new timing belt behind the power steering pump.
22.Rotate the coolant pump clockwise until the automatic tensioner adjust arm pointer aligns with the notch in the tensioner bracket using GM timing belt adjuster GM tool No. J-42492-A, or equivalent, Fig. 3.
23.Tighten the coolant pump mounting bolts.
24.Rotate the crankshaft clockwise two full turns.
25.Loosen the coolant pump mounting bolts.
26.Rotate the coolant pump until the adjust arm pointer aligns with the pointer on the tensioner bracket, Fig. 4.
27.Torque the coolant pump mounting bolts to 89 inch lbs.
28.Remove the crankshaft pulley bolt.
29.Install the power steering pump mounting bolts. Torque to 18 ft. lbs.
30.Install the timing belt lower front and upper front covers. Torque the bolts to 89 inch lbs.
31.Install the crankshaft pulley. Torque the bolt to 70 ft. lbs., then, using GM angular torque gauge tool No. J-45059, or equivalent, rotate the bolt another 30°, then an additional 15°.
32.Install the accessory drive belts.
33.Install the splash shield.
34.Install the tire and wheel, then lower the vehicle.
35.On 2008-09 models,torque the lug nuts to 88 ft. lbs.
36.On 2010 models,torque the lug nuts to 92 ft. lbs.
37.On 2011 models,torque the lug nuts to 103 ft. lbs.
38.On all models, install the air filter housing. Torque the bolts to 71 inch lbs.
39.Connect the air intake tube to the throttle body.
40.Connect the breather tube to the valve cover.
41.Connect the IAT sensor electrical connector.
42.Connect the battery ground cable.
43.Start the engine and ensure it operates properly.
Adjuntos


Siguenos en:
El contenido de especificaciones técnicas,comentarios, opiniones y otros datos en este foro sólo son con fines informativos y son de exclusiva responsabilidad de cada usuario. Foromecanicos.com no puede y no verifica ni garantiza la exactitud o exhaustividad de la información. Usted utiliza este sitio web bajo su propio riesgo y solo con fines informativos. Las marcas y los logotipos de los fabricantes de automóviles en esta página web son propiedad de los titulares de las mismas.
Usamos cookies.Si continúas utilizando este sitio, estás consintiendo utilizar cookies.