Dejo informacion de apoyo, cambio de banda de tiempo
Toyota 4runner limited 3.4L v6 5VZ-FE 1996
4RUNNER & TUNDRA
This engine is classified as a free-wheeling engine. Because of this free-wheeling design, if the timing belt breaks or jumps timing, there is less chance of a piston contacting an open valve. To avoid belt breakage, replace the timing belt as recommended by the vehicle manufacturer timing belt replacement interval.
1.Wait until the engine has cooled down before installing the new timing belt.
2.Record the radio presets.
3.To disarm the air bag system, proceed as follows:
a.Turn the ignition to Lock.
b.Disconnect the battery ground cable, then the positive cable.
c.Wait at least 90 seconds before servicing the vehicle.
d.All the wiring harness wraps and the connectors for the air bag system are color coded yellow.
4.Remove the engine undercover.
5.Drain the cooling system into an approved container, then disconnect the upper radiator hose.
6.Disconnect the power steering hoses from the air intake chamber and resonator.
7.Remove the power steering pressure tube clamp to frame bolt.
8.Remove the drive belts for the power steering pump alternator, and A/C compressor.
9.Remove power steering pump without disconnecting lines, and secure away from engine.
10.Disconnect the A/C compressor electrical connector.
11.Position the compressor aside with the hoses intact.
12.Loosen the fan, fluid coupling and pulley bolts.
13.Remove upper fan shroud.
14.Remove the fan, fluid coupling and pulley.
15.Remove the A/C compressor bracket.
16.Remove oil dipstick and guide.
17.Disconnect the spark plug lead clamps from the timing belt upper cover.
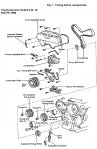
18.Remove the timing belt upper cover retaining bolts, then the cover, Fig. 1.
19.Remove the fan bracket assembly.
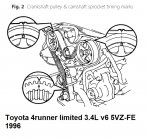
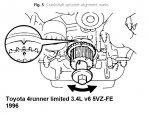
20.Align the crankshaft pulley and camshaft sprocket timing marks, Fig. 2.
21.Remove the crankshaft pulley bolt using a suitable tool to hold the pulley in position.
22.Remove the crankshaft pulley using a suitable puller.
23.Remove the starter wire bracket and lower timing cover.
24.Remove the timing belt guide.
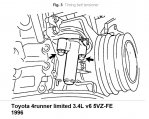
25.Alternately and evenly loosen the two timing belt tensioner attaching bolts, Fig. 3.
26.Remove the timing belt.
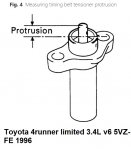
27.Measure the timing belt tensioner pushrod protrusion, Fig. 4, which should be .394-.425 inch. If not, replace the tensioner.
28.Ensure the crankshaft sprocket timing mark is aligned, Fig. 5.
29.Wait until the engine has cooled down before installing the new timing belt.
30.Install the new timing belt over the crankshaft sprocket, tensioner pulley and the water pump sprocket.
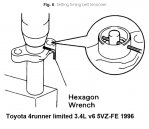
31.Slowly press in the tensioner pushrod using a press. Align the holes of the pushrod and housing and using a 1.27 MM hex wrench, then set the rod in the retracted position, Fig. 6.
32.Install the dust boot to the tensioner.
33.Install the tensioner and alternately torque the bolts to 20 ft. lbs. Remove the hex wrench from the tensioner.
34.Turn the crankshaft clockwise 2 revolutions, aligning the timing marks of the timing pulley and the oil pump body. Ensure the camshaft timing marks are aligned, Fig. 2. If not, remove the timing belt and installed once again.
35.Install the timing belt guide on the crankshaft with the cupped side facing outward.
36.Install the starter wiring bracket and the timing belt lower cover with a new gasket. Torque the attaching bolts to 80 inch lbs.
37.Install the crankshaft pulley. Torque the pulley bolt to 217 ft. lbs. using a suitable tool to hold the pulley in place.
38.Install the fan bracket assembly.
39.Install the timing belt upper cover with a new gasket. Torque the attaching bolts to 80 inch lbs.
40.Connect the wiring to the timing belt upper cover.
41.Connect the CMP sensor electrical connector.
42.Install the oil dipstick and guide with a new O-ring. Install bolt to alternator bracket and torque to 71 inch lbs.
43.Install the A/C compressor bracket. Torque the bolts to 35 ft. lbs.
44.Temporarily install the fan, fluid coupling and pulley. Do not tighten the fasteners just yet.
45.Install the lower fan shroud.
46.Install the alternator drive belt. Refer to "Accessory Drive Belt Tension" for proper belt tension.
47.Torque the fan, fluid coupling and pulley nuts to 48 inch lbs.
48.Install the A/C compressor. Torque the bolts to 18 ft. lbs.
49.Install the A/C compressor drive belt. Refer to "Accessory Drive Belt Tension" for proper belt tension.
50.Install the power steering pump and its drive belt. Refer to "Accessory Drive Belt Tension" for proper belt tension.
51.Install the power steering pressure tube clamp and bolt.
52.Connect the two power steering air hoses to the air intake chamber and resonator.
53.Connect the upper hose.
54.Close the radiator petcock, then fill the cooling system.
55.Connect the battery positive cable, then the ground cable.
56.Start the engine and ensure it operates properly without any leaks.
57.Install the engine undercover.
58.Reset the radio presets and the clock.