Tobe82
Experto
Cambiando bomba de Agua en un Cadillac DeVille 1999 V8-4.6L VIN Y
Vehicle Engine, Cooling and Exhaust Engine Water Pump Service and Repair Removal and Replacement Water Pump Replacement
WATER PUMP REPLACEMENT
REMOVER
- Tools Required
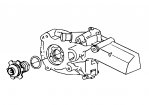
- J 38816-1A Water Pump Remover/installer
Imagen 1
1. Drain the cooling system.
2. Remove the air cleaner assembly. Refer to Air Cleaner Assembly Replacement in Powertrain Management.
3. Remove the water pump belt cover.
4. Remove the water pump drive belt.
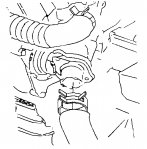
5. Remove the bypass hose.
Imagen2
6. Remove the lower radiator hose from the thermostat housing.
Imagen3
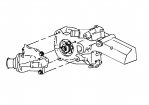
7. Remove the bolts from the water pump cover.
8. Remove the water pump cover.
Imagen 4
9. Remove the water pump, the pump seal, and the gasket from the housing using the J 38816-1A. Turn the tool clockwise in order to remove the water pump.
10. Remove the water pump from the vehicle.
11. Clean the water pump and the pump cover sealing surfaces.
INSTALACION
- Tools Required
- J 38816-1A Water Pump Remover/Installer
Notice: Use the correct fastener in the correct location. Replacement fasteners must be the correct part number for that application. Fasteners requiring replacement or fasteners requiring the use of thread locking compound or sealant are identified in the service procedure. Do not use paints, lubricants, or corrosion inhibitors on fasteners or fastener joint surfaces unless specified. These coatings affect fastener torque and joint clamping force and may damage the fastener. Use the correct tightening sequence and specifications when installing fasteners in order to avoid damage to parts and systems.
Imagen5
1. Install the water pump using J 38816-1A. Turn the tool counterclockwise in order to install the pump.
- Tighten the water pump to 100 Nm (73 lb ft).
Imagen6
2. Install the water pump housing cover and the bolts.
- Tighten the water pump housing cover bolts to 10 Nm (89 lb in).
Imagen7
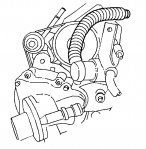
3. Install the lower radiator hose to the thermostat housing.
Imagen8
4. Install the thermostat bypass hose.
5. Install the water pump drive belt.
6. Install the water pump belt cover.
7. Install the air cleaner assembly.
8. Refill the cooling system.
Vehicle Engine, Cooling and Exhaust Engine Water Pump Service and Repair Removal and Replacement Water Pump Replacement
WATER PUMP REPLACEMENT
REMOVER
- Tools Required
- J 38816-1A Water Pump Remover/installer
Imagen 1
1. Drain the cooling system.
2. Remove the air cleaner assembly. Refer to Air Cleaner Assembly Replacement in Powertrain Management.
3. Remove the water pump belt cover.
4. Remove the water pump drive belt.
5. Remove the bypass hose.
Imagen2
6. Remove the lower radiator hose from the thermostat housing.
Imagen3
7. Remove the bolts from the water pump cover.
8. Remove the water pump cover.
Imagen 4
9. Remove the water pump, the pump seal, and the gasket from the housing using the J 38816-1A. Turn the tool clockwise in order to remove the water pump.
10. Remove the water pump from the vehicle.
11. Clean the water pump and the pump cover sealing surfaces.
INSTALACION
- Tools Required
- J 38816-1A Water Pump Remover/Installer
Notice: Use the correct fastener in the correct location. Replacement fasteners must be the correct part number for that application. Fasteners requiring replacement or fasteners requiring the use of thread locking compound or sealant are identified in the service procedure. Do not use paints, lubricants, or corrosion inhibitors on fasteners or fastener joint surfaces unless specified. These coatings affect fastener torque and joint clamping force and may damage the fastener. Use the correct tightening sequence and specifications when installing fasteners in order to avoid damage to parts and systems.
Imagen5
1. Install the water pump using J 38816-1A. Turn the tool counterclockwise in order to install the pump.
- Tighten the water pump to 100 Nm (73 lb ft).
Imagen6
2. Install the water pump housing cover and the bolts.
- Tighten the water pump housing cover bolts to 10 Nm (89 lb in).
Imagen7
3. Install the lower radiator hose to the thermostat housing.
Imagen8
4. Install the thermostat bypass hose.
5. Install the water pump drive belt.
6. Install the water pump belt cover.
7. Install the air cleaner assembly.
8. Refill the cooling system.
Adjuntos
-
 cadillac99-bombaagua1.jpg198,8 KB · Visitas: 335
 -
 cadillac99-bombaagua2.jpg165 KB · Visitas: 347
 -
 cadillac99-bombaagua3.jpg101,9 KB · Visitas: 367
 -
 cadillac99-bombaagua4.jpg110,4 KB · Visitas: 363
 -
 cadillac99-bombaagua5.jpg110,4 KB · Visitas: 355
 -
 cadillac99-bombaagua6.jpg101,9 KB · Visitas: 346
 -
 cadillac99-bombaagua7.jpg166,1 KB · Visitas: 372
 -
 cadillac99-bombaagua8.jpg198,8 KB · Visitas: 358