Aqui comparto para poner a tiempo Dodge Caravan 3.0L 1996, sirve tambien para
ACCLAIM, CARAVAN, DAYTONA, DYNASTY, LEBARON, MINI RAM VAN, NEW YORKER, SPIRIT, TOWN & COUNTRY & VOYAGER
On 3.0L SOHC engine with 12 valves,this engine is classified as a free-wheeling engine. Because of this free-wheeling design, if the timing belt breaks or jumps timing, there is less chance of a piston contacting an open valve. To avoid belt breakage, replace the timing belt as recommended by the vehicle manufacturer timing belt replacement interval. Valve to valve interference is possible if camshafts are rotated independently.
On 3.0L SOHC engine with 24 valves,this engine is classified as an Interference engine. If the timing belt breaks or jumps timing, a piston may contact an open valve. Piston to valve contact may cause damage to the valve, piston and other engine components. In some cases valve to valve contact may be experienced when the timing belt breaks or jumps timing. To avoid belt breakage, replace the timing belt as recommended by the vehicle manufacturer timing belt replacement interval.
1.Disconnect and isolate the battery ground cable.
2.Remove the accessory drive belts. On Caravan, Town and Country and Voyager models, it may be required to remove the accessory drive belt splash shield from underneath the vehicle.
3.On all models: Remove the A/C compressor to mounting bracket screws and position the compressor aside.
4.Remove the A/C mounting bracket and the adjustable drive belt tensioner retaining bolts.
5.Remove the power steering pump belt tensioner mounting bolt and the automatic belt tensioner.
6.Remove the power steering pump to engine mounting bracket screws and the rear support locknut. Position the power steering pump aside.
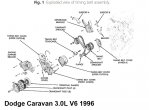
7.Remove the crankshaft drive pulleys and the torsional damper, Fig. 1.
8.Place a suitable jack and wooden block under the engine and raise slightly, then remove the engine mount bracket.
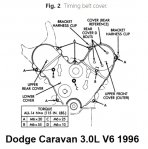
9.Remove the timing belt cover, Fig. 2.
10.Loosen the timing belt tensioner, then remove the crankshaft sprocket flange shield and the timing belt.
11.To install, ensure all timing marks are properly aligned, then place the new timing belt on the crankshaft sprocket first. Keep the belt tight on the tension side and install the belt on the lefthand camshaft sprocket.
12.Install the belt on the water pump pulley, then on the righthand camshaft sprocket and the belt tensioner.
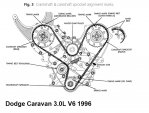
13.Apply rotating force to the front camshaft sprocket in opposite direction to tighten the tension side of the belt, then ensure all the timing marks are properly aligned, Fig. 3.
14.Install the crankshaft sprocket flange shield, then loosen the tensioner bolt and turn the crankshaft two full turns clockwise.
15.Inspect the timing marks once again, then torque the tensioner lock bolt to 21 ft. lbs.
16.Install the timing belt cover.
17.Install the engine mount bracket, then remove the jack from under the engine.
18.Install the crankshaft torsional damper and drive pulleys, then proceed as follows:
a.On models through 1990, torque the crankshaft pulley center bolt "A" to 150 ft. lbs.
b.On 1991-96 models, torque the crankshaft pulley center bolt "A" to 112 ft. lbs.
c.On 1997-2000 models, torque the crankshaft pulley center bolt "A" to 100 ft. lbs.
d.On all models, torque the crankshaft pulley outer bolts "B" to 21 ft. lbs.
19.Install the power steering pump.
20.Install the drive belt auto-tensioner and the power steering belt tensioner mounting bolt.
21.Install the drive belt tensioner retaining bolts and the A/C compressor mounting bracket.
22.Install the A/C compressor.
23.Install the accessory drive belts. Refer to "Accessory Drive Belt Tension" for proper belt tension.
24.Connect the battery ground cable.
25.Start the engine and ensure it operates properly.