Tobe82
Experto
Como cambiar un compresor en 2003 Lexus IS 300 L6-3.0L (2JZ-GE)?
Remover e Instalar (instrucciones en ingles)
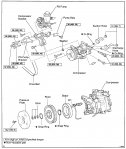
Vehicle Heating and Air Conditioning Compressor HVAC Service and Repair Procedures Removal and Installation
REMOVAL AND INSTALLATION
Compressor And Magnetic Clutch
diagrama 1
REMOVER
1. RUN ENGINE AT IDLE SPEED WITH A/C ON FOR APPROX. 10 MINUTES
2. STOP ENGINE
3. DISCONNECT NEGATIVE (-) TERMINAL CABLE FROM BATTERY
4. DISCHARGE REFRIGERANT FROM REFRIGERATION SYSTEM
5. REMOVE DRIVE BELT
diagrama 2
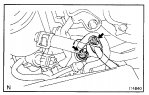
6. DISCONNECT DISCHARGE AND SUCTION HOSES
Remove the 2 nuts and disconnect the both hoses.
NOTE: Cap the open fitting immediately to keep moisture or dirt out of the system.
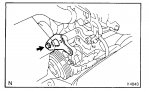
7. REMOVE PS PUMP WITH PRESSURE FEED AND RETURN TUBES STILL CONNECTED
diagrama 3
a. Disconnect the PS pump connector and PS pump tube clamp.
b. Disconnect the engine wire.
diagrama 4
c. Remove the 2 PS pump set bolts and slide the PS pump backward.
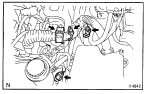
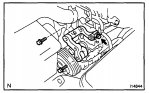
8. REMOVE COMPRESSOR
diagrama 5
a. Remove the bolt and PS pump bracket.
diagrama 6
b. Remove the 3 bolts and compressor bracket.
c. Disconnect the connector.
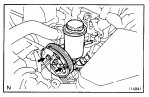
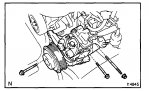
diagrama 7
d. Remove the nut and 2 bolts.
e. Using a torx socket (E10), remove the stud bolt and compressor.
INSTALACION
1. INSTALL COMPRESSOR
a. Install the compressor with the stud bolt.
Torque: 26 N.m (265 kgf.cm, 19 ft.lbf)
b. Install the 2 bolts and nut.
Torque:
Bolt: 52 N.m (530 kgf.cm, 38 ft.lbf)
Nut: 52 N.m (530 kgf.cm, 38 ft.lbf)
c. Connect the connector.
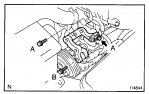
diagrama 8
d. Install the compressor bracket with the 3 bolts.
Torque:
bolt A: 39 N.m (400 kgf.cm, 29 ft.lbf)
bolt B: 52 N.m (530 kgf.cm, 38 ft.lbf)
e. Install the PS pump bracket with the bolt.
Torque: 52 N.m (530 kgf.cm, 38 ft.lbf)
2. INSTALL PS PUMP
a. Install 2 PS pump set bolt.
Torque: 58 N.m (590 kgf.cm, 43 ft.lbf)
b. Connect the engine wire.
c. Connect the PS pump connector and wire harness clamp.
3. CONNECT DISCHARGE AND SUCTION HOSES
Connect the both hoses with 2 nut.
Torque: 10 N.m (100 kgf.cm, 7 ft.lbf)
NOTE: Hose should be connected immediately after the caps have been removed.
HINT: Lubricate 2 new O-rings with compressor oil and install them to the hoses.
4. INSTALL DRIVE BELT
5. INSPECT DRIVE BELT TENSION
6. CONNECT NEGATIVE (-) TERMINAL CABLE TO BATTERY
7. EVACUATE AIR FROM REFRIGERATION SYSTEM AND CHARGE SYSTEM WITH REFRIGERANT
Specified amount: 600 50 g (21.16 1.76 oz.)
8. INSPECT FOR LEAKAGE OF REFRIGERANT
Using a gas leak detector, check for leakage of refrigerant.
If there is leakage, check the tightening torque at the joints.
9. INSPECT A/C OPERATION
Remover e Instalar (instrucciones en ingles)
Vehicle Heating and Air Conditioning Compressor HVAC Service and Repair Procedures Removal and Installation
REMOVAL AND INSTALLATION
Compressor And Magnetic Clutch
diagrama 1
REMOVER
1. RUN ENGINE AT IDLE SPEED WITH A/C ON FOR APPROX. 10 MINUTES
2. STOP ENGINE
3. DISCONNECT NEGATIVE (-) TERMINAL CABLE FROM BATTERY
4. DISCHARGE REFRIGERANT FROM REFRIGERATION SYSTEM
5. REMOVE DRIVE BELT
diagrama 2
6. DISCONNECT DISCHARGE AND SUCTION HOSES
Remove the 2 nuts and disconnect the both hoses.
NOTE: Cap the open fitting immediately to keep moisture or dirt out of the system.
7. REMOVE PS PUMP WITH PRESSURE FEED AND RETURN TUBES STILL CONNECTED
diagrama 3
a. Disconnect the PS pump connector and PS pump tube clamp.
b. Disconnect the engine wire.
diagrama 4
c. Remove the 2 PS pump set bolts and slide the PS pump backward.
8. REMOVE COMPRESSOR
diagrama 5
a. Remove the bolt and PS pump bracket.
diagrama 6
b. Remove the 3 bolts and compressor bracket.
c. Disconnect the connector.
diagrama 7
d. Remove the nut and 2 bolts.
e. Using a torx socket (E10), remove the stud bolt and compressor.
INSTALACION
1. INSTALL COMPRESSOR
a. Install the compressor with the stud bolt.
Torque: 26 N.m (265 kgf.cm, 19 ft.lbf)
b. Install the 2 bolts and nut.
Torque:
Bolt: 52 N.m (530 kgf.cm, 38 ft.lbf)
Nut: 52 N.m (530 kgf.cm, 38 ft.lbf)
c. Connect the connector.
diagrama 8
d. Install the compressor bracket with the 3 bolts.
Torque:
bolt A: 39 N.m (400 kgf.cm, 29 ft.lbf)
bolt B: 52 N.m (530 kgf.cm, 38 ft.lbf)
e. Install the PS pump bracket with the bolt.
Torque: 52 N.m (530 kgf.cm, 38 ft.lbf)
2. INSTALL PS PUMP
a. Install 2 PS pump set bolt.
Torque: 58 N.m (590 kgf.cm, 43 ft.lbf)
b. Connect the engine wire.
c. Connect the PS pump connector and wire harness clamp.
3. CONNECT DISCHARGE AND SUCTION HOSES
Connect the both hoses with 2 nut.
Torque: 10 N.m (100 kgf.cm, 7 ft.lbf)
NOTE: Hose should be connected immediately after the caps have been removed.
HINT: Lubricate 2 new O-rings with compressor oil and install them to the hoses.
4. INSTALL DRIVE BELT
5. INSPECT DRIVE BELT TENSION
6. CONNECT NEGATIVE (-) TERMINAL CABLE TO BATTERY
7. EVACUATE AIR FROM REFRIGERATION SYSTEM AND CHARGE SYSTEM WITH REFRIGERANT
Specified amount: 600 50 g (21.16 1.76 oz.)
8. INSPECT FOR LEAKAGE OF REFRIGERANT
Using a gas leak detector, check for leakage of refrigerant.
If there is leakage, check the tightening torque at the joints.
9. INSPECT A/C OPERATION
Adjuntos
-
 lexus-compresor1.jpg992,4 KB · Visitas: 269
 -
 lexus-compresor2.jpg163,7 KB · Visitas: 267
 -
 lexus-compresor3.jpg187,5 KB · Visitas: 269
 -
 lexus-compresor4.jpg169,3 KB · Visitas: 265
 -
 lexus-compresor5.jpg148,6 KB · Visitas: 269
 -
 lexus-compresor6.jpg150 KB · Visitas: 269
 -
 lexus-compresor7.jpg171,1 KB · Visitas: 274
 -
 lexus-compresor8.jpg141,2 KB · Visitas: 276