Hola, te comparto las indicaciones para sincronizar banda de tiempo Volvo S40 2.4L b5244 , espero te sirva
Volvo 2004.5-07 S40 y 2005-07 V50 timing belt
These engines are classified as an Interference engine. If the timing belt breaks or jumps timing, a piston may contact an open valve. Piston to valve contact may cause damage to the valve, piston and other engine components. In some cases valve to valve contact may be experienced when the timing belt breaks or jumps timing. To avoid belt breakage, replace the timing belt as recommended by the vehicle manufacturer timing belt replacement interval.
With the timing belt removed, avoid turning the camshaft or crankshaft. If movement is required, exercise extreme caution to avoid valve damage caused by piston contact.
1.Disconnect and isolate the battery ground cable.
2.Remove the coolant overflow tank and position aside.
3.Install a suitable engine support fixture.
4.Remove the righthand engine mount limiter pad retaining bolts from the righthand frame member and cylinder head.
5.Remove the timing belt front covers.
6.Raise and support the vehicle using suitable jackstands.
7.Remove the right front tire and wheel assembly.
8.Remove the right front fender inner liner.
9.Disconnect the power steering pump pressure and return hoses. Cap the hose and pump openings
10.Rotate the serpentine drive belt tensioner clockwise to relieve belt tension, the remove the drive belt.
11.Remove the center nut and the vibration damper using Volvo tool No. 999 5433, or equivalent, to hold the vibration dampener in position.
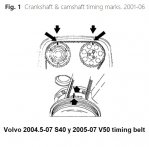
12.Turn the crankshaft clockwise to place timing marks at TDC, Fig. 1.
13.Loosen the timing belt tensioner center bolt. It may be necessary to lower the engine slightly to access the timing belt tensioner center bolt.
14.While holding the timing belt tensioner center bolt in position, use a 6 mm hex wrench to move the tensioner eccentric clockwise to the 10 o'clock position.
15.Remove the timing belt.
16.Remove the timing belt tensioner and idler pulleys. The timing belt tensioner and idler pulleys and retaining bolts must always be replaced when replacing the timing belt.
17.Install a new timing belt tensioner pulley and hand tighten retaining bolt. Ensure the tensioner fork is centered over the engine block rib and the hex hole on the eccentric is at 10 O'clock.
18.Install the new idler pulley and tighten the retaining screws.
19.Install the new timing belt over the crankshaft sprocket, idler pulley, intake camshaft sprocket, exhaust camshaft sprocket, water pump pulley and then the tensioner pulley.
20.Install the vibration damper nut.
21.Turn the crankshaft slightly in the clockwise direction to tension the timing belt between the crankshaft sprocket, idler pulley and intake camshaft sprocket.
22.While holding the timing belt tensioner center bolt, move the eccentric counterclockwise until the tensioner indicator passes the marked position.
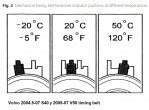
23.Turn the eccentric back in the clockwise direction until the needle reaches the marked position corresponding to the relevant temperature, Fig. 2.
24.While holding the timing belt tensioner eccentric in position, torque the center bolt to 15 ft. lbs.
25.Ensure that the timing belt tensioner indicator is in the correct position. If not, the timing belt must be tensioned.
26.Press on the timing belt to ensure that the indicator on the timing belt tensioner moves easily.
27.Temporarily install the upper timing cover.
28.Turn the crankshaft clockwise two revolutions aligning the crankshaft and camshaft timing marks.
29.Ensure that the indicator on the timing belt tensioner is within the marked area. If not readjust the timing belt tension.
30.Remove the vibration damper nut from the crankshaft.
31.Install the vibration damper. Use Volvo tool No. 999 5433, or equivalent, to hold the vibration dampener in place while torque the center nut to 133 ft. lbs. Install and tighten the screws.
32.Install the timing belt front cover. Torque the attaching screws to 71 inch lbs.
33.Install the timing belt upper front cover. Torque the attaching screws to 74 inch lbs.
34.Install the timing belt front cover. Torque the attaching screws to 71 inch lbs.
35.Connect the power steering pump pressure and return hoses. After completing installation, inspect the fluid level.
36.Install the righthand engine mount limiter pad retaining bolts from the righthand frame member and cylinder head. Tighten the flanged M12 screws to 59 ft. lbs.
37.Install the right front fender inner liner.
38.Install the wheel and tire, then lower the vehicle and tighten the lugnuts.
39.Remove the engine support fixture.
40.Install the coolant overflow tank. Ensure the hoses are correctly positioned.
41.Connect the battery ground cable.
42.Start the engine, and ensure it operates properly.