-
Hola Invitado, Foromecanicos es el Foro de Automecanico y Autoelectronico - informacion sobre mecanica automotriz, computers, encendido y auto electronics, diagramas.
Estás utilizando un navegador obsoleto. Este u otros sitios web pueden no ser mostrados correctamente.
Debes actualizarlo o utilizar un navegador alternativo.
Debes actualizarlo o utilizar un navegador alternativo.
Tobe82
Experto
Aqui comparto algunos manuales para cambio de banda de tiempo
BREEZE, CIRRUS, STRATUS & 1995-1999 NEON 2.0L 4cil cod. ECB
This engine is classified as an Interference engine. If the timing belt breaks or jumps timing, a piston may contact an open valve. Piston to valve contact may cause damage to the valve, piston and other engine components. In some cases valve to valve contact may be experienced when the timing belt breaks or jumps timing. To avoid belt breakage, replace the timing belt as recommended by the vehicle manufacturer timing belt replacement interval.
With the timing belt removed, avoid turning the camshaft or crankshaft. If movement is required, exercise extreme caution to avoid valve damage caused by piston contact.
1.Disconnect and isolate the battery ground cable.
2.Remove the engine accessory drive belts.
3.Loosen the righthand front wheel lug nuts.
4.Raise and support the vehicle with jack stands.
5.Remove the righthand front wheel and tire assembly.
6.Remove the righthand inner splash shield.
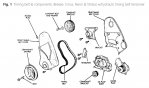
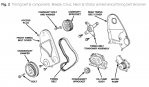
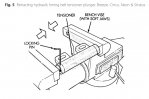
7.Remove the crankshaft damper retaining bolt, Figs. 1 and 2.
8.Remove the crankshaft damper using DaimlerChrysler tool Nos. 1026 and 6827-A, or equivalents.
9.On Neon models, remove lower torque strut.
10.On all models: support the engine with a suitable jack and wooden block placed under the oil pan.
11.On Breeze, Cirrus and Stratus models, remove the three bolts attaching the engine support assembly to the engine bracket, then remove the righthand engine mount.
12.On 1995-99 Neon models, proceed as follows:
a.Remove the purge solenoid from the engine mount bracket.
b.Remove the righthand engine mount to frame rail bolts.
c.Remove the engine mount insulator through bolt, then the insulator.
13.On 1998-2000 Breeze, Cirrus and Stratus models, disconnect the alternator electrical connector and terminal lead, then remove the alternator and bracket.
14.On 1998-99 Neon models, remove the power steering pump and position aside with hoses attached.
15.On all models, remove the righthand engine mount bracket from the engine.
16.Remove the timing belt outer cover.
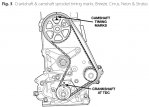
17.Align the crankshaft and camshaft sprocket timing marks before removing the timing belt by rotating the crankshaft. Fig. 3.
18.On models equipped with a hydraulic timing belt tensioner, loosen the tensioner mounting bolts, but do not loosen, remove or tighten the tensioner pivot bolt.
19.On models equipped with a mechanical timing belt tensioner, proceed as follows:
a.Do not separate the tensioner pulley from its mounting bracket.
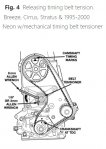
b.Insert an 8 mm hex wrench into the tensioner, Fig. 4.
c.Insert the long end of a 1/8 inch or 3 mm hex wrench into the pin hole on the front of the tensioner.
d.Rotate the tensioner counterclockwise with the hex wrench while pushing in lightly on the 1/8 inch or 3 mm hex wrench until it slides into the locking hole.
20.On all models, remove the timing belt.
21.On models equipped with a hydraulic timing belt tensioner, proceed as follows:
a.Remove the tensioner retaining bolts, then the tensioner.
b.Position the tensioner in a soft-jawed vise. Place the tensioner in the vise the same way as it is installed on the engine. This ensures proper pin orientation for easier installation.
c.Slowly compress the tensioner rod.
d.After the tensioner rod has been compressed, insert a 5/64 inch hex wrench through the tensioner body hole to retain the plunger in position, Fig. 5.
e.Remove the tensioner from the vise.
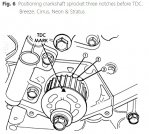
22.On all models, set the crankshaft sprocket to TDC by aligning the sprocket mark with the oil pump housing mark, then back the crankshaft sprocket off TDC by three notches, Fig. 6.
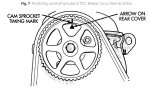
23.Set the camshaft sprocket to TDC by aligning the sprocket mark with the mark on the rear timing belt cover, Fig. 7.
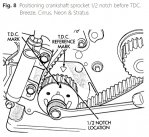
24.Move the crankshaft sprocket to 1/2 notch before TDC, Fig. 8.
25.Install the timing belt over the crankshaft sprocket, water pump sprocket, camshaft sprocket and under the tensioner pulley.
26.Move the crankshaft sprocket 1/2 notch to the TDC position.
27.On models equipped with a hydraulic timing belt tensioner, proceed as follows:
a.Install the timing belt tensioner, but do not tighten the attaching screws.
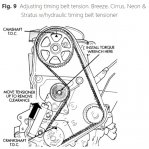
b.Apply approximately 21 ft. lbs., of torque using a suitable torque wrench to the belt tensioner pulley, Fig. 9.
c.With torque being applied to the tensioner pulley, move the tensioner against the tensioner pulley bracket. Torque the tensioner retaining screws to 23 ft. lbs.
d.Remove the hex wrench from the tensioner body and plunger holes. Proper pretension is proven when the hex wrench can be installed and removed from the tensioner body hole.
28.On models equipped with a mechanical timing belt tensioner, remove the pin or hex wrench from the tensioner.
29.On all models, rotate the crankshaft two turns clockwise. Ensure the crankshaft and camshaft sprocket timing marks are aligned, Fig. 3. If not, the timing belt will have to be removed and installed.
30.Install the timing belt cover. Torque the attaching screws to 105 inch lbs.
31.Install the engine mount bracket.
32.On Breeze, Cirrus and Stratus models, install the righthand engine mount. Torque the three engine mount attaching bolts to 45 ft. lbs.
33.On 1995-1999 Neon models, proceed as follows:
a.Install the engine mount insulator, then the through bolt. Torque the through bolt to 80 ft. lbs.
b.Install the engine mount to frame rail bolts. Torque the bolts to 40 ft. lbs.
c.Install the purge solenoid to the engine mount bracket.
34.On 1998-2000 Breeze, Cirrus and Stratus models, install the alternator and mounting bracket, then connect the electrical connector and lead.
35.On 1998-99 Neon models, install the power steering pump.
36.On all models, install the righthand engine mount, then remove the jack and wooden block from under the oil pan.
37.Install the crankshaft damper using DaimlerChrysler tool No. 6792, or equivalent.
38.Install the crankshaft damper retaining bolt, then torque to 105 ft. lbs.
39.Install the alternator and A/C compressor drive belt. Refer to "Accessory Drive Belt Tension" for proper belt tension.
40.Install the power steering pump drive belt. Refer to "Accessory Drive Belt Tension" for proper belt tension.
41.Install the inner splash shield, then the wheel and tire assembly.
42.Remove the jack stands and lower the vehicle, then tighten the lug nuts as follows:
a.On 1995 models, torque the lug nuts to 95 ft. lbs.
b.On 1996 Neon and 1996-2000 Breeze, Cirrus and Stratus models, torque the lug nuts to 100 ft. lbs.
c.On 1997 Neon models, torque the lug nuts to 80-110 ft. lbs.
d.On 1998-99 Neon models, torque the lug nuts to 85-115 ft. lbs.
43.On all models,connect the battery ground cable.
44.The DaimlerChrysler DRB Scan Tool or another suitable scan tool may be required to perform the camshaft and crankshaft relearn position procedure. Follow the tool manufacturer's instructions.
BREEZE, CIRRUS, STRATUS & 1995-1999 NEON 2.0L 4cil cod. ECB
This engine is classified as an Interference engine. If the timing belt breaks or jumps timing, a piston may contact an open valve. Piston to valve contact may cause damage to the valve, piston and other engine components. In some cases valve to valve contact may be experienced when the timing belt breaks or jumps timing. To avoid belt breakage, replace the timing belt as recommended by the vehicle manufacturer timing belt replacement interval.
With the timing belt removed, avoid turning the camshaft or crankshaft. If movement is required, exercise extreme caution to avoid valve damage caused by piston contact.
1.Disconnect and isolate the battery ground cable.
2.Remove the engine accessory drive belts.
3.Loosen the righthand front wheel lug nuts.
4.Raise and support the vehicle with jack stands.
5.Remove the righthand front wheel and tire assembly.
6.Remove the righthand inner splash shield.
7.Remove the crankshaft damper retaining bolt, Figs. 1 and 2.
8.Remove the crankshaft damper using DaimlerChrysler tool Nos. 1026 and 6827-A, or equivalents.
9.On Neon models, remove lower torque strut.
10.On all models: support the engine with a suitable jack and wooden block placed under the oil pan.
11.On Breeze, Cirrus and Stratus models, remove the three bolts attaching the engine support assembly to the engine bracket, then remove the righthand engine mount.
12.On 1995-99 Neon models, proceed as follows:
a.Remove the purge solenoid from the engine mount bracket.
b.Remove the righthand engine mount to frame rail bolts.
c.Remove the engine mount insulator through bolt, then the insulator.
13.On 1998-2000 Breeze, Cirrus and Stratus models, disconnect the alternator electrical connector and terminal lead, then remove the alternator and bracket.
14.On 1998-99 Neon models, remove the power steering pump and position aside with hoses attached.
15.On all models, remove the righthand engine mount bracket from the engine.
16.Remove the timing belt outer cover.
17.Align the crankshaft and camshaft sprocket timing marks before removing the timing belt by rotating the crankshaft. Fig. 3.
18.On models equipped with a hydraulic timing belt tensioner, loosen the tensioner mounting bolts, but do not loosen, remove or tighten the tensioner pivot bolt.
19.On models equipped with a mechanical timing belt tensioner, proceed as follows:
a.Do not separate the tensioner pulley from its mounting bracket.
b.Insert an 8 mm hex wrench into the tensioner, Fig. 4.
c.Insert the long end of a 1/8 inch or 3 mm hex wrench into the pin hole on the front of the tensioner.
d.Rotate the tensioner counterclockwise with the hex wrench while pushing in lightly on the 1/8 inch or 3 mm hex wrench until it slides into the locking hole.
20.On all models, remove the timing belt.
21.On models equipped with a hydraulic timing belt tensioner, proceed as follows:
a.Remove the tensioner retaining bolts, then the tensioner.
b.Position the tensioner in a soft-jawed vise. Place the tensioner in the vise the same way as it is installed on the engine. This ensures proper pin orientation for easier installation.
c.Slowly compress the tensioner rod.
d.After the tensioner rod has been compressed, insert a 5/64 inch hex wrench through the tensioner body hole to retain the plunger in position, Fig. 5.
e.Remove the tensioner from the vise.
22.On all models, set the crankshaft sprocket to TDC by aligning the sprocket mark with the oil pump housing mark, then back the crankshaft sprocket off TDC by three notches, Fig. 6.
23.Set the camshaft sprocket to TDC by aligning the sprocket mark with the mark on the rear timing belt cover, Fig. 7.
24.Move the crankshaft sprocket to 1/2 notch before TDC, Fig. 8.
25.Install the timing belt over the crankshaft sprocket, water pump sprocket, camshaft sprocket and under the tensioner pulley.
26.Move the crankshaft sprocket 1/2 notch to the TDC position.
27.On models equipped with a hydraulic timing belt tensioner, proceed as follows:
a.Install the timing belt tensioner, but do not tighten the attaching screws.
b.Apply approximately 21 ft. lbs., of torque using a suitable torque wrench to the belt tensioner pulley, Fig. 9.
c.With torque being applied to the tensioner pulley, move the tensioner against the tensioner pulley bracket. Torque the tensioner retaining screws to 23 ft. lbs.
d.Remove the hex wrench from the tensioner body and plunger holes. Proper pretension is proven when the hex wrench can be installed and removed from the tensioner body hole.
28.On models equipped with a mechanical timing belt tensioner, remove the pin or hex wrench from the tensioner.
29.On all models, rotate the crankshaft two turns clockwise. Ensure the crankshaft and camshaft sprocket timing marks are aligned, Fig. 3. If not, the timing belt will have to be removed and installed.
30.Install the timing belt cover. Torque the attaching screws to 105 inch lbs.
31.Install the engine mount bracket.
32.On Breeze, Cirrus and Stratus models, install the righthand engine mount. Torque the three engine mount attaching bolts to 45 ft. lbs.
33.On 1995-1999 Neon models, proceed as follows:
a.Install the engine mount insulator, then the through bolt. Torque the through bolt to 80 ft. lbs.
b.Install the engine mount to frame rail bolts. Torque the bolts to 40 ft. lbs.
c.Install the purge solenoid to the engine mount bracket.
34.On 1998-2000 Breeze, Cirrus and Stratus models, install the alternator and mounting bracket, then connect the electrical connector and lead.
35.On 1998-99 Neon models, install the power steering pump.
36.On all models, install the righthand engine mount, then remove the jack and wooden block from under the oil pan.
37.Install the crankshaft damper using DaimlerChrysler tool No. 6792, or equivalent.
38.Install the crankshaft damper retaining bolt, then torque to 105 ft. lbs.
39.Install the alternator and A/C compressor drive belt. Refer to "Accessory Drive Belt Tension" for proper belt tension.
40.Install the power steering pump drive belt. Refer to "Accessory Drive Belt Tension" for proper belt tension.
41.Install the inner splash shield, then the wheel and tire assembly.
42.Remove the jack stands and lower the vehicle, then tighten the lug nuts as follows:
a.On 1995 models, torque the lug nuts to 95 ft. lbs.
b.On 1996 Neon and 1996-2000 Breeze, Cirrus and Stratus models, torque the lug nuts to 100 ft. lbs.
c.On 1997 Neon models, torque the lug nuts to 80-110 ft. lbs.
d.On 1998-99 Neon models, torque the lug nuts to 85-115 ft. lbs.
43.On all models,connect the battery ground cable.
44.The DaimlerChrysler DRB Scan Tool or another suitable scan tool may be required to perform the camshaft and crankshaft relearn position procedure. Follow the tool manufacturer's instructions.
Adjuntos
-
 dodge_stratus_timingbelt_1.jpg115,3 KB · Visitas: 278
 -
 dodge_stratus_timingbelt_2.jpg125,2 KB · Visitas: 259
 -
 dodge_stratus_timingbelt_3.jpg100,6 KB · Visitas: 265
 -
 dodge_stratus_timingbelt_4.jpg70,1 KB · Visitas: 277
 -
 dodge_stratus_timingbelt_5.jpg95,7 KB · Visitas: 240
 -
 dodge_stratus_timingbelt_6.jpg108,8 KB · Visitas: 238
 -
 dodge_stratus_timingbelt_7.jpg145,4 KB · Visitas: 263
 -
 dodge_stratus_timingbelt_8.jpg114,4 KB · Visitas: 268
 -
 dodge_stratus_timingbelt_9.jpg109,6 KB · Visitas: 340
Siguenos en:
El contenido de especificaciones técnicas,comentarios, opiniones y otros datos en este foro sólo son con fines informativos y son de exclusiva responsabilidad de cada usuario. Foromecanicos.com no puede y no verifica ni garantiza la exactitud o exhaustividad de la información. Usted utiliza este sitio web bajo su propio riesgo y solo con fines informativos. Las marcas y los logotipos de los fabricantes de automóviles en esta página web son propiedad de los titulares de las mismas.
Usamos cookies.Si continúas utilizando este sitio, estás consintiendo utilizar cookies.