Hola, dejo manual para cambiar cadena de tiempo para Ford Escape 2.5L años 2009 a 2014
TIMING CHAIN, REPLACE
1. Raise and support vehicle.
2. Remove front righthand wheel and tire.
3. Release tensioner and remove accessory drive belt.
4. Remove valve cover.
5. Turn crankshaft clockwise to position No. 1 piston at TDC using crankshaft pulley bolt. Hole in crankshaft pulley should be in 6 o'clock position. Caution: Failure to position No. 1 piston at TDC can result in damage to engine. Turn engine in normal direction of rotation only.
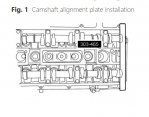
6. Install special tool No. 303-465 or equivalent, in slots on rear of both camshafts, Fig. 1.
7. Remove engine plug bolt, then install holding tool Nos. 303-507, 205-072-02 and 205-126, or equivalents, to crankshaft.
8. Remove crankshaft pulley bolt and washer, then the crankshaft pulley. Caution: Crankshaft must remain at Top Dead Center (TDC) position during removal of pulley bolt, or damage to engine can occur.
9. Remove and discard diamond washer. Caution: A new diamond washer must be installed, or engine damage may occur.
10. Remove engine mount.
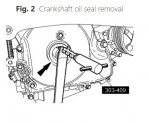
11. Remove crankshaft front oil seal using remover tool No. 303-409, or equivalent, Fig. 2. Use care not to damage engine front cover or crankshaft when removing seal.
12. Remove bolts and coolant pump pulley, then the bolts and accessory drive belt tensioner.
13. On models equipped with hybrid engine, detach transaxle selector lever cable fastener from engine front cover stud bolt.
14. On all models, disconnect CKP sensor electrical connector, then remove CKP sensor.
15. Remove bolts, stud bolt and engine front cover.
16. Release and hold ratchet mechanism of timing chain tensioner using a small pick, Fig. 3.
17. While holding ratchet mechanism in released position, compress tensioner by pushing timing chain arm toward tensioner, Fig. 3, then insert paper clip into hole to retain tensioner.
18. Remove mounting bolts and timing chain tensioner.
19. Remove timing chain tensioner arm.
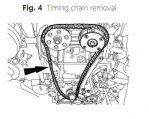
20. Remove timing chain, Fig. 4.
21. Remove bolts and lefthand timing chain guide.
22. Reverse procedure to install, noting the following:
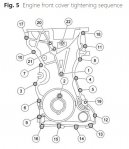
a. Install engine front cover and tighten bolts, using sequence, Fig. 5. Torque 8mm bolts to 89 inch lbs.; 13mm bolts to 35 ft. lbs.
b. Torque crankshaft pulley bolt to 74 ft. lbs., then tighten an additional 90° turn.
c. Torque timing chain tensioner and guide to 89 inch lbs.
d. Torque engine mount bolt to 35 ft. lbs.
e. Torque water pump pulley bolts to 15 ft. lbs.