Kia Rio 1.6L 4cil 1998-2006, mas info de apoyo para cambio de banda de tiempo:
These engines are classified as an Interference engine. If the timing belt breaks or jumps timing, a piston may contact an open valve. Piston to valve contact may cause damage to the valve, piston and other engine components. In some cases valve to valve contact may be experienced when the timing belt breaks or jumps timing. To avoid belt breakage, replace the timing belt as recommended by the vehicle manufacturer timing belt replacement interval.
With the timing belt removed, avoid turning the camshaft or crankshaft. If movement is required, exercise extreme caution to avoid valve damage caused by piston contact.
1.Record the radio station presets, then disconnect and isolate the battery ground cable.
2.Raise and support the vehicle with jack stands.
3.Loosen, but do not remove, the water pump pulley attaching bolts.
4.Loosen the power steering pump mounting bolts and the tensioner lock bolt. Release the drive belt tension, then remove the drive belt.
5.Loosen the A/C compressor tensioner lock bolt. Release the drive belt tension, then remove the drive belt.
6.Loosen the alternator mounting bolts. Loosen the adjuster bolt to release the drive belt tension, then remove the drive belt.
7.Remove the water pump pulley attaching bolts, then the pulley.
8.Remove the crankshaft pulley attaching bolts, then the pulley and timing belt guide plate.
9.Remove the timing belt upper and lower cover attaching bolts, then the covers.
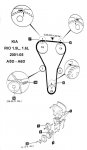
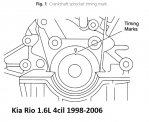
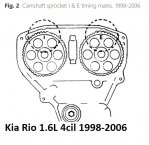
10.Align the crankshaft and camshaft sprocket timing marks, Figs. 1 and 2. The "I" and "E" marks align with the cylinder head cover notch marks directly above them.
11.Loosen the timing belt tensioner pulley lock bolt.
12.Pry the tensioner pulley away from the timing belt to its furthest point of travel and secure in position by tightening the pulley lock bolt.
13.Remove the timing belt from the sprockets and the tensioner pulley. Discard the tensioner spring.
14.Install the timing belt tensioner pulley with a new spring. The tensioner spring should be replaced when replacing the timing belt.
15.Ensure the crankshaft and camshaft sprocket timing marks are aligned, Figs. 1 and 2. The I and E marks align with the cylinder head cover notch marks directly above them.
16.Install the new timing belt over the crankshaft sprocket, idler pulley, exhaust camshaft sprocket, intake camshaft sprocket and the tensioner pulley. Ensure there is no belt looseness between any components.
17.Loosen the timing belt tensioner pulley lock bolt and allow the belt to tension.
18.Torque the timing belt tensioner pulley lock bolt to 28-38 ft. lbs.
19.Rotate the crankshaft clockwise two revolutions.
20.Align the crankshaft and camshaft timing marks, Figs. 1 and 2. If the timing marks do not align, the timing belt must be removed and installed once again.
21.Apply a pressure of 22 lbs. on the timing belt midway between the camshaft sprockets and ensure the belt deflection is as follows:
a.On 1998-2003 models, deflection should be .36-.45 inch.
b.On 2004-06 models, deflection should be .43-.51 inch.
c.On all models, if deflection is not within limits, the timing belt must be removed and installed once again.
22.Install the lower, middle and upper timing belt covers. Torque the cover attaching bolts to 70-96 inch lbs.
23.Install the timing belt guide plate and crankshaft pulley. Torque the crankshaft pulley bolts to 10-13 ft. lbs.
24.Install the water pump pulley. Torque the bolts to 10-13 ft. lbs.
25.Install the alternator, A/C compressor and power steering drive belts. Refer to "Accessory Drive Belt Tension" for proper belt tension.
26.Connect the battery ground cable.
27.Reset the radio station presets and the clock.
 cion o tiene que quedar uno arriba y otro abajo.