Y para la banda de tiempo
FRONTIER, XTERRA & 2000 PATHFINDER
This engine is classified as an Interference engine. If the timing belt breaks or jumps timing, a piston may contact an open valve. Piston to valve contact may cause damage to the valve, piston and other engine components. In some cases valve to valve contact may be experienced when the timing belt breaks or jumps timing. To avoid belt breakage, replace the timing belt as recommended by the vehicle manufacturer timing belt replacement interval.
With the timing belt removed, avoid turning the camshaft or crankshaft. If movement is required, exercise extreme caution to avoid valve damage caused by piston contact.
1.Wait until the engine has cooled before installing the new timing belt.
2.Disconnect and isolate the battery ground cable.
3.Raise and safely support the front of the vehicle with jackstands.
4.Remove the engine compartment undercover.
5.Drain the coolant into an approved container.
6.Remove the radiator assembly.
7.Remove the engine accessory drive belts.
8.Remove the engine cooling fan and the water pump pulley.
9.After tagging the spark plug leads, disconnect them from the spark plugs.
10.Remove the spark plugs.
11.Remove the distributor protector.
12.Remove the A/C compressor drive belt idler pulley bracket.
13.Remove the fresh air intake tube or breather tube from the rocker arm cover.
14.Remove the coolant hose from the thermostat housing.
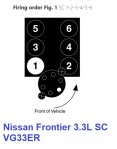
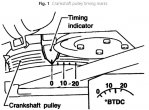
15.Rotate the crankshaft clockwise until the No. 1 cylinder reaches TDC mark, Fig. 1.
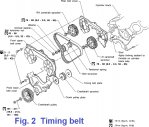
16.Loosen and remove the crankshaft pulley bolt, Fig. 2.
17.Remove the crankshaft pulley using a suitable puller tool.
18.Remove the timing belt front upper and lower covers.
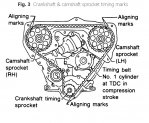
19.Align the lefthand camshaft sprocket punch mark with the punch mark on the timing belt upper rear cover, Fig. 3.
20.Align the crankshaft sprocket punch mark with the oil pump housing notch, Fig. 3.
21.Temporarily install the crankshaft pulley bolt so the crankshaft can be rotated.
22.Loosen the timing belt tensioner nut, turn the tensioner outward, then remove the timing belt, Fig. 2.
23.Inspect the timing belt tensioner. Ensure it rotates freely and the spring is in good condition.
24.Ensure the No. 1 piston is set at TDC on its compression stroke, Fig. 3.
25.If the tensioner was removed, apply thread lock sealer to the tensioner spring stud threads which enter the engine block, then install the stud, tensioner and spring.
26.Turn the tensioner completely outward using a hex wrench, then temporarily tighten the locknut.
27.Install the new timing belt as follows:
a.On belts equipped with arrow mark, the arrow should face toward the front belt cover.
b.On belts equipped with white lines, align the lines with the punch marks on the camshaft sprockets and the crankshaft sprocket.
c.The belt has 133 teeth. When properly installed, there should be 40 teeth between the lefthand and righthand camshaft sprockets, and 43 teeth between the lefthand camshaft sprocket and the crankshaft sprocket.
28.Loosen the tensioner locknut.
29.Turn the tensioner clockwise and counterclockwise at least two times.
30.Tighten the tensioner locknut.
31.Turn the crankshaft in the clockwise direction at least twice, then slowly set the No. 1 piston at TDC of its compression strike, Fig. 3.
32.Measure the timing belt deflection midway between the camshaft pulleys while applying a force of 22 lbs., Fig. 4.
33.If the belt deflection is not within 0.51-0.59 inch (13 to 15 mm), repeat steps 27 through 32.
34.Torque the tensioner locknut to 32-43 ft. lbs.
35.Install the upper and lower timing belt covers, Fig. 5. Torque the mounting bolts to 26-43 inch lbs.
36.Install the crankshaft pulley. Torque the mounting bolt to 141-156 ft. lbs.
37.Install the coolant hose at the thermostat housing.
38.Install the fresh air tube at the rocker cover.
39.Install the A/C compressor drive belt idler bracket.
40.Install the distributor protector.
41.Install the spark plugs, then connect the leads.
42.Install the water pump pulley and the engine cooling fan.
43.Install the engine accessory drive belts. Refer to "Accessory Drive Belt Tension" for proper belt tension.
44.Close the radiator petcock.
45.Install the radiator.
46.Install the engine undercover.
47.Fill the radiator and cooling system to the proper level.
48.Connect the battery ground cable.
49.Start the engine, then inspect and adjust the timing as required.