Aqui comparto mas info de apoyo para cadena de tiempo Ford ranger
Ford Ranger 2.3L 2007-2009
TIMING CHAIN, REPLACE
The crankshaft, crankshaft sprocket and pulley are fitted together by friction between flange faces on each part. If the crankshaft pulley is loosened, crankshaft sprocket is also loosened. Caution: The engine must be timed each time damper is removed, or severe damage to engine may occur.
1.Remove cooling fan, shroud and accessory drive belt.
2.Remove valve cover.
3.Turn crankshaft clockwise with crankshaft bolt to position No. 1 piston at TDC. Hole in crankshaft pulley should be in 6 o'clock position.
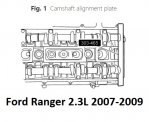
4.Install camshaft alignment plate tool No. 303-465, or equivalent, in slots on rear of both camshafts.
5.Camshaft alignment plate tool is for camshaft alignment only. Using tool to prevent rotation can result in engine damage, Fig. 1.
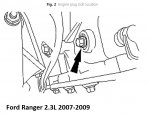
6.Remove engine plug bolt, Fig. 2.
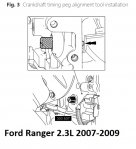
7.Install crankshaft timing peg tool No. 303-507, or equivalent, Fig. 3.
8.Only turn engine in normal direction of rotation. Installing timing peg tool will prevent engine from being rotated in clockwise direction, but engine can still be rotated in counterclockwise direction.
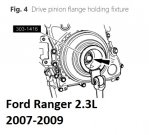
9.Install drive pinion flange holding fixture tool No. 303-1416, or equivalent, Fig. 4.
10.Failure to hold crankshaft pulley in place during bolt loosening can cause damage to engine.
11.Remove and discard crankshaft pulley bolt and drive pinion holding fixture, then the crankshaft pulley.
12.Remove and discard crankshaft position sensor.
13.Remove accessory belt tensioner and water pump pulley.
14.Disconnect power steering pressure switch electrical connector.
15.Remove mounting bolt and position power steering pump aside.
16.If new cover is being installed, remove fan drive pulley with suitable three jaw puller.
17.There is one bolt behind cooling fan drive pulley that can be accessed by lining up one of holes in fan drive pulley.
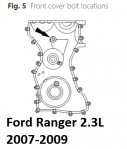
18.Remove bolts, Fig. 5, then the front cover.
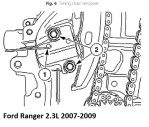
19.Compress timing chain tensioner and insert paper clip into tensioner hole, Fig. 6.
20.Remove tensioner. Caution: Do not rely on camshaft alignment plate to prevent camshaft rotation. Tool or camshaft may be damaged.
21.Remove righthand timing chain guide, then the timing chain.
22.Remove lefthand timing chain guide.
23.Reverse procedure to install, noting the following:
a.Torque chain tensioner and guide bolts to 89 inch lbs.
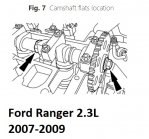
b.Prevent camshaft rotation using flats on camshaft, Fig. 7. Torque bolts to 53 ft. lbs.
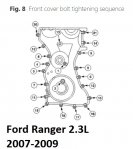
c.Tighten front cover bolts in sequence, Fig. 8. Torque 8mm bolts to 89 inch lbs.; 10mm bolts to 18 ft. lbs.; 13mm bolts to 35 ft. lbs.
d.Torque crankshaft pulley bolts to 74 ft. lbs., then tighten an additional 90° turn.
e.Torque water pump pulley to 18 ft. lbs.