Hola si, sirve para Tucson, dejo el manual: Cambio de Banda de tiempo para Elantra, Tiburon y Tucson 2.0L años 2004/2007
This engine is classified as an Interference engine. If the timing belt breaks or jumps timing, a piston may contact an open valve. Piston to valve contact may cause damage to the valve, piston and other engine components. In some cases valve to valve contact may be experienced when the timing belt breaks or jumps timing. To avoid belt breakage, replace the timing belt as recommended by the vehicle manufacturer timing belt replacement interval.
With the timing belt removed, avoid turning the camshaft or crankshaft. If movement is required, exercise extreme caution to avoid valve damage caused by piston contact.
1. Disconnect and isolate the battery ground cable.
2. Remove the engine appearance cover.
3. Loosen the righthand front wheel lugnuts.
4. Raise and safely support the vehicle with jackstands.
5. Remove the righthand side cover.
6. Position a suitable jack and wooden block under the oil pan.
7. Raise the engine slightly to relieve the weight from the engine support brace.
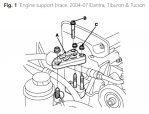
8. Remove the engine mounting brace attaching bolts and nuts, then the brace, Fig. 1.
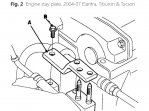
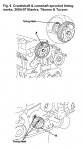
9. Remove the engine stay plate retaining bolts, then the stay plate, Fig. 2.
10. Loosen the water pump pulley retaining bolts.
11. Remove thew accessory drive belts.
12. Remove the water pump pulley retaining bolts, then the pulley.
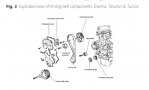
13. Remove the upper timing belt front cover retaining bolts, then the upper cover, Fig. 3.
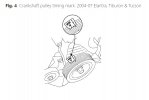
14. Rotate the crankshaft pulley in the clockwise direction until the pulley mark is aligned with the T mark on the timing tab, Fig. 4.
15. Remove the crankshaft pulley mounting bolt, then the pulley and flange plate.
16. Remove the lower timing belt front cover, Fig. 3.
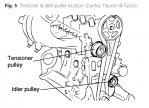
17. Remove the timing belt tensioner pulley, Fig. 5.
18. Remove the timing belt.
19. Inspect the timing belt tensioner and idler pulleys as follows:
a. Inspect the timing belt tensioner and idler pulley for smooth rotation, play and noise and replace as required.
b. Inspect the tensioner and idler pulleys for abnormal wear, cracks and other damage and replace as required.
c. Replace pulley if grease is leaking from the bearing.
20. Align the timing marks of the crankshaft sprocket and camshaft sprocket with the No. 1 piston placed at TDC compression stroke, Fig. 6.
21. Temporarily install the timing belt tensioner with plain washer.
22. Install the new timing belt on the crankshaft. When the timing belt is installed on the camshaft sprocket, ensure the tension side is tight and the timing belt tensioner pulley pushes toward the water pump.
23. Temporarily fasten tensioner pulley by center bolt to add force at the timing belt.
24. Rotate the crankshaft slightly in the clockwise direction until the camshaft has moved two teeth.
25. Using a suitable tool, rotate the tensioner pulley to tension the timing belt.
26. Tighten the tensioner pulley bolt to 31 to 40 ft. lbs.
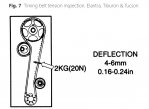
27. Check the timing belt tension by applying a force of 5 lbs. to the timing belt between camshaft sprocket and the idler pulley and measuring the belt deflection, Fig. 7. The timing belt deflection should be between .16 to .24 inch.
28. Turn the crankshaft two turns in a clockwise direction and realign crankshaft sprocket timing mark, Fig. 6.Do not turn crankshaft in a counterclockwise direction.
29. Install the lower timing belt front cover and torque bolts to 6-7 ft. lbs.
30. Install the crankshaft pulley, ensuring the crankshaft sprocket pin fits the small hole in the pulley. Torque the bolt to 125-133 ft. lbs.
31. Install the timing belt upper front cover.
32. Install the water pump pulley.
33. Install the engine accessory drive belts and adjust the tension. Refer to "Accessory Drive Belt Tension" for proper belt tension.
34. Install the engine stay. Tighten the retaining bolt to 32 to 40 ft. lbs.
35. Install the engine support brace. Tighten the 17 mm nut to 44 to 59 ft. lbs. and the 14 mm nut to 37 to 48 ft. lbs.
36. Remove the jack and wooden block from under the oil pan.
37. Install the righthand side cover.
38. Install the righthand wheel and tire assembly.
39. Remove the jackstand, then lower the vehicle.
40. Tighten the lugnuts.
41. Install the engine appearance cover.
42. Connect the battery ground cable.
43. Start the engine and inspect for proper operation.
 agua amigos gracias toda ayuda .