Dejo guia de como cambiar cadena de tiempo Ford E-series/ econoline 4.6L y 5.4L años 1997/2014
TIMING CHAIN, REPLACE
REMOVAL
1. Remove front cover.
2. Remove crankshaft sensor ring from crankshaft.
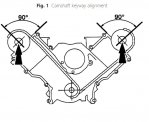
3. Rotate crankshaft until both camshaft keyways are 90° from valve cover surface, Fig. 1. Ensure copper links are aligned with dots on camshaft sprocket.
4. Install camshaft positioning tool No. T91P-6256-A and camshaft positioning tool adapters tool No. T92P-6256-A, or equivalents, to camshafts.
5. Remove timing chain tensioners, then tensioner arms from dowel pins.
6. Remove timing chains and crankshaft sprockets.
7. Remove timing chain guides.
INSTALLATION
1. Compress timing chain tensioner plunger using a suitable vise. Do not compress ratchet assembly.
2. Push back and hold ratchet using a suitable screwdriver.
3. While holding ratchet mechanism, move ratchet arm back into tensioner housing.
4. Install a suitable clip to hole in tensioner housing to hold ratchet and plunger during installation.
5. If copper links of timing chain are not visible, mark two links on opposite ends of chain.
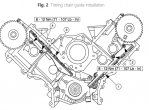
6. Install timing chain guides (1, 3) with bolts (2, 4), Fig. 2.
7. Install timing chains with crankshaft sprockets. Ensure lefthand inner sprocket is installed first and that sprocket hubs face each other. Align marked chain links with dot on crankshaft sprockets. Position chain over camshaft sprocket ensuring marked links are aligned with dot on camshaft sprocket.
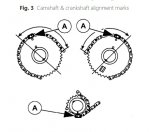
8. After chains are installed, ensure marked links (A) of timing chain are aligned as outlined in Fig. 3.
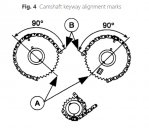
9. Ensure camshaft sprocket keyway (A) is 90° from valve cover mounting surface (B), Fig. 4.
10. Install lefthand and righthand timing chain tensioner arms.
11. Install timing chain tensioners, then remove pins from tensioners.
12. Remove cam positioning tool and adapters from camshafts.
13. Install crankshaft sensor ring.
14. Install front cover.