Tobe82
Experto
Poniendo a tiempo, un Cadillac SRX, comparto manual
Cadillac SRX 3.0L V6 (Y) LF1 2010-2011
TIMING CHAIN, REPLACE
Caution: With the timing chain removed, avoid turning the camshaft or crankshaft. If movement is required, exercise extreme caution to avoid valve damage caused by piston contact.
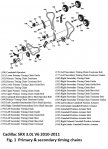
PRIMARY DRIVE CHAIN
Removal
1.Remove spark plugs.
2.Remove front cover.
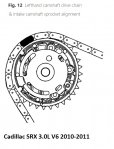
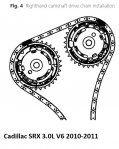
3.Remove righthand side secondary camshaft drive chain tensioner attaching bolts, then the drive chain tensioner, Fig. 1.
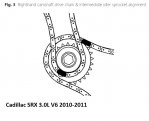
4.Remove righthand side secondary timing chain shoe, then the righthand side secondary drive chain.
5.Remove primary camshaft drive chain tensioner.
6.Remove primary camshaft drive chain upper guide, then the primary chain.
Installation
1.Hold righthand camshafts in place by installing camshaft holding GM tool No. 46105, or equivalent, onto camshafts.
2.Wrap primary camshaft drive chain around large sprockets of each camshaft intermediate chain idler and crankshaft sprocket.
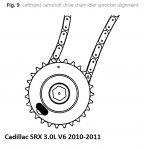
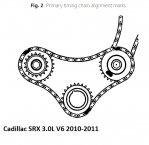
3.Align lefthand side camshaft intermediate drive chain idler timing mark with bright plated camshaft drive chain link, Fig. 2.
4.Align righthand side camshaft intermediate drive chain idler timing mark with bright plated camshaft drive chain link, Fig. 2.
5.Align crankshaft sprocket timing mark with bright plated camshaft drive chain link, Fig. 2.
6.Compress primary drive chain tensioner plunger into tensioner body using tensioner GM tool No. J-45027, or equivalent.
7.Install tensioner retraction pins GM tool No. 46112, or equivalent, into tensioner body to hold plunger in place.
8.Install a new primary camshaft drive chain tensioner gasket to primary camshaft drive chain tensioner.
9.Install primary camshaft drive chain tensioner bolts through primary camshaft drive chain tensioner and gasket.
10.Install drive tensioner, then tighten bolts loosely.
11.Ensure tensioner gasket is in place, then tighten tensioner bolts to specification.
12.Remove tensioner retraction pins and release tensioner plunger.
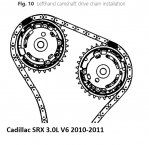
13.Place righthand side secondary camshaft drive chain around righthand side camshaft intermediate drive chain idler outer sprocket, align bright plated camshaft drive link with alignment access hole in camshaft drive chain idler inner sprocket, Fig. 3.
14.Wrap secondary camshaft drive chain around both righthand side actuator drive sprockets, ensuring there are seven darkened links between bright plated camshaft drive chain links for camshaft position actuator sprockets, Fig. 4.
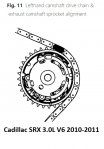
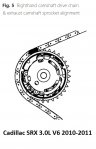
15.Align righthand side exhaust camshaft position actuator sprocket alignment triangle mark with bright plated camshaft drive chain link, Fig. 5.
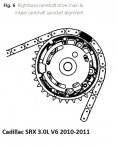
16.Align righthand side intake camshaft position actuator sprocket alignment triangle mark with bright plated camshaft drive chain link, Fig. 6.
17.Install chain guide.
18.Compress righthand side secondary camshaft drive chain tensioner plunger into tensioner body using tensioner GM tool No. J-45027, or equivalent.
19.Install tensioner retraction pins GM tool No. 46112, or equivalent, into tensioner body to hold plunger in place.
20.Install a new righthand side secondary camshaft drive chain tensioner gasket to drive chain tensioner.
21.Install righthand side secondary camshaft drive chain tensioner bolts through drive chain tensioner and gasket.
22.Install drive tensioner, then tighten bolts loosely.
23.Ensure tensioner gasket is in place, then tighten tensioner bolts to specification.
24.Remove tensioner retraction pins and release tensioner plunger.
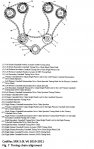
25.Ensure all timing marks are aligned, Fig. 7.
26.Install front cover.
27.Install spark plugs.
Cadillac SRX 3.0L V6 (Y) LF1 2010-2011
TIMING CHAIN, REPLACE
Caution: With the timing chain removed, avoid turning the camshaft or crankshaft. If movement is required, exercise extreme caution to avoid valve damage caused by piston contact.
PRIMARY DRIVE CHAIN
Removal
1.Remove spark plugs.
2.Remove front cover.
3.Remove righthand side secondary camshaft drive chain tensioner attaching bolts, then the drive chain tensioner, Fig. 1.
4.Remove righthand side secondary timing chain shoe, then the righthand side secondary drive chain.
5.Remove primary camshaft drive chain tensioner.
6.Remove primary camshaft drive chain upper guide, then the primary chain.
Installation
1.Hold righthand camshafts in place by installing camshaft holding GM tool No. 46105, or equivalent, onto camshafts.
2.Wrap primary camshaft drive chain around large sprockets of each camshaft intermediate chain idler and crankshaft sprocket.
3.Align lefthand side camshaft intermediate drive chain idler timing mark with bright plated camshaft drive chain link, Fig. 2.
4.Align righthand side camshaft intermediate drive chain idler timing mark with bright plated camshaft drive chain link, Fig. 2.
5.Align crankshaft sprocket timing mark with bright plated camshaft drive chain link, Fig. 2.
6.Compress primary drive chain tensioner plunger into tensioner body using tensioner GM tool No. J-45027, or equivalent.
7.Install tensioner retraction pins GM tool No. 46112, or equivalent, into tensioner body to hold plunger in place.
8.Install a new primary camshaft drive chain tensioner gasket to primary camshaft drive chain tensioner.
9.Install primary camshaft drive chain tensioner bolts through primary camshaft drive chain tensioner and gasket.
10.Install drive tensioner, then tighten bolts loosely.
11.Ensure tensioner gasket is in place, then tighten tensioner bolts to specification.
12.Remove tensioner retraction pins and release tensioner plunger.
13.Place righthand side secondary camshaft drive chain around righthand side camshaft intermediate drive chain idler outer sprocket, align bright plated camshaft drive link with alignment access hole in camshaft drive chain idler inner sprocket, Fig. 3.
14.Wrap secondary camshaft drive chain around both righthand side actuator drive sprockets, ensuring there are seven darkened links between bright plated camshaft drive chain links for camshaft position actuator sprockets, Fig. 4.
15.Align righthand side exhaust camshaft position actuator sprocket alignment triangle mark with bright plated camshaft drive chain link, Fig. 5.
16.Align righthand side intake camshaft position actuator sprocket alignment triangle mark with bright plated camshaft drive chain link, Fig. 6.
17.Install chain guide.
18.Compress righthand side secondary camshaft drive chain tensioner plunger into tensioner body using tensioner GM tool No. J-45027, or equivalent.
19.Install tensioner retraction pins GM tool No. 46112, or equivalent, into tensioner body to hold plunger in place.
20.Install a new righthand side secondary camshaft drive chain tensioner gasket to drive chain tensioner.
21.Install righthand side secondary camshaft drive chain tensioner bolts through drive chain tensioner and gasket.
22.Install drive tensioner, then tighten bolts loosely.
23.Ensure tensioner gasket is in place, then tighten tensioner bolts to specification.
24.Remove tensioner retraction pins and release tensioner plunger.
25.Ensure all timing marks are aligned, Fig. 7.
26.Install front cover.
27.Install spark plugs.
Adjuntos
-
 cadillac_srx_30_timingchain_1.jpg291,6 KB · Visitas: 495
 -
 cadillac_srx_30_timingchain_2.jpg80,2 KB · Visitas: 644
 -
 cadillac_srx_30_timingchain_3.jpg67,8 KB · Visitas: 649
 -
 cadillac_srx_30_timingchain_4.jpg99,8 KB · Visitas: 523
 -
 cadillac_srx_30_timingchain_5.jpg73,6 KB · Visitas: 434
 -
 cadillac_srx_30_timingchain_6.jpg98,4 KB · Visitas: 506
 -
 cadillac_srx_30_timingchain_7.jpg419,9 KB · Visitas: 2.078
Última edición: