Grand Caravan ES 3.3L 1996
PASSENGER'S SIDE AIR BAG MODULE, REPLACE
Use extreme care to prevent any foreign material from entering the passenger side air bag module, or becoming entrapped between the instrument panel top cover and the passenger side air bag module. Failure to observe this warning could result in occupant injuries upon air bag deployment.
Non-Deployed
1.Disarm air bag system as outlined under "Air Bag System Disarming & Arming."
2.Disconnect glove compartment door and allow door to fully open.
3.Remove passenger's air bag module mounting screws.
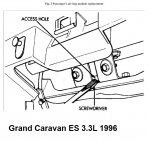
4.Pry passenger's air bag module up with large flat tipped screwdriver to unsnap door from trim pad, then lift away from snaps, Fig. 3.
5.Holding on to door, lift passenger's air bag module from opening and rest air bag module on trim pad.
6.Disconnect electrical connectors and remove passenger's air bag module.
7.Reverse procedure to install, noting the following. Arm air bag system as outlined under "Air Bag System Disarming & Arming."
8.Torque passenger air bag module to 50 inch lbs.
Deployed
1.Disarm air bag system as outlined under "Air Bag System Disarming & Arming."
2.Clean powder residue from vehicle interior as outlined under "Clean Up Procedure." in "Air Bag System Disarming & Arming."
3.Open lower console door, then remove lower console mounting screws.
4.Slide lower console rearward from instrument panel supports, then remove lower console from vehicle.
5.Remove lower heat duct to instrument panel supports attaching screw.
6.Remove bolts retaining lower instrument panel supports to instrument panel and floor pan.
7.Remove lower instrument panel supports from instrument panel.
8.Disconnect passenger's air bag module electrical connector.
9.Remove front door sill and A-Pillar trim covers.
10.Open glove compartment door, then disconnect stop cord from glove compartment door.
11.Pivot glove compartment door downward to disconnect hinges from instrument panel, then remove glove compartment from vehicle.
12.Disconnect antenna lead connector through glove compartment opening.
13.Remove steering column lower trim panel, then the stiffener panel.
14.Disconnect two 40-pin connectors from junction block at lefthand side of steering column.
15.Disconnect instrument panel harness connector from body control module.
16.Disconnect two 40-pin connectors from junction block at righthand side of steering column.
17.Remove pinch bolt from steering column coupler, then disconnect steering column from lower shaft.
18.Remove instrument panel mounting bolts from brake pedal support.
19.Disconnect gearshift cable from gear selector lever, then remove gearshift cable and bracket from steering column.
20.Disconnect hood release handle from instrument panel, then position cable and handle aside.
21.Disengage clips at rear edge of top instrument panel covers using suitable flat bladed tool.
22.Disconnect wiring harness connector from message center.
23.Pull top cover rearward to disengage clips and release top cover from instrument panel.
24.Pry righthand and lefthand instrument panel end covers from instrument panel using suitable flat bladed tool.
25.Disconnect wiring harness connectors from heating and air conditioning unit through glove compartment opening.
26.Remove instrument panel to cowl panel upper attaching bolts, then loosen, but do not remove lower cowl panel to instrument panel bolts.
27.Remove instrument panel to body attaching bolts located below windshield.
28.Remove instrument panel assembly from vehicle.
29.Remove all reusable components from instrument panel retainer.
30.Reverse procedure to install, noting the following:
a.Install all reusable components to a new instrument panel retainer.
b.Install new passenger's air bag module into instrument panel.
c.Arm air bag system as outlined under "Air Bag System Disarming & Arming."
AIR BAG CONTROL MODULE (ACM), REPLACE
1.Disarm air bag system as outline under "Air Bag System Disarming & Arming."
2.Remove forward lower console from instrument panel.
3.Remove lower heat duct mounting screws and lower heat duct from instrument panel.
4.Remove righthand support bolts and righthand support from instrument panel.
5.Disconnect ACM electrical connectors.
6.Remove ACM bracket assembly bolts from floor and remove ACM. Do not remove ACM from its mounting bracket. This is included with new ACM.
7.Reverse procedure to install, noting the following. Arm air bag system as outlined under "Air Bag System Disarming & Arming."
8.Torque air bag controll module to 85-105 inch lbs.
AIR BAG SYSTEM DIAGNOSTIC MODULE (ASDM), REPLACE
1.Disarm air bag system as outlined under "Air Bag System Disarming & Arming."
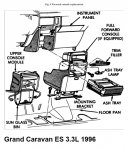
2.Remove forward console, Fig. 4.
3.Remove module and bracket attaching screws.
4.Carefully lift module up and rearward, disconnect electrical connectors, then remove module.
5.Reverse procedure to install, noting the following:
a.Position module and bracket facing forward.
b.Arm air bag system as outlined under "Air Bag System Disarming & Arming."
FRONT IMPACT SENSORS, REPLACE
1.Disarm air bag system as outlined under "Air Bag System Disarming & Arming."
2.Remove upper radiator closure crossmember to sensor attaching nuts.
3.Disconnect sensor electrical connector, then remove.
4.Reverse procedure to install, noting the following. Arm air bag system as outlined under "Air Bag System Disarming & Arming."
OCCUPANT RESTRAINT CONTROLLER (OCR), REPLACE
1.Disarm air bag system as outlined under "Air Bag System Disarming & Arming."
2.Remove storage bin from instrument panel, then the three bolts from ORC bracket.
3.Disconnect electrical connector from ORC, then remove ORC with bracket from vehicle.
4.Reverse procedure to install, noting the following. Arm air bag system as outlined under "Air Bag System Disarming & Arming."
5.Torque occupant restraint controller to 65-85 inch lbs.
SEAT BELT RETRACTOR & TENSIONER, REPLACE
1.Disarm air bag system as outlined under "Air Bag System Disarming & Arming."
2.Remove shoulder belt height control knob.
3.Remove turning loop to belt adjuster bolt.
4.Remove upper B-Pillar trim.
5.Remove access cover from B-Pillar trim.
6.Disengage B-Pillar trim attaching clips.
7.Route seat belt turning loop and belt through trim panel.
8.Remove lower B-Pillar trim.
9.Disconnect seat belt retractor electrical connector.
10.Remove retractor mounting fasteners, then the retractor.
11.Reverse procedure to install, noting the following:
a.Ensure all wiring is properly routed to avoid pinching.
b.Arm air bag system as outlined under "Air Bag System Disarming & Arming."
SIDE IMPACT AIR BAG CONTROL MODULE (SIACM), REPLACE
1.Disarm air bag system as outlined under "Air Bag System Disarming & Arming."
2.Remove lower B-Pillar trim from appropriate side of vehicle.
3.Disconnect SIACM electrical connectors.
4.Remove three screws, then the SIACM from vehicle.
5.Reverse procedure to install, noting the following. Arm air bag system as outlined under "Air Bag System Disarming & Arming."
6.Torque side impact air bag control module to 50-70 inch lbs.
AIR BAG MODULE DISPOSAL
After deployment, air bag module should be placed in a plastic bag and disposed of in same manner as any other scrap components, except that following points should be carefully noted during disposal.
1.When handling deployed air bag assembly, face shield and rubber gloves should be worn.
2.There may be, adhered to air bag module, material that could irritate eyes and/or skin. Note following: If any irritation develops, seek medical attention.
a.If sinus or throat irritation is encountered during air bag removal, exit vehicle and breath fresh air.
b.If material does come in contact with eyes and/or skin, immediately rinse affected area with a large amount of cool, clear water.
c.If sinus, throat, skin or any other type of irritation continues, consult a physician.
3.After handling a deployed air bag assembly, wash hands and rinse thoroughly with water.
4.Inflator will be quite hit immediately after deployment, wait 30 minutes to allow air bag to cool.
5.Do not put water or oil on air bag after deployment.
6.Put deployed air bag in a hermetically sealed container and discard it.
7.Use a vacuum cleaner to remove any residual powder from vehicle interior as follows:
a.Work from outside to center of vehicle.
b.Vacuum A/C vent, defroster and heater ducts.
c.Run blower motor on low speed and vacuum any powder expelled from plenum.
d.It may be required to vacuum interior of vehicle a second time to ensure all powder is recovered.
8.An air bag that has been deployed should be removed as outlined under "Driver's Air Bag Assembly, Replace" or "Passenger's Air Bag Assembly, Replace."
9.Prior to removing a deployed air bag assembly, place tape over air bag exhaust vents.
10.Before disposing of a vehicle equipped with air bag(s), or prior to disposing of air bag module, the module must be deployed as follows:
a.If vehicle is to be scrapped, deploy air bag(s) inside vehicle.
b.If vehicle is to continue in service, air bags must be removed and deployed outside vehicle.
")