Comparto instrucciones para cambio de banda de tiempo Hyundai Accent GL 1.6L 2008
TIMING BELT, REPLACE
This engine is classified as an Interference engine. If the timing belt breaks or jumps timing, a piston may contact an open valve. Piston to valve contact may cause damage to the valve, piston and other engine components. In some cases valve to valve contact may be experienced when the timing belt breaks or jumps timing. To avoid belt breakage, replace the timing belt as recommended by the vehicle manufacturer timing belt replacement interval.
With the timing belt removed, avoid turning the camshaft or crankshaft. If movement is required, exercise extreme caution to avoid valve damage caused by piston contact.
1.Record the radio station presets, then disconnect and isolate the battery ground cable.
2.Remove the engine cover attaching screws, then the cover.
3.Loosen the righthand front wheel lugnuts.
4.Raise and support the vehicle with jack stands, then remove the right front wheel and tire assembly.
5.Remove the two bolts securing the righthand side cover, then the cover.
6.Loosen, but do not remove, the water pump pulley attaching bolts.
7.Remove the alternator drive belt.
8.Remove the A/C compressor drive belt.
9.Remove the power steering pump drive belt.
10.Remove the water pump pulley attaching bolts, then the pulley.
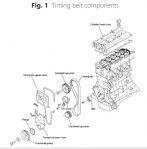
11.Remove the four upper timing belt cover attaching screws, then the cover, Fig. 1.
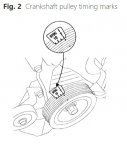
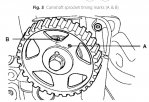
12.Align the crankshaft pulley and camshaft sprocket timing marks, Figs. 2 and 3.
13.Remove the crankshaft pulley retaining bolt, then the pulley.
14.Remove the crankshaft flange.
15.Remove the four timing belt lower cover attaching screws, then the cover.
16.Loosen the timing belt tensioner mounting bolts, then move the tensioner toward the water pump. Tighten the tensioner bolts to hold the tensioner in position.
17.Remove the timing belt from the sprockets and the tensioner pulley.
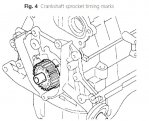
18.Ensure the camshaft and crankshaft sprocket timing marks are aligned, Figs. 3 and 4.
19.Install the new timing belt over the crankshaft sprocket, idler pulley, camshaft sprocket and the tensioner pulley. Ensure there is no belt looseness between any components.
20.Loosen the timing belt tensioner mounting bolts and allow the belt to tension.
21.After checking timing belt alignment, torque the timing belt tensioner mounting bolts to 14.5-19.5 ft. lbs.
22.Rotate the crankshaft clockwise two revolutions.
23.Align the crankshaft and camshaft timing marks, Figs. 3 and 4. If the timing marks do not align, the timing belt must be removed and re-installed.
24.Verify that when the tensioner and tension side of the timing belt are pushed in horizontally with a force of approximately 11 lbs., the timing belt cog end is approximately 1/2 of the tensioner mounting bolt head radius (across flats) away from the bolt center, Fig. 5.
25.Align the crankshaft and camshaft timing marks, Figs. 3 and 4. If the timing marks do not align, the timing belt must be removed and re-installed.
26.Install the lower belt cover. Torque the cover attaching bolts to 70-86 inch lbs.
27.Install the crankshaft flange.
28.Install the crankshaft pulley, washer and bolt. Ensure the crankshaft sprocket pin engages the small hole in the pulley. Torque the bolt to 101.3-108.5 ft. lbs.
29.Install the upper belt cover. Torque the cover attaching bolts to 70-86 inch lbs.
30.Install the water pump pulley. Torque the bolts to 9-13 ft. lbs.
31.Install the power steering, A/C compressor and alternator drive belts.
32.Install the righthand side cover, then the wheel and tire assembly.
33.Lower the vehicle and tighten the lugnuts
34.Install the engine cover and torque the attaching screws to 35-51 in. lbs.
35.Connect the battery ground cable.
36.Reset the radio station presets and the clock.
 En que kilometraje se remplaza la faja de tiempo de un Hyundai Accent del año 2008 ?????????