
-
Hola Invitado, Foromecanicos es el Foro de Automecanico y Autoelectronico - informacion sobre mecanica automotriz, computers, encendido y auto electronics, diagramas.
Estás utilizando un navegador obsoleto. Este u otros sitios web pueden no ser mostrados correctamente.
Debes actualizarlo o utilizar un navegador alternativo.
Debes actualizarlo o utilizar un navegador alternativo.
Honda Odyssey
- Iniciador del tema boscano
- Fecha de inicio
-
- Etiquetas
- honda odyssey
Cada Cuantas Millas Se Debe Reemplazar La Correa De Distribucion De Tiempo De Un Honda Odyssey V6 3.5l
no lo se en una odisey, pero si se en un accord 2.3, segun el manual se cambia cada 100,000 kms., solo te hago un apunte cuida de que la vuelvan acolocar en la misma posición que la quitan, que los engranes se mantengan en sus marcas, porque sino luego es un grave problema.

Tobe82
Experto
Para Honda motor 3.5L J35A1 año 2000 segun el manual dice
Under normal conditions, replace at intervals of 105,000 miles or every 84 months. If vehicle is operated at ambient temperatures under -20°F or above 110°F, replace at 60,000 mile intervals or every 48 months.
Under normal conditions, replace at intervals of 105,000 miles or every 84 months. If vehicle is operated at ambient temperatures under -20°F or above 110°F, replace at 60,000 mile intervals or every 48 months.
Última edición:
Tobe82
Experto
Dejo manual para cambiar banda de tiempo Honda Oddysey 3.5L J35A1 año 2000
PROCEDURE
This engine is classified as an Interference engine. If the timing belt breaks or jumps timing, a piston may contact an open valve. Piston to valve contact may cause damage to the valve, piston and other engine components. In some cases valve to valve contact may be experienced when the timing belt breaks or jumps timing. To avoid belt breakage, replace the timing belt as recommended by the vehicle manufacturer timing belt replacement interval.
With the timing belt removed, avoid turning the camshaft or crankshaft. If movement is required, exercise extreme caution to avoid valve damage caused by piston contact.
1.Note and record the radio anti-theft codes and station presets, then disconnect and isolate the battery ground cable.
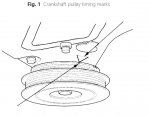
2.Rotate the crankshaft pulley clockwise until its white mark, Fig. 1, aligns with the pointer.
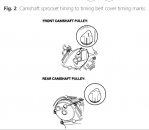
3.Ensure the rear camshaft sprocket mark, Fig. 2 aligns with the rear upper cover mark.
4.Loosen the front wheel lug nuts on both sides.
5.Raise and support the front of the vehicle with jackstands.
6.Remove the front tires and wheels.
7.Remove the front splash shield.
8.Remove the drive belts for the alternator and power steering pump.
9.Support the engine with a suitable jack and wooden block positioned under the oil pan.
10.Remove the side engine mount bracket.
11.Remove the engine oil dipstick and tube.
12.Hold the crankshaft pulley using Honda handle tool No. 07JAB-001020A and holder attachment tool No. 07MAB-PY3010A, or equivalents.
13.Remove the pulley bolt using a heavy duty 19 mm socket and a suitable breaker bar.
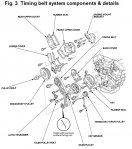
14.Remove the timing belt front upper cover, Fig. 3, rear upper and lower covers. Also note the timing belt lower guide plate orientation for proper installation.
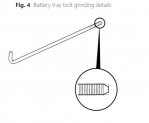
15.Remove a battery tray hold down bolt and grind the threaded end as illustrated, Fig. 4.
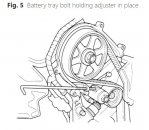
16.Thread the battery clamp bolt in as illustrated, Fig. 5, to retain the timing belt adjuster in its current position. Tighten by hand only. Do not use a wrench.
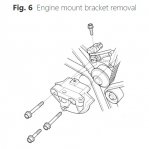
17.Remove the engine mount bracket, Fig. 6.
18.Remove the idler pulley attaching bolt and the idler pulley.
19.Remove the timing belt.
20.Clean all the belt sprockets and covers.
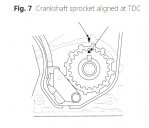
21.Set the crankshaft sprocket at TDC by aligning the TDC mark, Fig. 7, with the oil pump pointer.
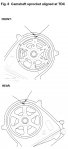
22.Set the camshaft sprockets at TDC by aligning the TDC marks, Fig. 8, with the pointers on the rear covers.
23.Remove the battery clamp bolt from the rear cover.
24.Remove the timing belt tensioner.
25.On 1999 models, proceed as follows:
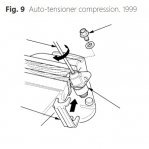
a.Hold the tensioner, Fig. 9, with the maintenance bolt facing upward. Use caution when handling the tensioner to prevent oil leaks and spills. Refill oil as required. Total capacity is .22 fluid ounces.
b.Remove the maintenance bolt from the tensioner.
c.Clamp the tensioner boss in a suitable soft-jawed vise. Do not grip the tensioner housing.
d.Insert a flat blade screwdriver, Fig. 9, into the maintenance hole.
e.Place Honda stopper 14540-P8A-A01, or equivalent, on the tensioner while turning the screwdriver clockwise to compress the bottom. Avoid damaging the threads or the gasket contact surface.
f.Install the maintenance bolt with a new gasket.
g.After inspecting and correcting any oil leaks at the maintenance bolt, install the tensioner. Torque the bolts to 8.7 ft. lbs. Ensure the stopper tool stays in position.
26.On 2000-07 models,proceed as follows:
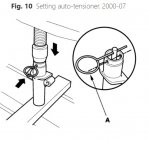
a.Align the auto-tensioner housing and rod holes.
b.Slowly compress the auto-tensioner and insert an .08 inch diameter pin through the housing into the rod, Fig. 10. Do not exceed 2200 lbs. of pressure.
c.Install the tensioner. Torque the bolts to 8.7 ft. lbs. Ensure the stopper tool stays in position.
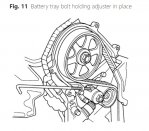
27.Thread the battery clamp bolt in as illustrated, Fig. 11, to retain the timing belt adjuster in its current position. Tighten by hand only. Do not use a wrench.
28.Apply liquid thread locking compound to the idler pulley bolt threads, then loosely install the idler pulley and bolt.
29.Install the new timing belt in a counterclockwise direction, starting at the crankshaft sprocket.
30.Torque the idler pulley bolt to 33 ft. lbs.
31.Remove the stopper tool from the auto-tensioner.
32.Remove the battery clamp bolt from the rear cover.
33.Install the engine mount bracket. Torque the three horizontal bolts to 33 ft. lbs. Torque the single vertical bolt to 8.7 ft. lbs.
34.Install the timing belt lower, front upper and rear upper covers. Torque the bolts to 8.7 ft. lbs.
35.Clean the crankshaft pulley bolt and washer.
36.Clean all oil from the inside face of the crankshaft pulley, then apply lubricant to the pulley bolt and washer.
37.On 1999-2004 models,install the crankshaft pulley and torque the bolt to 181 ft. lbs. while holding it with Honda handle tool No. 07JAB-001020A and holder attachment tool No. 07MAB-PY3010A, or equivalents. Do not use an impact wrench.
38.On 2005-07 models,install the crankshaft pulley and torque the bolt to 47 ft. lbs., then tighten an additional 60° while holding it with Honda handle 07JAB-001020A and holder attachment 07MAB-PY3010A, or equivalents. Do not use an impact wrench.
39.On all models, rotate the crankshaft pulley clockwise approximately 5 or 6 turns to position the timing belt on the sprockets, then align the white mark on crankshaft pulley, Fig. 1, with the pointer.
40.Inspect the camshaft sprocket marks, which should be at TDC, Fig. 2. If timing marks are improperly aligned, the timing belt must be removed and installed again.
41.Install the dipstick and tube with a new O-ring. Torque the mounting bolt to 8.7 ft. lbs.
42.Install the power steering and alternator drive belts. Refer to "Accessory Drive Belt Tension" for proper belt tension.
43.Install the side engine mount bracket. Torque the vertical bolts to 33 ft. lbs., then torque the through bolt to 40 ft. lbs.
44.Remove the jack and wooden from under the engine oil pan.
45.Return the battery clamp bolt to its original location.
46.Install the battery ground cable.
47.Install the front splash shield.
48.Install the front tires and wheels.
49.Remove the jackstands, then lower the vehicle.
50.Torque the lug nuts to 80 ft. lbs.
51.Connect the battery ground cable.
52.Reset the radio station presets and the clock.
PROCEDURE
This engine is classified as an Interference engine. If the timing belt breaks or jumps timing, a piston may contact an open valve. Piston to valve contact may cause damage to the valve, piston and other engine components. In some cases valve to valve contact may be experienced when the timing belt breaks or jumps timing. To avoid belt breakage, replace the timing belt as recommended by the vehicle manufacturer timing belt replacement interval.
With the timing belt removed, avoid turning the camshaft or crankshaft. If movement is required, exercise extreme caution to avoid valve damage caused by piston contact.
1.Note and record the radio anti-theft codes and station presets, then disconnect and isolate the battery ground cable.
2.Rotate the crankshaft pulley clockwise until its white mark, Fig. 1, aligns with the pointer.
3.Ensure the rear camshaft sprocket mark, Fig. 2 aligns with the rear upper cover mark.
4.Loosen the front wheel lug nuts on both sides.
5.Raise and support the front of the vehicle with jackstands.
6.Remove the front tires and wheels.
7.Remove the front splash shield.
8.Remove the drive belts for the alternator and power steering pump.
9.Support the engine with a suitable jack and wooden block positioned under the oil pan.
10.Remove the side engine mount bracket.
11.Remove the engine oil dipstick and tube.
12.Hold the crankshaft pulley using Honda handle tool No. 07JAB-001020A and holder attachment tool No. 07MAB-PY3010A, or equivalents.
13.Remove the pulley bolt using a heavy duty 19 mm socket and a suitable breaker bar.
14.Remove the timing belt front upper cover, Fig. 3, rear upper and lower covers. Also note the timing belt lower guide plate orientation for proper installation.
15.Remove a battery tray hold down bolt and grind the threaded end as illustrated, Fig. 4.
16.Thread the battery clamp bolt in as illustrated, Fig. 5, to retain the timing belt adjuster in its current position. Tighten by hand only. Do not use a wrench.
17.Remove the engine mount bracket, Fig. 6.
18.Remove the idler pulley attaching bolt and the idler pulley.
19.Remove the timing belt.
20.Clean all the belt sprockets and covers.
21.Set the crankshaft sprocket at TDC by aligning the TDC mark, Fig. 7, with the oil pump pointer.
22.Set the camshaft sprockets at TDC by aligning the TDC marks, Fig. 8, with the pointers on the rear covers.
23.Remove the battery clamp bolt from the rear cover.
24.Remove the timing belt tensioner.
25.On 1999 models, proceed as follows:
a.Hold the tensioner, Fig. 9, with the maintenance bolt facing upward. Use caution when handling the tensioner to prevent oil leaks and spills. Refill oil as required. Total capacity is .22 fluid ounces.
b.Remove the maintenance bolt from the tensioner.
c.Clamp the tensioner boss in a suitable soft-jawed vise. Do not grip the tensioner housing.
d.Insert a flat blade screwdriver, Fig. 9, into the maintenance hole.
e.Place Honda stopper 14540-P8A-A01, or equivalent, on the tensioner while turning the screwdriver clockwise to compress the bottom. Avoid damaging the threads or the gasket contact surface.
f.Install the maintenance bolt with a new gasket.
g.After inspecting and correcting any oil leaks at the maintenance bolt, install the tensioner. Torque the bolts to 8.7 ft. lbs. Ensure the stopper tool stays in position.
26.On 2000-07 models,proceed as follows:
a.Align the auto-tensioner housing and rod holes.
b.Slowly compress the auto-tensioner and insert an .08 inch diameter pin through the housing into the rod, Fig. 10. Do not exceed 2200 lbs. of pressure.
c.Install the tensioner. Torque the bolts to 8.7 ft. lbs. Ensure the stopper tool stays in position.
27.Thread the battery clamp bolt in as illustrated, Fig. 11, to retain the timing belt adjuster in its current position. Tighten by hand only. Do not use a wrench.
28.Apply liquid thread locking compound to the idler pulley bolt threads, then loosely install the idler pulley and bolt.
29.Install the new timing belt in a counterclockwise direction, starting at the crankshaft sprocket.
30.Torque the idler pulley bolt to 33 ft. lbs.
31.Remove the stopper tool from the auto-tensioner.
32.Remove the battery clamp bolt from the rear cover.
33.Install the engine mount bracket. Torque the three horizontal bolts to 33 ft. lbs. Torque the single vertical bolt to 8.7 ft. lbs.
34.Install the timing belt lower, front upper and rear upper covers. Torque the bolts to 8.7 ft. lbs.
35.Clean the crankshaft pulley bolt and washer.
36.Clean all oil from the inside face of the crankshaft pulley, then apply lubricant to the pulley bolt and washer.
37.On 1999-2004 models,install the crankshaft pulley and torque the bolt to 181 ft. lbs. while holding it with Honda handle tool No. 07JAB-001020A and holder attachment tool No. 07MAB-PY3010A, or equivalents. Do not use an impact wrench.
38.On 2005-07 models,install the crankshaft pulley and torque the bolt to 47 ft. lbs., then tighten an additional 60° while holding it with Honda handle 07JAB-001020A and holder attachment 07MAB-PY3010A, or equivalents. Do not use an impact wrench.
39.On all models, rotate the crankshaft pulley clockwise approximately 5 or 6 turns to position the timing belt on the sprockets, then align the white mark on crankshaft pulley, Fig. 1, with the pointer.
40.Inspect the camshaft sprocket marks, which should be at TDC, Fig. 2. If timing marks are improperly aligned, the timing belt must be removed and installed again.
41.Install the dipstick and tube with a new O-ring. Torque the mounting bolt to 8.7 ft. lbs.
42.Install the power steering and alternator drive belts. Refer to "Accessory Drive Belt Tension" for proper belt tension.
43.Install the side engine mount bracket. Torque the vertical bolts to 33 ft. lbs., then torque the through bolt to 40 ft. lbs.
44.Remove the jack and wooden from under the engine oil pan.
45.Return the battery clamp bolt to its original location.
46.Install the battery ground cable.
47.Install the front splash shield.
48.Install the front tires and wheels.
49.Remove the jackstands, then lower the vehicle.
50.Torque the lug nuts to 80 ft. lbs.
51.Connect the battery ground cable.
52.Reset the radio station presets and the clock.
Adjuntos
-
 honda-oddysey-timingbelt-1.jpg64,8 KB · Visitas: 417
 -
 honda-oddysey-timingbelt-2.jpg57 KB · Visitas: 396
 -
 honda-oddysey-timingbelt-3.jpg123,5 KB · Visitas: 1.036
 -
 honda-oddysey-timingbelt-4.jpg27,9 KB · Visitas: 380
 -
 honda-oddysey-timingbelt-5.jpg72,1 KB · Visitas: 410
 -
 honda-oddysey-timingbelt-6.jpg33,7 KB · Visitas: 390
 -
 honda-oddysey-timingbelt-7.jpg42,1 KB · Visitas: 439
 -
 honda-oddysey-timingbelt-8.jpg175,8 KB · Visitas: 371
 -
 honda-oddysey-timingbelt-9.jpg36,7 KB · Visitas: 396
 -
 honda-oddysey-timingbelt-010.jpg46 KB · Visitas: 398
 -
 honda-oddysey-timingbelt-011.jpg83,7 KB · Visitas: 433
Última edición:
Siguenos en:
El contenido de especificaciones técnicas,comentarios, opiniones y otros datos en este foro sólo son con fines informativos y son de exclusiva responsabilidad de cada usuario. Foromecanicos.com no puede y no verifica ni garantiza la exactitud o exhaustividad de la información. Usted utiliza este sitio web bajo su propio riesgo y solo con fines informativos. Las marcas y los logotipos de los fabricantes de automóviles en esta página web son propiedad de los titulares de las mismas.
Usamos cookies.Si continúas utilizando este sitio, estás consintiendo utilizar cookies.