Tobe82
Experto
Trabajando en un Hyundai Sonata 3.3L V6, cambiando cadena de tiempo, comparto manual
TIMING CHAIN, REPLACE - Hyundai Sonata 3.3L V6 2006 a 2010
1.Remove engine cover.
2.Remove air duct.
3.Disconnect Mass Air Flow Sensor (MAF) connector.
4.Disconnect breather hose from air cleaner hose.
5.Disconnect Electronic Control Module (ECM) connector.
6.Remove intake air hose and air cleaner.
7.Remove righthand front wheel.
8.Remove under cover.
9.Remove side cover.
10.Drain engine coolant into a suitable container.
11.Remove upper radiator hose.
12.Drain engine oil into a suitable container.
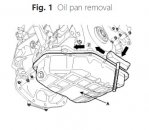
13.Insert blade of oil pan remover tool No. 09215-3C000, or equivalent, between upper oil pan and lower oil pan, and cut off applied sealer and remove lower oil pan, Fig. 1.
14.Install jack to upper oil pan.
15.Loosen transaxle mounting bolts without removing transaxle mounting.
16.Remove engine coolant reservoir tank.
17.Remove engine mounting bracket.
18.Loosen A/C pipe bracket mounting bolt.
19.Remove No. 1 engine mounting through lower position of A/C pipe line.
20.Disconnect righthand oxygen sensor connector.
21.Disconnect power steering oil pressure sensor connector.
22.Disconnect righthand injector and ignition coil connectors.
23.Disconnect Oil Control Valve (OCV) and knock sensor connectors.
24.Disconnect lefthand front oxygen sensor, alternator and air compressor connectors.
25.Disconnect lefthand ignition coil, injector, condenser and ground connectors, then remove wiring harness protector.
26.Disconnect lefthand Camshaft Position Sensor (CMP) and oil pressure switch connectors.
27.Disconnect Electronic Throttle Control (ETC) and knock sensor connectors.
28.Disconnect Purge Control Solenoid Valve (PCSV), Manifold Absolute Pressure (MAP) sensor connectors and PCSV hose.
29.Remove ETC bracket.
30.Disconnect water hoses from ETC.
31.Disconnect Positive Control Valve (PCV) hose.
32.Disconnect brake vacuum hose.
33.Remove surge tank stay.
34.Remove connector bracket from surge tank.
35.Remove surge tank. Cover inlet of intake manifold with clean woven cloth or vinyl cover to prevent foreign materials from entering.
36.Remove connector bracket from lefthand cylinder head cover.
37.Disconnect righthand ignition coil and condenser connectors, then remove wiring bracket.
38.Remove lefthand and righthand ignition coils.
39.Remove lefthand and righthand valve covers. Cover upside of engine head with clean woven cloth or vinyl cover to prevent foreign materials from entering.
40.Set No. 1 cylinder to TDC/compression by turning crankshaft pulley and align its groove with timing mark "T" of lower timing chain cover. Do not rotate engine counterclockwise.
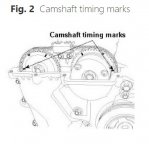
41.Ensure mark of camshaft timing sprockets are in straight line on cylinder head surface. If not, turn crankshaft one revolution (360°), Fig. 2.
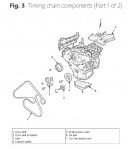
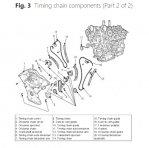
42.Remove drive belt, Fig. 3.
43.Lock flywheel with flywheel stopper tool No. 09231-3C300, or equivalent, then remove crankshaft pulley bolt and crankshaft damper pulley.
44.Lift up engine assembly by using a suitable jack.
45.Remove power steering pump.
46.Remove air conditioner compressor.
47.Remove alternator.
48.Remove drive belt idler and drive belt auto tensioner.
49.Remove water pump pulley and timing chain cover.
50.Install a set pin after compressing righthand timing chain tensioner.
51.Remove righthand cam to cam guide.
52.Remove righthand timing chain auto tensioner and righthand timing chain tensioner arm.
53.Remove righthand timing chain.
54.Remove righthand timing chain guide.
55.Remove oil pump chain cover.
56.Remove oil pump chain tensioner assembly.
57.Remove oil pump chain guide.
58.Remove oil pump chain sprocket and oil pump chain.
59.Remove crankshaft sprocket.
60.Install a set pin after compressing lefthand timing chain tensioner.
61.Remove lefthand cam to cam guide.
62.Remove lefthand timing chain auto tensioner and lefthand timing chain tensioner arm.
63.Remove lefthand timing chain.
64.Reverse procedure to install.
TIMING CHAIN, REPLACE - Hyundai Sonata 3.3L V6 2006 a 2010
1.Remove engine cover.
2.Remove air duct.
3.Disconnect Mass Air Flow Sensor (MAF) connector.
4.Disconnect breather hose from air cleaner hose.
5.Disconnect Electronic Control Module (ECM) connector.
6.Remove intake air hose and air cleaner.
7.Remove righthand front wheel.
8.Remove under cover.
9.Remove side cover.
10.Drain engine coolant into a suitable container.
11.Remove upper radiator hose.
12.Drain engine oil into a suitable container.
13.Insert blade of oil pan remover tool No. 09215-3C000, or equivalent, between upper oil pan and lower oil pan, and cut off applied sealer and remove lower oil pan, Fig. 1.
14.Install jack to upper oil pan.
15.Loosen transaxle mounting bolts without removing transaxle mounting.
16.Remove engine coolant reservoir tank.
17.Remove engine mounting bracket.
18.Loosen A/C pipe bracket mounting bolt.
19.Remove No. 1 engine mounting through lower position of A/C pipe line.
20.Disconnect righthand oxygen sensor connector.
21.Disconnect power steering oil pressure sensor connector.
22.Disconnect righthand injector and ignition coil connectors.
23.Disconnect Oil Control Valve (OCV) and knock sensor connectors.
24.Disconnect lefthand front oxygen sensor, alternator and air compressor connectors.
25.Disconnect lefthand ignition coil, injector, condenser and ground connectors, then remove wiring harness protector.
26.Disconnect lefthand Camshaft Position Sensor (CMP) and oil pressure switch connectors.
27.Disconnect Electronic Throttle Control (ETC) and knock sensor connectors.
28.Disconnect Purge Control Solenoid Valve (PCSV), Manifold Absolute Pressure (MAP) sensor connectors and PCSV hose.
29.Remove ETC bracket.
30.Disconnect water hoses from ETC.
31.Disconnect Positive Control Valve (PCV) hose.
32.Disconnect brake vacuum hose.
33.Remove surge tank stay.
34.Remove connector bracket from surge tank.
35.Remove surge tank. Cover inlet of intake manifold with clean woven cloth or vinyl cover to prevent foreign materials from entering.
36.Remove connector bracket from lefthand cylinder head cover.
37.Disconnect righthand ignition coil and condenser connectors, then remove wiring bracket.
38.Remove lefthand and righthand ignition coils.
39.Remove lefthand and righthand valve covers. Cover upside of engine head with clean woven cloth or vinyl cover to prevent foreign materials from entering.
40.Set No. 1 cylinder to TDC/compression by turning crankshaft pulley and align its groove with timing mark "T" of lower timing chain cover. Do not rotate engine counterclockwise.
41.Ensure mark of camshaft timing sprockets are in straight line on cylinder head surface. If not, turn crankshaft one revolution (360°), Fig. 2.
42.Remove drive belt, Fig. 3.
43.Lock flywheel with flywheel stopper tool No. 09231-3C300, or equivalent, then remove crankshaft pulley bolt and crankshaft damper pulley.
44.Lift up engine assembly by using a suitable jack.
45.Remove power steering pump.
46.Remove air conditioner compressor.
47.Remove alternator.
48.Remove drive belt idler and drive belt auto tensioner.
49.Remove water pump pulley and timing chain cover.
50.Install a set pin after compressing righthand timing chain tensioner.
51.Remove righthand cam to cam guide.
52.Remove righthand timing chain auto tensioner and righthand timing chain tensioner arm.
53.Remove righthand timing chain.
54.Remove righthand timing chain guide.
55.Remove oil pump chain cover.
56.Remove oil pump chain tensioner assembly.
57.Remove oil pump chain guide.
58.Remove oil pump chain sprocket and oil pump chain.
59.Remove crankshaft sprocket.
60.Install a set pin after compressing lefthand timing chain tensioner.
61.Remove lefthand cam to cam guide.
62.Remove lefthand timing chain auto tensioner and lefthand timing chain tensioner arm.
63.Remove lefthand timing chain.
64.Reverse procedure to install.