Tobe82
Experto
Cambiando el cilindro maestro del embrague (Clutch master cylinder) y el Clutch release cylinder en un kia spectra 2003 4cil
Clutch master cylinder
Remover
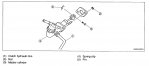
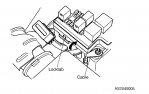
1. Disconnect cable.
2. Pull locktab, then remove fuse box.
3. Remove spring clip and pin from master cylinder push rod.
4. Remove master cylinder mounting nuts.
Notice: Clutch brake fluid will damage painted surfaces so use a container or shop towels for fluid collection. If fluid gets on a painted surface, rinse immediately with clear water to prevent damage.
5. Disconnect clutch master cylinder hose.
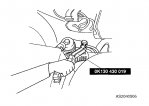
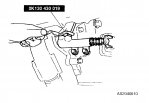
6. Disconnect clutch hydraulic line with SST(OK130 430 019).
7. Remove clutch master cylinder.
Reemplazando
1. Install clutch master cylinder.
2. Tighten master cylinder mounting nuts.
3. Insert spring clip and pin into master cylinder push rod.
4. Tighten clutch hydraulic line with SST(OK130 430 019).
Tightening torque: 9.4 - 15.9 ft. Lbs. (12.7 - 21.5 Nm, 1.3 - 2.2 kg.M)
5. Connect clutch master cylinder hose.
6. Install fuse box.
7. Install cable.
8. Perform clutch hydraulic line bleeding.
9. Verify that there is no leakage.
10. Perform a road test.
Clutch release cylinder
Remover
Notice:
a) Clutch fluid will damage painted surfaces. Be sure to use a container or shop towels to collect it
b) If fluid contacts a painted surface, rinse immediately with clear water to prevent damage.
Caution: After removing the clutch line, plug the clutch line to avoid fluid leakage.
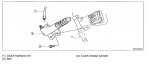
1. Raise and properly support vehicle.
2. Remove gravel shield from under engine (seven bolts).
3. Disconnect clutch line with SST(OK130 430 019).
4. Remove two release cylinder bolts, then remove release cylinder.
Reemplazando
1. Install clutch release cylinder.
2. Tighten two release cylinder bolts
Tightening torque: 13.7 - 18.8 ft. Lbs. (18.6 - 25.5 Nm, 1.9 - 2.6 kg.M)
3. Tighten clutch hydraulic line flare nut with SST(OK130 430 019).
Tightening torque: 9.4 - 15.9 ft. Lbs. (12.7 - 21.5 Nm, 1.3 - 2.2 kg.M)
4. After installation, bleed the clutch system.
5. Verify that there is no leakage.
6. Perform a road test.
Clutch master cylinder
Remover
1. Disconnect cable.
2. Pull locktab, then remove fuse box.
3. Remove spring clip and pin from master cylinder push rod.
4. Remove master cylinder mounting nuts.
Notice: Clutch brake fluid will damage painted surfaces so use a container or shop towels for fluid collection. If fluid gets on a painted surface, rinse immediately with clear water to prevent damage.
5. Disconnect clutch master cylinder hose.
6. Disconnect clutch hydraulic line with SST(OK130 430 019).
7. Remove clutch master cylinder.
Reemplazando
1. Install clutch master cylinder.
2. Tighten master cylinder mounting nuts.
3. Insert spring clip and pin into master cylinder push rod.
4. Tighten clutch hydraulic line with SST(OK130 430 019).
Tightening torque: 9.4 - 15.9 ft. Lbs. (12.7 - 21.5 Nm, 1.3 - 2.2 kg.M)
5. Connect clutch master cylinder hose.
6. Install fuse box.
7. Install cable.
8. Perform clutch hydraulic line bleeding.
9. Verify that there is no leakage.
10. Perform a road test.
Clutch release cylinder
Remover
Notice:
a) Clutch fluid will damage painted surfaces. Be sure to use a container or shop towels to collect it
b) If fluid contacts a painted surface, rinse immediately with clear water to prevent damage.
Caution: After removing the clutch line, plug the clutch line to avoid fluid leakage.
1. Raise and properly support vehicle.
2. Remove gravel shield from under engine (seven bolts).
3. Disconnect clutch line with SST(OK130 430 019).
4. Remove two release cylinder bolts, then remove release cylinder.
Reemplazando
1. Install clutch release cylinder.
2. Tighten two release cylinder bolts
Tightening torque: 13.7 - 18.8 ft. Lbs. (18.6 - 25.5 Nm, 1.9 - 2.6 kg.M)
3. Tighten clutch hydraulic line flare nut with SST(OK130 430 019).
Tightening torque: 9.4 - 15.9 ft. Lbs. (12.7 - 21.5 Nm, 1.3 - 2.2 kg.M)
4. After installation, bleed the clutch system.
5. Verify that there is no leakage.
6. Perform a road test.