Tobe82
Experto
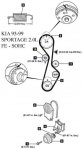
Reemplazando banda de tiempo en un Kia Sportage 2000 2.0L , comparto instrucciones. Sirve para Kia Sportage 2.0L años 1995 a 2002
1995-2002
This engine is classified as an Interference engine. If the timing belt breaks or jumps timing, a piston may contact an open valve. Piston to valve contact may cause damage to the valve, piston and other engine components. In some cases valve to valve contact may be experienced when the timing belt breaks or jumps timing. To avoid belt breakage, replace the timing belt as recommended by the vehicle manufacturer timing belt replacement interval.
With the timing belt removed, avoid turning the camshaft or crankshaft. If movement is required, exercise extreme caution to avoid valve damage caused by piston contact.
1.Record the radio station presets, then disconnect and isolate the battery ground cable.
2.Remove the two bolts attaching the fresh air duct to the radiator support.
3.Loosen the hose clamp at the air intake housing, then remove the fresh air duct.
4.Remove the engine cooling fan shroud attaching bolts.
5.Remove the engine cooling fan attaching bolts.
6.Remove the engine cooling fan and shroud.
7.Loosen the alternator mounting and adjusting bolts.
8.Remove the alternator drive belt.
9.Remove the engine cooling fan drive pulley.
10.Remove the engine lower splash guard attaching bolts, then the splash guard.
11.Loosen the A/C idler pulley nut, then loosen the adjusting bolts and remove the A/C compressor drive belt.
12.Loosen the power steering pump mounting and lock bolts, then remove the power steering pump drive belt.
13.Remove the five upper timing belt cover attaching bolts, then the upper cover.
14.Remove the two lower timing belt cover attaching bolts, then the lower cover.
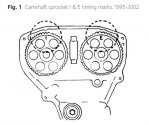
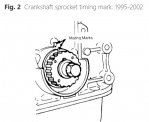
15.Align the crankshaft and camshaft sprocket timing marks, Figs. 1 and 2. Align the intake camshaft sprocket "I" mark with the rear cover mark. For the exhaust camshaft, align the "E" mark with the rear cover "E" mark.
16.Loosen the timing belt tensioner lock bolt. Pivot the tensioner outward, away from the timing belt, then tighten the lock bolt to hold the tensioner in position.
17.Remove the timing belt from the sprockets and tensioner.
18.Ensure the crankshaft and camshaft sprocket timing marks are aligned, Figs. 1 and 2.
19.Install the new timing belt so there is no looseness at the tension side of the belt and between the camshaft sprockets.
20.Loosen the timing belt tensioner lock bolt and allow the tensioner to tension the belt.
21.Rotate the crankshaft two turns in the normal direction of rotation.
22.Inspect the crankshaft and camshaft sprocket timing marks for proper alignment, Figs. 1 and 2. If the marks are not aligned, the timing belt must be removed and installed once again.
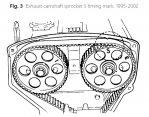
23.Rotate the crankshaft in the normal direction until the exhaust camshaft sprocket "S" mark aligns with the rear cover mark, Fig. 3.
24.Torque the timing belt tensioner lock bolt to 27-38 ft. lbs.
25.Measure the timing belt deflection at the midway point between the two camshaft sprockets, which should be between .30-.33 inch with a force of 22 lbs. If the deflection is not within specifications, repeat steps 19 through 23.
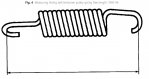
26.On 1995-96 models, ensure the tensioner spring free length is 2.189 inches, Fig. 4. If not, replace the spring.
27.On all models, install the timing belt lower and upper covers. Torque the attaching bolts to 61-87 inch lbs.
28.Install the power steering pump drive belt, then torque the lock and mounting bolts to 27-34 ft. lbs. Refer to "Accessory Drive Belt Tension" for proper belt tension.
29.Install the engine cooling fan pulley.
30.Install the alternator drive belt. Refer to "Accessory Drive Belt Tension" for proper belt tension. Adjust the belt tension by tightening the adjusting bolt. Torque the alternator upper mounting bolt to 16 ft. lbs. and the lower bolt to 32 ft. lbs.
31.Install the A/C compressor drive belt. Adjust the belt tension by tightening the adjusting bolt. Torque the idler pulley bolt to 23-25 ft. lbs. Refer to "Accessory Drive Belt Tension" for proper belt tension.
32.Install the engine lower splash shield.
33.Install the engine cooling fan and shroud at the same time. Torque the fan attaching bolts to 24 ft. lbs.
34.Install the engine cooling fan shroud attaching bolts and torque to 69-95 inch lbs.
35.Install the fresh air duct, connecting the hose at the resonance chamber and installing the clamp at the air intake housing. Torque the duct attaching screws to 69-95 inch lbs.
36.Connect the battery ground cable.
37.Reset the radio station presets and the clock.
1995-2002
This engine is classified as an Interference engine. If the timing belt breaks or jumps timing, a piston may contact an open valve. Piston to valve contact may cause damage to the valve, piston and other engine components. In some cases valve to valve contact may be experienced when the timing belt breaks or jumps timing. To avoid belt breakage, replace the timing belt as recommended by the vehicle manufacturer timing belt replacement interval.
With the timing belt removed, avoid turning the camshaft or crankshaft. If movement is required, exercise extreme caution to avoid valve damage caused by piston contact.
1.Record the radio station presets, then disconnect and isolate the battery ground cable.
2.Remove the two bolts attaching the fresh air duct to the radiator support.
3.Loosen the hose clamp at the air intake housing, then remove the fresh air duct.
4.Remove the engine cooling fan shroud attaching bolts.
5.Remove the engine cooling fan attaching bolts.
6.Remove the engine cooling fan and shroud.
7.Loosen the alternator mounting and adjusting bolts.
8.Remove the alternator drive belt.
9.Remove the engine cooling fan drive pulley.
10.Remove the engine lower splash guard attaching bolts, then the splash guard.
11.Loosen the A/C idler pulley nut, then loosen the adjusting bolts and remove the A/C compressor drive belt.
12.Loosen the power steering pump mounting and lock bolts, then remove the power steering pump drive belt.
13.Remove the five upper timing belt cover attaching bolts, then the upper cover.
14.Remove the two lower timing belt cover attaching bolts, then the lower cover.
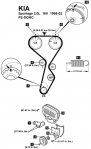
15.Align the crankshaft and camshaft sprocket timing marks, Figs. 1 and 2. Align the intake camshaft sprocket "I" mark with the rear cover mark. For the exhaust camshaft, align the "E" mark with the rear cover "E" mark.
16.Loosen the timing belt tensioner lock bolt. Pivot the tensioner outward, away from the timing belt, then tighten the lock bolt to hold the tensioner in position.
17.Remove the timing belt from the sprockets and tensioner.
18.Ensure the crankshaft and camshaft sprocket timing marks are aligned, Figs. 1 and 2.
19.Install the new timing belt so there is no looseness at the tension side of the belt and between the camshaft sprockets.
20.Loosen the timing belt tensioner lock bolt and allow the tensioner to tension the belt.
21.Rotate the crankshaft two turns in the normal direction of rotation.
22.Inspect the crankshaft and camshaft sprocket timing marks for proper alignment, Figs. 1 and 2. If the marks are not aligned, the timing belt must be removed and installed once again.
23.Rotate the crankshaft in the normal direction until the exhaust camshaft sprocket "S" mark aligns with the rear cover mark, Fig. 3.
24.Torque the timing belt tensioner lock bolt to 27-38 ft. lbs.
25.Measure the timing belt deflection at the midway point between the two camshaft sprockets, which should be between .30-.33 inch with a force of 22 lbs. If the deflection is not within specifications, repeat steps 19 through 23.
26.On 1995-96 models, ensure the tensioner spring free length is 2.189 inches, Fig. 4. If not, replace the spring.
27.On all models, install the timing belt lower and upper covers. Torque the attaching bolts to 61-87 inch lbs.
28.Install the power steering pump drive belt, then torque the lock and mounting bolts to 27-34 ft. lbs. Refer to "Accessory Drive Belt Tension" for proper belt tension.
29.Install the engine cooling fan pulley.
30.Install the alternator drive belt. Refer to "Accessory Drive Belt Tension" for proper belt tension. Adjust the belt tension by tightening the adjusting bolt. Torque the alternator upper mounting bolt to 16 ft. lbs. and the lower bolt to 32 ft. lbs.
31.Install the A/C compressor drive belt. Adjust the belt tension by tightening the adjusting bolt. Torque the idler pulley bolt to 23-25 ft. lbs. Refer to "Accessory Drive Belt Tension" for proper belt tension.
32.Install the engine lower splash shield.
33.Install the engine cooling fan and shroud at the same time. Torque the fan attaching bolts to 24 ft. lbs.
34.Install the engine cooling fan shroud attaching bolts and torque to 69-95 inch lbs.
35.Install the fresh air duct, connecting the hose at the resonance chamber and installing the clamp at the air intake housing. Torque the duct attaching screws to 69-95 inch lbs.
36.Connect the battery ground cable.
37.Reset the radio station presets and the clock.