Hola, esta semana quite las cabezas de mi motor porque empezó a pasar agua a un cilindro, al armar todo nuevamente me percate que en el manual trae una instrucción para después de montar las cabezas para ajustar los arboles con sus poleas pero se requiere una herramienta especial, en el manual se ve como dos placas metalizas con perforaciones en los costados y un pin por la parte central, estas placas se supone van en: se retiran las tapas traseras de las cabezas detrás de los arboles y dice el manual que se colocan estas placas con un pin para sujetar los arboles y luego se ponen las poleas frontales, alineando las marcas en cada una de ellas, desgraciadamente no pude conseguir esta herramienta especial y así lo arme y no arranca, alguien me dice que siga intentando hasta que arranque que tal vez es porque se descargaron los botadores pero no estoy seguro, alguien me puede asesorar?, se los agradezco. Saludos.
-
Hola Invitado, Foromecanicos es el Foro de Automecanico y Autoelectronico - informacion sobre mecanica automotriz, computers, encendido y auto electronics, diagramas.
Estás utilizando un navegador obsoleto. Este u otros sitios web pueden no ser mostrados correctamente.
Debes actualizarlo o utilizar un navegador alternativo.
Debes actualizarlo o utilizar un navegador alternativo.
Motor Dodge 3.5 fuera de tiempo
- Iniciador del tema Jimenez1976
- Fecha de inicio
-
- Etiquetas
- dodge herramienta especial poleas de arboles sincronía
Gracias Xico, el motor es de un Dodge Intrepid 2002 3.5, saludos.dices motor 3.5 pero dodge que , modelo que. mas datos para poder dar un punto de vista
Tobe82
Experto
Banda de Tiempo Dodge Intrepid ES 3.5L V6 2002
This engine is classified as an Interference engine. If the timing belt breaks or jumps timing, a piston may contact an open valve. Piston to valve contact may cause damage to the valve, piston and other engine components. In some cases valve to valve contact may be experienced when the timing belt breaks or jumps timing. To avoid belt breakage, replace the timing belt as recommended by the vehicle manufacturer timing belt replacement interval.
With the timing belt removed, avoid turning the camshaft or crankshaft. If movement is required, exercise extreme caution to avoid valve damage caused by piston contact.
1.Note and record the radio anti-theft codes and station presets, then disconnect the battery ground cable from the remote jumper terminal.
2.Remove the upper radiator crossmember.
3.Remove the fan module.
4.Remove the engine accessory drive belts.
5.Remove the crankshaft damper center bolt while holding the damper in place with DaimlerChrysler damper holder 8191, or equivalent.
6.Remove the crankshaft damper using DaimlerChrysler puller 1023 and insert C-4685-C2, or equivalents.
7.Remove the timing belt front covers.
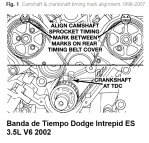
8.Rotate the crankshaft clockwise until the timing mark aligns with the TDC mark on the oil pump housing, and the camshaft sprocket timing marks are between marks on the rear timing belt covers, Fig. 1.
9.Mark the exact position of the camshaft sprocket timing marks relative to the two rear cover marks using an ink or paint marker.
10.Remove the timing belt tensioner.
11.Remove the timing belt.
12.If the camshafts have rotated from their marks, always rotate them toward the direction nearest the timing marks. Do not turn them a full revolution or piston and valve contact result.
13.If camshaft sprockets have been loosened or removed, the sprockets must be timed to the engine again as follows:
a.Remove both camshaft sprockets. Hold the sprocket in position using a 36 mm box wrench while loosening the retaining bolt. It may be required to raise the engine slightly to provide clearance for camshaft sprocket bolt removal.
b.Align the crankshaft sprocket timing mark with the mark on the oil pump housing.
c.With the spark plug removed, install a suitable dial indicator in No. 1 cylinder to position the piston exactly at TDC.
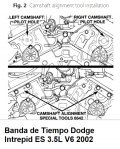
d.Remove the cam covers, then install the DaimlerChrysler camshaft alignment tool No. 6642, or equivalent, to the rear of each cylinder head, Fig. 2.
e.Install the camshaft sprockets onto the camshafts with new attaching bolts. The left camshaft sprocket can be identified by the pickup slots on the rear of the sprocket. The 255 mm bolt is used to retain the lefthand camshaft sprocket while the 213 mm bolt is used to retain the righthand camshaft sprocket. Do not tighten the camshaft sprocket retaining bolts.
f.The camshaft sprocket timing marks should be positioned between the timing marks on the cover, Fig. 1. Do not tighten the camshaft sprocket retaining bolts until after the timing belt and tensioner have been installed.
14.After noting the proper running direction, install the new belt by starting at the crankshaft sprocket and moving in a counterclockwise direction. Keep tension on the belt as it positions around the tensioner pulley.
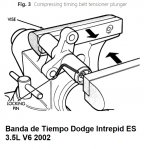
15.Position the timing belt tensioner in a soft-jawed vise, then slowly compress plunger into tensioner body, Fig. 3. Total tensioner bleed down should take approximately 5 minutes. Index the tensioner in the vise in the same way it is installed on the engine.
16.When the timing belt tensioner plunger is compressed into the tensioner body, install a suitable pin through the body and plunger to keep the plunger in place until installation, Fig. 3. If the tensioner will not be installed soon it should be stored in a vertical position with its plunger facing upward.
17.While holding the tensioner pulley against the belt, install the tensioner into its housing and torque the bolts to 20.8 ft. lbs.
18.Each camshaft mark should still fall between the cover marks.
19.After the tensioner is securely in place, remove the retaining pin to allow the tensioner to expand to the pulley bracket.
20.If the camshaft sprockets were loosened or removed, proceed as follows:
a.With the No. 1 piston at TDC and camshaft sprocket timing marks aligned, hold camshaft sprocket in position with a 36 mm box wrench and tighten the sprocket retaining bolt. Torque the right camshaft sprocket bolt to 75 ft. lbs., then tighten the bolt an additional 90°. Torque the left camshaft sprocket bolt to 85 ft. lbs., then tighten the bolt an additional 90°.
b.Remove the dial indicator from the No. 1 cylinder and install spark plug.
c.Remove the camshaft alignment tools from the rear of the camshafts.
d.Install the cam covers and O-rings. Torque cam cover fasteners to 21 ft. lbs.
21.Rotate the crankshaft sprocket two revolutions and inspect all the timing marks, which should properly align within their respective locations, Fig. 1. If the marks do not align, repeat the procedure.
22.Install the timing belt covers.
23.Install the crankshaft damper using DaimlerChrysler bolt C-4685-C1, special tool No. 6792-1, while holding the damper in place with holder 8191, or equivalents. Install crankshaft damper center bolt and torque to 85 ft. lbs.
24.Install the engine accessory drive belts. Refer to "Accessory Drive Belt Tension" for proper belt tension.
25.Install the fan module.
26.Install the upper radiator crossmember.
27.Connect the battery ground cable at the remote jumper terminal.
28.Start the engine and allow it to idle for one minute.
29.On 1998 models, operate the engine at 1200-1500 RPM for 5 minutes to release any trapped air from the timing belt tensioner.
30.On 1999-2006 models, operate the engine at 1600-2000 RPM for 10 minutes to release any trapped air from the timing belt tensioner.
This engine is classified as an Interference engine. If the timing belt breaks or jumps timing, a piston may contact an open valve. Piston to valve contact may cause damage to the valve, piston and other engine components. In some cases valve to valve contact may be experienced when the timing belt breaks or jumps timing. To avoid belt breakage, replace the timing belt as recommended by the vehicle manufacturer timing belt replacement interval.
With the timing belt removed, avoid turning the camshaft or crankshaft. If movement is required, exercise extreme caution to avoid valve damage caused by piston contact.
1.Note and record the radio anti-theft codes and station presets, then disconnect the battery ground cable from the remote jumper terminal.
2.Remove the upper radiator crossmember.
3.Remove the fan module.
4.Remove the engine accessory drive belts.
5.Remove the crankshaft damper center bolt while holding the damper in place with DaimlerChrysler damper holder 8191, or equivalent.
6.Remove the crankshaft damper using DaimlerChrysler puller 1023 and insert C-4685-C2, or equivalents.
7.Remove the timing belt front covers.
8.Rotate the crankshaft clockwise until the timing mark aligns with the TDC mark on the oil pump housing, and the camshaft sprocket timing marks are between marks on the rear timing belt covers, Fig. 1.
9.Mark the exact position of the camshaft sprocket timing marks relative to the two rear cover marks using an ink or paint marker.
10.Remove the timing belt tensioner.
11.Remove the timing belt.
12.If the camshafts have rotated from their marks, always rotate them toward the direction nearest the timing marks. Do not turn them a full revolution or piston and valve contact result.
13.If camshaft sprockets have been loosened or removed, the sprockets must be timed to the engine again as follows:
a.Remove both camshaft sprockets. Hold the sprocket in position using a 36 mm box wrench while loosening the retaining bolt. It may be required to raise the engine slightly to provide clearance for camshaft sprocket bolt removal.
b.Align the crankshaft sprocket timing mark with the mark on the oil pump housing.
c.With the spark plug removed, install a suitable dial indicator in No. 1 cylinder to position the piston exactly at TDC.
d.Remove the cam covers, then install the DaimlerChrysler camshaft alignment tool No. 6642, or equivalent, to the rear of each cylinder head, Fig. 2.
e.Install the camshaft sprockets onto the camshafts with new attaching bolts. The left camshaft sprocket can be identified by the pickup slots on the rear of the sprocket. The 255 mm bolt is used to retain the lefthand camshaft sprocket while the 213 mm bolt is used to retain the righthand camshaft sprocket. Do not tighten the camshaft sprocket retaining bolts.
f.The camshaft sprocket timing marks should be positioned between the timing marks on the cover, Fig. 1. Do not tighten the camshaft sprocket retaining bolts until after the timing belt and tensioner have been installed.
14.After noting the proper running direction, install the new belt by starting at the crankshaft sprocket and moving in a counterclockwise direction. Keep tension on the belt as it positions around the tensioner pulley.
15.Position the timing belt tensioner in a soft-jawed vise, then slowly compress plunger into tensioner body, Fig. 3. Total tensioner bleed down should take approximately 5 minutes. Index the tensioner in the vise in the same way it is installed on the engine.
16.When the timing belt tensioner plunger is compressed into the tensioner body, install a suitable pin through the body and plunger to keep the plunger in place until installation, Fig. 3. If the tensioner will not be installed soon it should be stored in a vertical position with its plunger facing upward.
17.While holding the tensioner pulley against the belt, install the tensioner into its housing and torque the bolts to 20.8 ft. lbs.
18.Each camshaft mark should still fall between the cover marks.
19.After the tensioner is securely in place, remove the retaining pin to allow the tensioner to expand to the pulley bracket.
20.If the camshaft sprockets were loosened or removed, proceed as follows:
a.With the No. 1 piston at TDC and camshaft sprocket timing marks aligned, hold camshaft sprocket in position with a 36 mm box wrench and tighten the sprocket retaining bolt. Torque the right camshaft sprocket bolt to 75 ft. lbs., then tighten the bolt an additional 90°. Torque the left camshaft sprocket bolt to 85 ft. lbs., then tighten the bolt an additional 90°.
b.Remove the dial indicator from the No. 1 cylinder and install spark plug.
c.Remove the camshaft alignment tools from the rear of the camshafts.
d.Install the cam covers and O-rings. Torque cam cover fasteners to 21 ft. lbs.
21.Rotate the crankshaft sprocket two revolutions and inspect all the timing marks, which should properly align within their respective locations, Fig. 1. If the marks do not align, repeat the procedure.
22.Install the timing belt covers.
23.Install the crankshaft damper using DaimlerChrysler bolt C-4685-C1, special tool No. 6792-1, while holding the damper in place with holder 8191, or equivalents. Install crankshaft damper center bolt and torque to 85 ft. lbs.
24.Install the engine accessory drive belts. Refer to "Accessory Drive Belt Tension" for proper belt tension.
25.Install the fan module.
26.Install the upper radiator crossmember.
27.Connect the battery ground cable at the remote jumper terminal.
28.Start the engine and allow it to idle for one minute.
29.On 1998 models, operate the engine at 1200-1500 RPM for 5 minutes to release any trapped air from the timing belt tensioner.
30.On 1999-2006 models, operate the engine at 1600-2000 RPM for 10 minutes to release any trapped air from the timing belt tensioner.
Adjuntos
Siguenos en:
El contenido de especificaciones técnicas,comentarios, opiniones y otros datos en este foro sólo son con fines informativos y son de exclusiva responsabilidad de cada usuario. Foromecanicos.com no puede y no verifica ni garantiza la exactitud o exhaustividad de la información. Usted utiliza este sitio web bajo su propio riesgo y solo con fines informativos. Las marcas y los logotipos de los fabricantes de automóviles en esta página web son propiedad de los titulares de las mismas.
Usamos cookies.Si continúas utilizando este sitio, estás consintiendo utilizar cookies.