-
Hola Invitado, Foromecanicos es el Foro de Automecanico y Autoelectronico - informacion sobre mecanica automotriz, computers, encendido y auto electronics, diagramas.
Estás utilizando un navegador obsoleto. Este u otros sitios web pueden no ser mostrados correctamente.
Debes actualizarlo o utilizar un navegador alternativo.
Debes actualizarlo o utilizar un navegador alternativo.
Necesito diagrama para poner a tiempo un Kia Sedona 2002
- Iniciador del tema ere30pr
- Fecha de inicio
-
- Etiquetas
- kia sedona
Re: Kia Sedona 2002
este es un pdf de la banda de tiempo
http://www.justanswer.com/uploads/rmillerphd/2008-04-05_103216_kiaFinal.pdf
este es un pdf de la banda de tiempo
http://www.justanswer.com/uploads/rmillerphd/2008-04-05_103216_kiaFinal.pdf
Última edición:
Tobe82
Experto
Torque de culata para Kia, se puede buscar el diagrama en
https://automecanico.com/auto2009/kia6cil.html
https://automecanico.com/auto2009/kia6cil.html
Tobe82
Experto
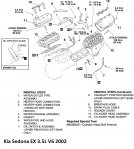
Kia Sedona EX 3.5L V6 2002 ,para quien lo ocupe
CYLINDER HEAD, REPLACE
1.Drain engine coolant into suitable container.
2.Remove timing belt as outlined in "Timing Belt, Replace."
3.Remove intake manifold as outlined in "Intake Manifold, Replace."
4.Disconnect front exhaust pipe as outlined in "Exhaust Manifold, Replace."
5.Remove cylinder head in numbered sequence, Fig. 1, noting the following. Remove cylinder head bolts in two or three steps using tool No. MD998051, or equivalent.
6.Reverse procedure to install, noting the following:
a.Ensure gasket mounting surface is clean of oil and grease, then place gasket on cylinder block with ID mark at front top position.
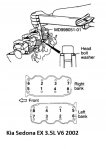
b.Torque cylinder head bolts in two or three steps, Fig. 2, to 80 ft. lbs.
c.Rinse mounting location of water pipe O-ring and water pipe with water, then install. Do not apply oil or grease to O-ring. Insert water pipe until its end bottoms.
d.Install water passage gasket onto water passage bending tabs of water passage, ensuring gasket does not slip.
e.Install thermostat with jiggle valve straight up.
CYLINDER HEAD, REPLACE
1.Drain engine coolant into suitable container.
2.Remove timing belt as outlined in "Timing Belt, Replace."
3.Remove intake manifold as outlined in "Intake Manifold, Replace."
4.Disconnect front exhaust pipe as outlined in "Exhaust Manifold, Replace."
5.Remove cylinder head in numbered sequence, Fig. 1, noting the following. Remove cylinder head bolts in two or three steps using tool No. MD998051, or equivalent.
6.Reverse procedure to install, noting the following:
a.Ensure gasket mounting surface is clean of oil and grease, then place gasket on cylinder block with ID mark at front top position.
b.Torque cylinder head bolts in two or three steps, Fig. 2, to 80 ft. lbs.
c.Rinse mounting location of water pipe O-ring and water pipe with water, then install. Do not apply oil or grease to O-ring. Insert water pipe until its end bottoms.
d.Install water passage gasket onto water passage bending tabs of water passage, ensuring gasket does not slip.
e.Install thermostat with jiggle valve straight up.
Adjuntos
Tobe82
Experto
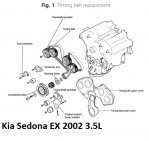
TIMING BELT, REPLACE
Kia Sedona EX 2002 3.5L
This engine is classified as an Interference engine. If the timing belt breaks or jumps timing, a piston may contact an open valve. Piston to valve contact may cause damage to the valve, piston and other engine components. In some cases valve to valve contact may be experienced when the timing belt breaks or jumps timing. To avoid belt breakage, replace the timing belt as recommended by the vehicle manufacturer timing belt replacement interval.
With the timing belt removed, avoid turning the camshaft or crankshaft. If movement is required, exercise extreme caution to avoid valve damage caused by piston contact.
1.Record the radio station presets, then disconnect and isolate the battery ground cable.
2.Remove the engine appearance cover.
3.Rotate the drive tensioner arm clockwise using a 16 MM wrench, then remove the serpentine belt.
4.Remove the power steering pump pulley, idler pulley, tensioner pulley and the crankshaft pulley.
5.Remove the timing belt upper and lower covers, Fig. 1.
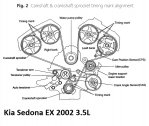
6.Rotate the crankshaft clockwise to align the crankshaft and camshaft timing marks and set the No. 1 piston at TDC compression stroke, Fig. 2.
7.Remove the timing belt auto-tensioner.
8.Remove the timing belt tensioner and the timing belt.
9.Inspect the tensioner and idler pulley for backlash or an irregular noise. Replace the tensioner and idler pulley as required.
10.Install the idler pulley to the engine support lower bracket.
11.Install the tension arm, shaft and plain washer to the engine block. Torque the bolt to 26-40 ft. lbs.
12.Retract the auto-tension rod, then use a suitable pin to lock the rod in the retracted position.
13.Install the auto-tensioner to the oil pump case. Torque the bolts to 15-20 ft. lbs.
14.Ensure the crankshaft and camshaft sprocket timing marks are aligned.
15.Install the new timing belt over the crankshaft sprocket, idler pulley, lefthand exhaust camshaft sprocket, lefthand intake camshaft sprocket, water pump pulley, righthand intake camshaft pulley, righthand exhaust camshaft sprocket and the tensioner pulley.
16.On Amanti and Sedona models, proceed as follows:
a.Rotate the crankshaft 1/4 turn counterclockwise, then rotate clockwise and align the timing marks.
b.Loosen the tensioner pulley center bolt.
c.Apply 43 inch lbs. of tension to the tensioner pulley using a suitable torque wrench and Kia socket tool No. 09244-28100, or equivalent.
17.On all models, torque the tensioner pulley center bolt to 31-40 ft. lbs.
18.Ensure the crankshaft and camshaft sprocket timing marks are aligned.
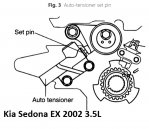
19.Remove the set pin from the auto-tensioner, Fig. 3.
20.Rotate the crankshaft 2 turns clockwise, aligning the crankshaft and camshaft sprocket timing marks. Ensure No. 1 cylinder is at TDC compression stroke.
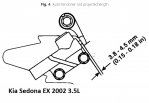
21.After waiting approximately five minutes, with No. 1 cylinder still at TDC compression stroke, measure the auto-tensioner rod projected length, which should be .15-.18 inch, Fig. 4.
22.If the auto-tensioner rod projected length is not within range, remove and install the timing belt once again.
23.Ensure the crankshaft and camshaft sprocket timing marks are still aligned. If the marks are not aligned, the timing belt must be removed and installed once again.
24.Install the timing belt upper and lower covers. Torque the 6 MM bolts to 84-108 inch lbs. and the 8 MM bolts to 14-20 ft. lbs.
25.Install the crankshaft pulley. Torque the bolt to 130-138 ft. lbs.
26.Install the power steering pump pulley.
27.Install the serpentine belt tensioner and idler pulleys. Torque the fasteners to 33-36 ft. lbs.
28.Install the power steering drive belt. Refer to "Accessory Drive Belt Tension" for proper belt tension.
29.Rotate the serpentine belt tensioner arm clockwise using a suitable 16 MM wrench, then install the belt.
30.Install the engine appearance cover.
31.Connect the battery ground cable.
32.Start the engine and inspect for proper operation.
33.Reset the radio station presets and the clock.
Kia Sedona EX 2002 3.5L
This engine is classified as an Interference engine. If the timing belt breaks or jumps timing, a piston may contact an open valve. Piston to valve contact may cause damage to the valve, piston and other engine components. In some cases valve to valve contact may be experienced when the timing belt breaks or jumps timing. To avoid belt breakage, replace the timing belt as recommended by the vehicle manufacturer timing belt replacement interval.
With the timing belt removed, avoid turning the camshaft or crankshaft. If movement is required, exercise extreme caution to avoid valve damage caused by piston contact.
1.Record the radio station presets, then disconnect and isolate the battery ground cable.
2.Remove the engine appearance cover.
3.Rotate the drive tensioner arm clockwise using a 16 MM wrench, then remove the serpentine belt.
4.Remove the power steering pump pulley, idler pulley, tensioner pulley and the crankshaft pulley.
5.Remove the timing belt upper and lower covers, Fig. 1.
6.Rotate the crankshaft clockwise to align the crankshaft and camshaft timing marks and set the No. 1 piston at TDC compression stroke, Fig. 2.
7.Remove the timing belt auto-tensioner.
8.Remove the timing belt tensioner and the timing belt.
9.Inspect the tensioner and idler pulley for backlash or an irregular noise. Replace the tensioner and idler pulley as required.
10.Install the idler pulley to the engine support lower bracket.
11.Install the tension arm, shaft and plain washer to the engine block. Torque the bolt to 26-40 ft. lbs.
12.Retract the auto-tension rod, then use a suitable pin to lock the rod in the retracted position.
13.Install the auto-tensioner to the oil pump case. Torque the bolts to 15-20 ft. lbs.
14.Ensure the crankshaft and camshaft sprocket timing marks are aligned.
15.Install the new timing belt over the crankshaft sprocket, idler pulley, lefthand exhaust camshaft sprocket, lefthand intake camshaft sprocket, water pump pulley, righthand intake camshaft pulley, righthand exhaust camshaft sprocket and the tensioner pulley.
16.On Amanti and Sedona models, proceed as follows:
a.Rotate the crankshaft 1/4 turn counterclockwise, then rotate clockwise and align the timing marks.
b.Loosen the tensioner pulley center bolt.
c.Apply 43 inch lbs. of tension to the tensioner pulley using a suitable torque wrench and Kia socket tool No. 09244-28100, or equivalent.
17.On all models, torque the tensioner pulley center bolt to 31-40 ft. lbs.
18.Ensure the crankshaft and camshaft sprocket timing marks are aligned.
19.Remove the set pin from the auto-tensioner, Fig. 3.
20.Rotate the crankshaft 2 turns clockwise, aligning the crankshaft and camshaft sprocket timing marks. Ensure No. 1 cylinder is at TDC compression stroke.
21.After waiting approximately five minutes, with No. 1 cylinder still at TDC compression stroke, measure the auto-tensioner rod projected length, which should be .15-.18 inch, Fig. 4.
22.If the auto-tensioner rod projected length is not within range, remove and install the timing belt once again.
23.Ensure the crankshaft and camshaft sprocket timing marks are still aligned. If the marks are not aligned, the timing belt must be removed and installed once again.
24.Install the timing belt upper and lower covers. Torque the 6 MM bolts to 84-108 inch lbs. and the 8 MM bolts to 14-20 ft. lbs.
25.Install the crankshaft pulley. Torque the bolt to 130-138 ft. lbs.
26.Install the power steering pump pulley.
27.Install the serpentine belt tensioner and idler pulleys. Torque the fasteners to 33-36 ft. lbs.
28.Install the power steering drive belt. Refer to "Accessory Drive Belt Tension" for proper belt tension.
29.Rotate the serpentine belt tensioner arm clockwise using a suitable 16 MM wrench, then install the belt.
30.Install the engine appearance cover.
31.Connect the battery ground cable.
32.Start the engine and inspect for proper operation.
33.Reset the radio station presets and the clock.
Adjuntos
Siguenos en:
El contenido de especificaciones técnicas,comentarios, opiniones y otros datos en este foro sólo son con fines informativos y son de exclusiva responsabilidad de cada usuario. Foromecanicos.com no puede y no verifica ni garantiza la exactitud o exhaustividad de la información. Usted utiliza este sitio web bajo su propio riesgo y solo con fines informativos. Las marcas y los logotipos de los fabricantes de automóviles en esta página web son propiedad de los titulares de las mismas.
Usamos cookies.Si continúas utilizando este sitio, estás consintiendo utilizar cookies.