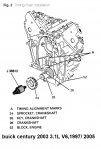
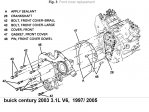
Dejo estas instrucciones para poner a tiempo un buick century 2003 3.1L V6, sirve para los años 1997/ 2005
TIMING CHAIN, REPLACE
Caution: With the timing chain removed, avoid turning the camshaft or crankshaft. If movement is required, exercise extreme caution to avoid valve damage caused by piston contact.
1.Disconnect and isolate battery ground cable.
2.Drain engine oil into suitable container.
3.Drain engine coolant into suitable container.
4.Remove cover and serpentine drive belt.
5.Remove serpentine drive belt tensioner and alternator.
6.Remove and position power steering pump aside.
7.Remove mounting bolts and cross vehicle brace.
8.Remove coolant overflow hose from radiator neck.
9.Remove mounting nuts and coolant reservoir.
10.Raise and support vehicle with jack stands.
11.Remove inner splash shield and flywheel cover.
12.Remove starter motor.
13.Remove crankshaft balancer using torsional damper remover tool No. J-24420, or equivalent.
14.Remove serpentine drive belt idler pulley.
15.Remove lower timing cover mounting bolts and lower vehicle.
16.Remove throttle body air inlet duct and lefthand engine mount strut.
17.Remove spark plug wires from lefthand bank.
18.Disconnect radiator hose at water pump and heater coolant hose from cooling system fill pipe.
19.Disconnect bypass, overflow and canister purge hoses.
20.Remove thermostat bypass pipe from front cover.
21.Remove mounting bolts and water pump pulley.
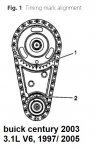
22.Remove lower crankshaft position sensor wiring harness bracket from engine front cover.
23.Remove mounting bolts and upper timing cover.
24.Rotate crankshaft until timing marks align, Fig. 1.
25.Remove mounting bolt, camshaft sprocket and timing chain.
26.Remove mounting bolts and timing chain damper.
27.Remove crankshaft sprocket using sprocket removal GM tool No. J-5825-A, or equivalent.
28.Reverse procedure to install, noting the following:
a.Install crankshaft sprocket until it is fully seated on flange of crankshaft using sprocket installer GM tool No. J-38612, or equivalent.
b.Coat camshaft and crankshaft sprockets with suitable engine oil.
c.Hold camshaft sprocket with chain hanging down and align camshaft and crankshaft sprockets marks with engine block cast timing marks, Fig. 2.
d.Install new front cover gasket.
e.Apply suitable sealant, Fig. 3.
f.Torque crankshaft damper mounting bolt to 52 ft. lbs., then tighten bolt an additional 72° turn.
g.Install accessory drive belt. Refer to last page for proper belt tension.
h.Inspect cooling system and fill to proper level with recommended coolant, as required.
i.Fill engine crankcase to proper level with recommended engine oil.
j.Connect battery ground cable.
k.Start engine and confirm proper operation, and ensure there are no leaks.
l.Clear DTC(s) using a suitably programmed scan tool.