Comparto las instrucciones que tengo
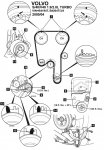
Volvo S40 2001 1.9L 4cil B4204T3
TIMING BELT, REPLACE
This engine is classified as an Interference engine. If the timing belt breaks or jumps timing, a piston may contact an open valve. Piston to valve contact may cause damage to the valve, piston and other engine components. In some cases valve to valve contact may be experienced when the timing belt breaks or jumps timing. To avoid belt breakage, replace the timing belt as recommended by the vehicle manufacturer timing belt replacement interval.
With the timing belt removed, avoid turning the camshaft or crankshaft. If movement is required, exercise extreme caution to avoid valve damage caused by piston contact.
1.Disconnect and isolate the battery ground cable.
2.On models with turbocharged engine, remove the righthand engine cover and the cover over the right headlamp.
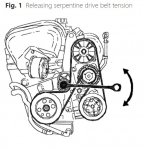
3.On all models, release the tension on the serpentine drive belt by turning the tensioner pulley clockwise, Fig. 1, then remove the drive belt.
4.Remove the upper timing belt cover.
5.Remove the front timing belt cover.
6.Remove the power steering hose bracket from the belt guard.
7.Raise the front of engine slightly using suitable engine lifting equipment.
8.Remove the power steering reservoir holder mounting bolts.
9.Remove the righthand engine mount bolts, then the mount.
10.Remove the lower timing belt cover.
11.Raise and support the vehicle using suitable jackstands.
12.Remove the right front wheel.
13.Temporarily position the upper timing belt cover on the engine.
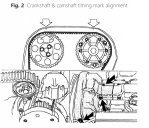
14.Turn the crankshaft until the timing marks are aligned, Fig. 2. Turn the crankshaft further 1/4 turn clockwise, then turn crankshaft back 1/4 turn aligning the timing marks.
15.Remove the upper timing belt cover.
16.Loosen the center bolt of the timing belt tensioner.
17.While holding the timing belt tensioner center bolt in place, use a 6 mm hex wrench to turn the eccentric clockwise until the wrench is at the 10 o'clock position.
18.Remove the timing belt from the tension pulley, camshaft sprocket and water pump pulley.
19.Inspect the idler pulley for noise and smooth operation. Replace as required. If replacement is required, torque the idler pulley to 18 ft. lbs.
20.Inspect the timing belt tensioner pulley for noise and smooth operation. Replace as required. If replacement is required, tighten the tensioner center screw by hand. Also ensure the tensioner fork is centered over the engine block rib and the hex hole on the eccentric is at the 10 o'clock position.
21.Remove the front air baffle.
22.Remove the rear air baffle.
23.Remove the lower timing belt cover.
24.Remove the lower timing belt guard.
25.Remove the timing belt.
26.Ensure the timing marks are aligned, Fig. 2.
27.Install the new timing belt over the crankshaft sprocket.
28.Install the lower belt guard.
29.Install the front air baffle.
30.Install the rear air baffle.
31.Finish installing the timing belt by routing the belt from the crankshaft sprocket to the idler pulley, intake camshaft sprocket, exhaust camshaft sprocket, water pump pulley, then the tensioner pulley.
32.Carefully turn the crankshaft slightly clockwise until the timing belt is tensioned between the intake camshaft sprocket, the idler pulley and the crankshaft sprocket.
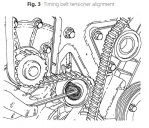
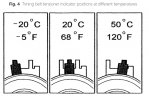
33.While holding the tensioner center bolt in position, move the eccentric counterclockwise until the indicator passes the marked position. Turn the eccentric back the other way until the indicator reaches the center of the window, Fig. 3. This adjustment is to be made with a cold engine. Suitable temperature is approximately 67°F. For warmer or cooler temperatures refer to Fig. 4,for proper placement of the indicator arm.
34.Holding the timing belt tensioner eccentric securely, then torque the center bolt to 15 ft. lbs. Ensure the tensioner indicator is still in the proper position. If not, the timing belt must be tensioned.
35.Push on the timing belt to ensure the tensioner moves freely.
36.Install the upper timing belt cover.
37.Turn the crankshaft two turns in the clockwise direction. Ensure the timing marks on the crankshaft and camshaft sprockets are properly aligned.
38.Ensure the timing belt tensioner indicator is still within the marked area.
39.Install the lower timing belt cover. Torque the attaching screws to 106 inch lbs.
40.Install the front timing belt cover. Torque the attaching screws to 106 inch lbs.
41.Install the right engine mounting. Torque the attaching bolts to 49 ft. lbs.
42.Install the bracket for the power steering reservoir. Torque the attaching bolts to 37 ft. lbs.
43.Install power steering reservoir.
44.Remove the engine lifting equipment.
45.Attach the power steering hose bracket to the belt guard.
46.Install the right front wheel and tire assembly.
47.Lower the vehicle to ground, then torque the right front wheel lugnuts to 81 ft. lbs.
48.Install the serpentine drive belt.
49.On models with turbocharged engine, install the righthand engine cover and the cover for the right headlamp.
50.On all models, connect the battery ground cable.
51.Start the engine, and ensure it operates properly.