Cambiando banda de tiempo: sirve para 2000-2006 Sentra 1.8L
TIMING CHAIN, REPLACE
Caution: With timing chain removed, avoid turning camshaft or crankshaft. If movement is required, exercise extreme caution to avoid valve damage caused by piston contact.
1.Relieve fuel system pressure as follows:
a.Remove fuel pump fuse from fuse panel.
b.Start engine.
c.After engine stalls, crank starter two or three times to ensure pressure is relieved.
d.Turn ignition Off.
e.After repair operations are complete, replace fuel pump fuse.
2.Drain engine coolant into a suitable container.
3.Mark running directions, then remove accessory drive belts.
4.Raise and support vehicle.
5.Remove front righthand wheel and splash undercover.
6.Disconnect vacuum, fuel and electrical connectors.
7.Remove ignition coils and spark plugs.
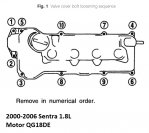
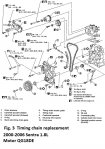
8.Remove valve cover bolts in sequence, Fig. 1, then valve cover.
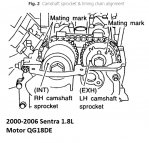
9.Set No. 1 piston at TDC on its compression stroke, rotate crankshaft until mating mark on camshaft sprocket is set in position, Fig. 2.
10.Remove CMP sensor, then cylinder head front cover, Fig. 3.
11.Remove timing chain guide from camshaft bracket.
12.Attach a suitable pin stopper to chain tensioner, then remove tensioner.
13.Paint matching marks on camshaft sprockets and timing chain for installation reference.
14.Remove camshaft sprocket retaining bolts and sprockets.
15.Remove cylinder head retaining bolts at front of engine.
16.Remove front exhaust pipe, exhaust manifold support, engine gusset and rear plate cover. Discard donut gasket.
17.Remove oil pan mounting bolts, then oil pan.
18.Remove starter motor, then insert ring gear stopper tool No. KV10105610, or equivalent, through starter motor opening.
19.Remove crankshaft pulley retaining bolt and crankshaft pulley with a suitable puller.
20.Support engine with a suitable jack, then remove righthand engine mount and bracket.
21.Remove idler pulley and bracket.
22.Remove water pump pulley and water pump.
23.Remove front cover retaining bolts and front cover.
24.Remove timing chain, oil pump drive spacer, chain guides and crankshaft sprocket.
25.Remove O-rings from cylinder block and front cover.
26.Install crankshaft sprocket. Ensure mating marks on sprocket face towards front of engine.
27.Position crankshaft so No. 1 piston is at TDC and crankshaft key is at 12 o'clock position.
28.Install slack side timing chain guide and timing chain tension guide.
29.Install timing chain on crankshaft sprocket. Ensure chain is aligned with mark on crankshaft sprocket.
30.Install camshaft sprockets. Align timing chain with camshaft sprocket alignment marks, Fig. 2.
31.Install camshaft sprocket bolts.
32.Insert a suitable pin through pin hole of chain tensioner.
33.Install chain tensioner and remove pin.
34.Install timing chain guide and O-rings into cylinder block.
35.Remove any remaining RTV sealant from front cover and cylinder block mating surfaces.
36.Apply a continuous bead of suitable sealant to mating surface of front cover, Fig. 4.
37.Prior to installing front cover, inspect alignment of timing chain and crankshaft sprocket. Align oil drive spacer with oil pump and place timing chain to side of chain guide. This will prevent chain from making contact with water seal area of front cover.
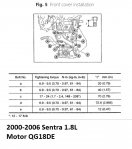
38.Install O-rings into front cover, then front cover. Tighten front cover bolts, Fig. 5.
39.Install cylinder head front bolts.
40.Install oil pump drive spacer, then water pump and water pump pulley.
41.Install idler pulley and bracket.
42.Install righthand engine mount bracket and mount.
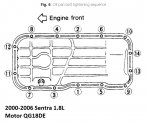
43.Install oil pan as follows:
a.Apply a continuous bead of suitable RTV sealant to oil pan mating surface. Caution: Install oil pan within five minutes of sealant application.
b.Torque oil pan nuts and bolts to 74 inch lbs. in sequence, Fig. 6.
44.Install crankshaft pulley, then remove ring gear stopper tool.
45.Install starter motor.
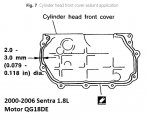
46.Apply a continuous bead of suitable RTV sealant to cylinder head front cover, Fig. 7.
47.Install CMP sensor.
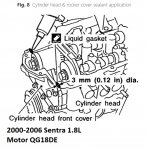
48.Apply a bead of suitable RTV sealant to valve cover mating surface, Fig. 8.
49.Install valve cover, spark plugs, ignition coils and front exhaust pipe with new donut gasket.
50.Install side splash undercover, then wheel and tire.
51.Install accessory drive belt.
52.Fill to proper level with recommended coolant.
53.Fill engine crankcase to proper level with recommended engine oil.
54.Connect battery ground cable.
55.Start engine and confirm proper operation, and ensure there are no leaks.