alguien tiene el diagrama para sincronizar la banda de tiempo y los arboles de lebas del toyota corolla modelo 91 no se el · de motor solo se que es el que lleva la banda a un solo arbol y el otro arbol funciona con engrane directo espero estos datos sirvan para que me proporcione alguie ayuda gracias
-
Hola Invitado, Foromecanicos es el Foro de Automecanico y Autoelectronico - informacion sobre mecanica automotriz, computers, encendido y auto electronics, diagramas.
Estás utilizando un navegador obsoleto. Este u otros sitios web pueden no ser mostrados correctamente.
Debes actualizarlo o utilizar un navegador alternativo.
Debes actualizarlo o utilizar un navegador alternativo.
sincronizacion toyota corolla 91
- Iniciador del tema T&JL
- Fecha de inicio
-
- Etiquetas
- sincronizacion toyota corolla
compadre espero sea este; https://www.automecanico.com/auto2007/canry20.html en la parete baja le das en continual, saludos,,,
Última edición por un moderador:
hola mandame tu corre electronico y te lo mando ok gacias
")
si no esta aqui me rindo https://www.automecanico.com/auto2039/toyobelt001.html saludos,,
Última edición por un moderador:
Tobe82
Experto
Dejo, este manual de cambio de banda de tiempo por si es el que sirve
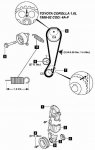
1992 Toyota Corolla Sedan L4-96.8 1587cc 1.6L DOHC (4A-FE)
Timing Belt Removal
Vehicle Engine, Cooling and Exhaust Engine Timing Components Timing Belt Service and Repair Procedures Timing Belt Replace Timing Belt Removal
REMOVAL OF TIMING BELT
1. Remove RH front wheel.
2. Remove RH engine under cover.
3. Remove washer tank.
4. Loosen water pump pulley bolts and remove alternator drive belt.
(a)Stretch the belt tight and loosen the water pump pulley bolts.
(b)Loosen the pivot nut and adjusting bolt, and remove drive belt.
5. On vehicles with A/C, remove A/C compressor drive belt.
(a)Loosen the idler pulley mounting bolt A.
(b)Loosen the adjusting bolt B and remove the drive belt
6. On vehicles with PS, remove PS pump drive belt.
(a)Loosen the pivot and lock bolts.
(b)Swing PS pump toward the engine and remove the drive belt.
7. Disconnect engine wire from No.3 timing belt cover.
(a)Disconnect the following connectors and wire:
- Alternator connector
- Alternator wire Oil pressure switch connector
- (with A/C) Compressor connector
(b)Remove the bolt.
(c)Disconnect the wire clamp from the wire bracket, and disconnect the engine wire from the timing belt cover.
8. Remove spark plug.
(a)Disconnect the high-tension cord from spark plug.
(b)Using a plug wrench (16 mm), remove the spark plugs.
9. Remove cylinder head cover.
(a)Disconnect the PCV hoses from the cylinder head cover.
(b)Remove the three cap nuts, grommet and cylinder head cover with the gasket.
10. Set No.1 cylinder at TDC/Compression.
(a)Turn the crankshaft pulley and align its groove with the No.1 timing belt cover.
(b)Check that the valve lifters on the No.1 cylinder are loose If not, turn the crankshaft pulley one complete revolution (360 ).
11. Remove RH engine mounting insulator.
(a)Set the jack to the engine.
HINT: Place a wooden block between the jack and engine.
(b)Remove the three bolts and mounting stay.
(c)Remove the bolt, two nuts, through bolt and RH mounting.
12. Remove water pump pulley.
13. Remove crankshaft pulley.
(a)Using SST 09213-14010 and 09330-00021 to hold the crankshaft pulley, remove the pulley bolt.
(b)Using SST 09213-31021, remove the pulley.
14. Remove timing belt covers.
Remove the nine bolts engine wire bracket and timing belt covers.
15. Remove timing belt guide.
16. Remove timing belt and idler pulley.
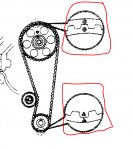
HINT: If reusing the timing belt, draw a direction arrow on the belt (in direction of engine revolution), and place matchmarks on the pulleys and belt as shown in the Illustration.
(a)Remove the bolt, idler pulley and tension spring.
(b)Remove the timing belt.
17. Remove crankshaft timing pulley.
18. Remove camshaft timing pulley.
Hold the hexagonal head wrench portion of the camshaft with a wrench, and remove the bolt and timing pulley.
NOTICE: Be careful not to damage the cylinder head with the wrench.
Install
1992 Toyota Corolla Sedan L4-96.8 1587cc 1.6L DOHC (4A-FE)
Timing Belt Installation
Vehicle Engine, Cooling and Exhaust Engine Timing Components Timing Belt Service and Repair Procedures Timing Belt Replace Timing Belt Installation
INSTALLATION OF TIMING BELT
1. Install camshaft timing pulley.
(a)Align the camshaft knock pin with the knock pin groove of the pulley, and slide on the pulley.
(b)Temporarily install the timing pulley bolt.
(c)Hold the hexagonal wrench head portion of the camshaft with a wrench, and tighten the timing pulley bolt.
Torque: 59 N.M (600 kgf. Cm, 43 ft. Lbf)
(d)Turn the hexagonal wrench head portion of the camshaft, and align the hole of the camshaft timing pulley with the timing mark of the bearing cap.
2. Install crankshaft timing pulley.
(a)Align the pulley set key with the key groove of the pulley.
(b)Slide on the timing pulley, facing the flange side inward.
(c)Using the crankshaft pulley bolt, turn the crankshaft and align the timing marks of the crankshaft timing pulley and oil pump body.
3. Temporarily install idler pulley and tension spring.
(a)Install the idler pulley with the bolt. Do not tighten the bolt yet.
(b)Install the tension spring.
(c)Push the pulley toward the left as far as it will go and tighten the bolt.
4. Install timing belt.
NOTICE: The engine should be cold.
HINT: If reusing the timing belt, align the points marked during removal, and install the belt with the arrow pointing in the direction of engine revolution.
5. Check valve timing and timing belt tension.
(a)Loosen the timing belt idler pulley mounting bolt.
(b)Temporarily install the crank pulley bolt and turn the crankshaft two revolutions from TDC to TDC.
HINT: Always turn the crankshaft clockwise.
(c)Check the valve timing.
Check that each pulley aligns with the marks as shown in the illustration.
(d)Tighten the timing belt idler pulley mounting bolt.
Torque: 37 N.M (375 kgf. Cm 27 ft. Lbf)
(e)Remove the temporarily installed crank pulley bolt.
(f)(Reference) Measure the timing belt deflection as shown in the illustration.
Timing belt deflection: 5 - 6 mm (0.20-0.24 in.) At 20 N (2 kgf, 4.4 lbf)
(g)If the measured value is not within standard, readjust with the idler pulley.
6. Install timing belt guide.
Install the guide, facing the cup side outward.
7. Install the timing belt covers.
(a)Install the timing belt cover with the three bolts.
(b)Install the No.2, No.3 timing belt covers and engine wire bracket with the six bolts.
Torque: 7.4 N.M (75 kgf. Cm, 65 in. Lbf)
8. Install crankshaft pulley.
(a)Align the pulley set key with the key groove of the pulley and slide on the pulley.
(b)Temporarily install the pulley bolt.
(C)Using SST 09213-14010 and 09330-00021, install the pulley bolt.
Torque: 118 N.M (1,200 kgf. Cm, 87 ft. Lbf)
9. Temporarily install water pump pulley.
10. Install RH engine mounting insulator.
(a)Install the RH mounting insulator to the engine mounting bracket with the two nuts and bolt. Align the RH mounting insulator with the body bracket and install the mounting through bolt and nut.
Torque:
Bolt 64 N.M (650 kgf. Cm, 47 ft. Lbf)
Nut 52 N.M (530 kgf. Cm, 38 ft. Lbf)
Through bolt 87 N.M (890 kgf. Cm, 69 ft. Lbf)
(b)Install the RH mounting stay with the three bolts, remove the jack.
Torque: 42 N.M (430 kgf. Cm 31 ft. Lbf)
11. Install cylinder head cover.
(a)Apply seal packing as shown in the illustration.
Seal packing: Part No. 08826-00080 or equivalent
HINT: Clean the indicated portions by removing the original sealant before recoating.
(b)Install the cylinder head cover with the three grommets and bolts.
(c)Install the PCV hoses.
12. Install spark plugs.
(a)Using a plug wrench (16 mm) install the spark plugs.
Torque: 18 N.M (180 kgf. Cm, 13 ft. Lbf)
(b)Connect the high tension cords to spark plugs.
13. Connect engine wire to No.3 timing belt cover.
(a)Connect the engine wire to the timing belt cover, and connect the wire clamp to the wire bracket.
(b)Install the bolt.
(c)Connect the following connectors and wire:
- Alternator connector Alternator wire
- Oil pressure switch connector
- (with A/C) Compressor connector
14. On vehicles with PS, install PS pump drive belt.
15. On vehicles with A/C, Install A/C compressor drive belt.
16. Install alternator drive belt.
17. Adjust drive belts.
Using a belt tension gauge, check and adjust the drive belt tension.
Drive belt tension:
Alternator Belt
New belt 160 20 lbf
Used belt 130 20 lbf
PS Belt
New belt 100 25 lbf
Used belt 55 20 lbf
A/C Belt
New belt 160 20 lbf
Used belt 100 20 lbf
18. Tighten water pump pulley bolts.
19. Install washer tank.
20. Install RH engine under cover.
21. Install RH front wheel.
1992 Toyota Corolla Sedan L4-96.8 1587cc 1.6L DOHC (4A-FE)
Timing Belt Removal
Vehicle Engine, Cooling and Exhaust Engine Timing Components Timing Belt Service and Repair Procedures Timing Belt Replace Timing Belt Removal
REMOVAL OF TIMING BELT
1. Remove RH front wheel.
2. Remove RH engine under cover.
3. Remove washer tank.
4. Loosen water pump pulley bolts and remove alternator drive belt.
(a)Stretch the belt tight and loosen the water pump pulley bolts.
(b)Loosen the pivot nut and adjusting bolt, and remove drive belt.
5. On vehicles with A/C, remove A/C compressor drive belt.
(a)Loosen the idler pulley mounting bolt A.
(b)Loosen the adjusting bolt B and remove the drive belt
6. On vehicles with PS, remove PS pump drive belt.
(a)Loosen the pivot and lock bolts.
(b)Swing PS pump toward the engine and remove the drive belt.
7. Disconnect engine wire from No.3 timing belt cover.
(a)Disconnect the following connectors and wire:
- Alternator connector
- Alternator wire Oil pressure switch connector
- (with A/C) Compressor connector
(b)Remove the bolt.
(c)Disconnect the wire clamp from the wire bracket, and disconnect the engine wire from the timing belt cover.
8. Remove spark plug.
(a)Disconnect the high-tension cord from spark plug.
(b)Using a plug wrench (16 mm), remove the spark plugs.
9. Remove cylinder head cover.
(a)Disconnect the PCV hoses from the cylinder head cover.
(b)Remove the three cap nuts, grommet and cylinder head cover with the gasket.
10. Set No.1 cylinder at TDC/Compression.
(a)Turn the crankshaft pulley and align its groove with the No.1 timing belt cover.
(b)Check that the valve lifters on the No.1 cylinder are loose If not, turn the crankshaft pulley one complete revolution (360 ).
11. Remove RH engine mounting insulator.
(a)Set the jack to the engine.
HINT: Place a wooden block between the jack and engine.
(b)Remove the three bolts and mounting stay.
(c)Remove the bolt, two nuts, through bolt and RH mounting.
12. Remove water pump pulley.
13. Remove crankshaft pulley.
(a)Using SST 09213-14010 and 09330-00021 to hold the crankshaft pulley, remove the pulley bolt.
(b)Using SST 09213-31021, remove the pulley.
14. Remove timing belt covers.
Remove the nine bolts engine wire bracket and timing belt covers.
15. Remove timing belt guide.
16. Remove timing belt and idler pulley.
HINT: If reusing the timing belt, draw a direction arrow on the belt (in direction of engine revolution), and place matchmarks on the pulleys and belt as shown in the Illustration.
(a)Remove the bolt, idler pulley and tension spring.
(b)Remove the timing belt.
17. Remove crankshaft timing pulley.
18. Remove camshaft timing pulley.
Hold the hexagonal head wrench portion of the camshaft with a wrench, and remove the bolt and timing pulley.
NOTICE: Be careful not to damage the cylinder head with the wrench.
Install
1992 Toyota Corolla Sedan L4-96.8 1587cc 1.6L DOHC (4A-FE)
Timing Belt Installation
Vehicle Engine, Cooling and Exhaust Engine Timing Components Timing Belt Service and Repair Procedures Timing Belt Replace Timing Belt Installation
INSTALLATION OF TIMING BELT
1. Install camshaft timing pulley.
(a)Align the camshaft knock pin with the knock pin groove of the pulley, and slide on the pulley.
(b)Temporarily install the timing pulley bolt.
(c)Hold the hexagonal wrench head portion of the camshaft with a wrench, and tighten the timing pulley bolt.
Torque: 59 N.M (600 kgf. Cm, 43 ft. Lbf)
(d)Turn the hexagonal wrench head portion of the camshaft, and align the hole of the camshaft timing pulley with the timing mark of the bearing cap.
2. Install crankshaft timing pulley.
(a)Align the pulley set key with the key groove of the pulley.
(b)Slide on the timing pulley, facing the flange side inward.
(c)Using the crankshaft pulley bolt, turn the crankshaft and align the timing marks of the crankshaft timing pulley and oil pump body.
3. Temporarily install idler pulley and tension spring.
(a)Install the idler pulley with the bolt. Do not tighten the bolt yet.
(b)Install the tension spring.
(c)Push the pulley toward the left as far as it will go and tighten the bolt.
4. Install timing belt.
NOTICE: The engine should be cold.
HINT: If reusing the timing belt, align the points marked during removal, and install the belt with the arrow pointing in the direction of engine revolution.
5. Check valve timing and timing belt tension.
(a)Loosen the timing belt idler pulley mounting bolt.
(b)Temporarily install the crank pulley bolt and turn the crankshaft two revolutions from TDC to TDC.
HINT: Always turn the crankshaft clockwise.
(c)Check the valve timing.
Check that each pulley aligns with the marks as shown in the illustration.
(d)Tighten the timing belt idler pulley mounting bolt.
Torque: 37 N.M (375 kgf. Cm 27 ft. Lbf)
(e)Remove the temporarily installed crank pulley bolt.
(f)(Reference) Measure the timing belt deflection as shown in the illustration.
Timing belt deflection: 5 - 6 mm (0.20-0.24 in.) At 20 N (2 kgf, 4.4 lbf)
(g)If the measured value is not within standard, readjust with the idler pulley.
6. Install timing belt guide.
Install the guide, facing the cup side outward.
7. Install the timing belt covers.
(a)Install the timing belt cover with the three bolts.
(b)Install the No.2, No.3 timing belt covers and engine wire bracket with the six bolts.
Torque: 7.4 N.M (75 kgf. Cm, 65 in. Lbf)
8. Install crankshaft pulley.
(a)Align the pulley set key with the key groove of the pulley and slide on the pulley.
(b)Temporarily install the pulley bolt.
(C)Using SST 09213-14010 and 09330-00021, install the pulley bolt.
Torque: 118 N.M (1,200 kgf. Cm, 87 ft. Lbf)
9. Temporarily install water pump pulley.
10. Install RH engine mounting insulator.
(a)Install the RH mounting insulator to the engine mounting bracket with the two nuts and bolt. Align the RH mounting insulator with the body bracket and install the mounting through bolt and nut.
Torque:
Bolt 64 N.M (650 kgf. Cm, 47 ft. Lbf)
Nut 52 N.M (530 kgf. Cm, 38 ft. Lbf)
Through bolt 87 N.M (890 kgf. Cm, 69 ft. Lbf)
(b)Install the RH mounting stay with the three bolts, remove the jack.
Torque: 42 N.M (430 kgf. Cm 31 ft. Lbf)
11. Install cylinder head cover.
(a)Apply seal packing as shown in the illustration.
Seal packing: Part No. 08826-00080 or equivalent
HINT: Clean the indicated portions by removing the original sealant before recoating.
(b)Install the cylinder head cover with the three grommets and bolts.
(c)Install the PCV hoses.
12. Install spark plugs.
(a)Using a plug wrench (16 mm) install the spark plugs.
Torque: 18 N.M (180 kgf. Cm, 13 ft. Lbf)
(b)Connect the high tension cords to spark plugs.
13. Connect engine wire to No.3 timing belt cover.
(a)Connect the engine wire to the timing belt cover, and connect the wire clamp to the wire bracket.
(b)Install the bolt.
(c)Connect the following connectors and wire:
- Alternator connector Alternator wire
- Oil pressure switch connector
- (with A/C) Compressor connector
14. On vehicles with PS, install PS pump drive belt.
15. On vehicles with A/C, Install A/C compressor drive belt.
16. Install alternator drive belt.
17. Adjust drive belts.
Using a belt tension gauge, check and adjust the drive belt tension.
Drive belt tension:
Alternator Belt
New belt 160 20 lbf
Used belt 130 20 lbf
PS Belt
New belt 100 25 lbf
Used belt 55 20 lbf
A/C Belt
New belt 160 20 lbf
Used belt 100 20 lbf
18. Tighten water pump pulley bolts.
19. Install washer tank.
20. Install RH engine under cover.
21. Install RH front wheel.
Adjuntos

Siguenos en:
El contenido de especificaciones técnicas,comentarios, opiniones y otros datos en este foro sólo son con fines informativos y son de exclusiva responsabilidad de cada usuario. Foromecanicos.com no puede y no verifica ni garantiza la exactitud o exhaustividad de la información. Usted utiliza este sitio web bajo su propio riesgo y solo con fines informativos. Las marcas y los logotipos de los fabricantes de automóviles en esta página web son propiedad de los titulares de las mismas.
Usamos cookies.Si continúas utilizando este sitio, estás consintiendo utilizar cookies.