Tobe82
Experto
Trabajando en cadena de tiempo Toyota corolla CE 2002 1.8L
Manual para reemplazar e instala Toyota Corolla y Matrix 1999 a 2008
REMOVAL
1.Relieve fuel system pressure as follows:
a.Remove rear seat cushion, then fuel pump service cover.
b.Disconnect fuel pump electrical connector.
c.Start and run engine until it stalls.
d.Turn ignition switch to LOCK position.
2.Drain engine coolant into a suitable container, then remove washer tank.
3.Remove righthand front wheel, then righthand engine under cover.
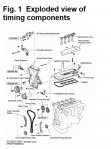
4.Release tensioner and remove drive belt, Fig. 1.
5.Remove mounting bolts and alternator.
6.Disconnect power steering oil pressure switch connector.
7.Remove power steering pulley bolt and pulley, using a holding tool Nos. 09960-10010, 09962-01000 and 09963-01000 or equivalent.
8.Remove power steering pump and reposition aside.
9.Place jack under engine. Caution: Place a wooden block between jack and engine.
10.On models equipped with A/C,remove bolt attaching A/C piping clamp to righthand engine mounting insulator.
11.On all models, remove bolts, nuts, then righthand engine mounting insulator.
12.Disconnect high-tension cords from clamp on cylinder head cover, then cords from spark plugs.
13.Disconnect two PCV hoses from cylinder head cover.
14.Remove attaching nuts, then bolt and wire harness protector cover.
15.Remove attaching bolts, then seal washers and nuts.
16.Remove cable bracket, then cylinder head cover and gasket.
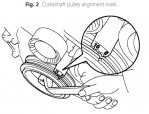
17.Set No. 1 cylinder to TDC of compression stroke by rotating crankshaft pulley as required to align pulley groove with "0" timing mark, Fig. 2.
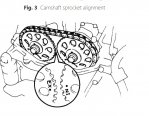
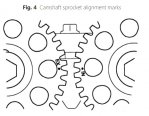
18.Ensure that point mark of camshaft timing sprockets are in straight line on timing chain cover surface, Fig. 3.
19.Remove pulley bolt, using crankshaft pulley holder tool Nos. 09213-70010, 09330-00021 or equivalents.
20.Remove crankshaft pulley, using crankshaft remover tool Nos. 09950-50011, 09951-05010, 09952-05010, 09953-05020 and 09954-05020 or equivalents.
21.Remove crankshaft position sensor, then drive belt tensioner.
22.Remove righthand engine mounting bracket.
23.Remove chain tensioner, then water pump.
24.Remove timing chain cover retaining bolts, then nuts.
25.Remove stud bolt, using a Torx wrench socket (E8) or equivalent.
26.Remove timing chain cover by prying portions between cylinder head and cylinder block. Caution: Ensure not to damage contact surface of timing chain cover, cylinder head and cylinder block.
27.Remove crank angle sensor plate, then chain tensioner slipper.
28.Remove timing chain and crankshaft timing sprocket.
29.Remove chain vibration damper, then camshaft timing sprockets.
Manual para reemplazar e instala Toyota Corolla y Matrix 1999 a 2008
REMOVAL
1.Relieve fuel system pressure as follows:
a.Remove rear seat cushion, then fuel pump service cover.
b.Disconnect fuel pump electrical connector.
c.Start and run engine until it stalls.
d.Turn ignition switch to LOCK position.
2.Drain engine coolant into a suitable container, then remove washer tank.
3.Remove righthand front wheel, then righthand engine under cover.
4.Release tensioner and remove drive belt, Fig. 1.
5.Remove mounting bolts and alternator.
6.Disconnect power steering oil pressure switch connector.
7.Remove power steering pulley bolt and pulley, using a holding tool Nos. 09960-10010, 09962-01000 and 09963-01000 or equivalent.
8.Remove power steering pump and reposition aside.
9.Place jack under engine. Caution: Place a wooden block between jack and engine.
10.On models equipped with A/C,remove bolt attaching A/C piping clamp to righthand engine mounting insulator.
11.On all models, remove bolts, nuts, then righthand engine mounting insulator.
12.Disconnect high-tension cords from clamp on cylinder head cover, then cords from spark plugs.
13.Disconnect two PCV hoses from cylinder head cover.
14.Remove attaching nuts, then bolt and wire harness protector cover.
15.Remove attaching bolts, then seal washers and nuts.
16.Remove cable bracket, then cylinder head cover and gasket.
17.Set No. 1 cylinder to TDC of compression stroke by rotating crankshaft pulley as required to align pulley groove with "0" timing mark, Fig. 2.
18.Ensure that point mark of camshaft timing sprockets are in straight line on timing chain cover surface, Fig. 3.
19.Remove pulley bolt, using crankshaft pulley holder tool Nos. 09213-70010, 09330-00021 or equivalents.
20.Remove crankshaft pulley, using crankshaft remover tool Nos. 09950-50011, 09951-05010, 09952-05010, 09953-05020 and 09954-05020 or equivalents.
21.Remove crankshaft position sensor, then drive belt tensioner.
22.Remove righthand engine mounting bracket.
23.Remove chain tensioner, then water pump.
24.Remove timing chain cover retaining bolts, then nuts.
25.Remove stud bolt, using a Torx wrench socket (E8) or equivalent.
26.Remove timing chain cover by prying portions between cylinder head and cylinder block. Caution: Ensure not to damage contact surface of timing chain cover, cylinder head and cylinder block.
27.Remove crank angle sensor plate, then chain tensioner slipper.
28.Remove timing chain and crankshaft timing sprocket.
29.Remove chain vibration damper, then camshaft timing sprockets.