Aca dejo un ejemplo de como reemplazar la cadena de tiempo en un chevrolet 2.4L
Estas instrucciones son para Chevrolet Equinox LS 2010/ 2014 2.4L 4cil
TIMING CHAIN, REPLACE
Caution: With the timing chain removed, avoid turning the camshaft or crankshaft. If movement is required, exercise extreme caution to avoid valve damage caused by piston contact.
1.Remove No. 1 spark plug and rotate engine until No. 1 piston is at TDC of compression stroke.
2.Remove camshaft cover as follows:
a.Remove intake manifold cover.
b.Remove air cleaner outlet duct.
c.Disconnect intake and exhaust camshaft position actuator solenoid valve electrical connectors.
d.Remove ignition coils.
e.Disconnect fuel feed pipe from fuel rail.
f.Remove camshaft cover bolts, then camshaft cover.
3.Remove engine front cover as outlined in "Front Cover."
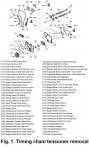
4.Remove upper timing chain guide, then timing chain tensioner, Fig. 1.
5.Place a suitable open end wrench on exhaust camshaft and hold camshaft, then remove exhaust camshaft actuator bolt and actuator from camshaft and timing chain.
6.Remove fixed timing chain guide bolts and guide.
7.Place a suitable wrench on intake camshaft flats, then remove and discard intake camshaft actuator bolt, then actuator and timing chain through top of cylinder head.
8.Remove fixed timing chain guide access plug.
9.Remove timing chain sprocket. If it is not required to replace balance shaft timing chain, proceed to Step 10. If balance shaft timing chain requires to be replaced, proceed as follows:
a.Remove balance shaft drive chain tensioner.
b.Remove adjustable balance shaft chain guide, then small balance shaft drive chain guide.
c.Remove upper balance shaft drive chain guide.
d.Remove all slack from balance shaft drive chain between crankshaft and water pump sprockets.
e.Remove balance shaft drive chain.
10.Reverse procedure to install, note following:
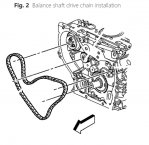
a.If installing balance shaft drive chain, align balance shaft drive chain colored links with marks on balance shaft drive sprockets and crankshaft sprocket as follows: Align colored link with timing mark on intake side balance shaft sprocket, Fig. 2, align chrome link with timing mark on balance shaft drive sprocket (approximately 6 o'clock position on sprocket), place chain link on water pump drive sprocket (alignment is not critical), align last chrome link with timing mark on exhaust side balance shaft drive sprocket.
b.Rotate balance shaft drive chain tensioner plunger 90° in its bore and compress plunger, then rotate tensioner back to original 12 o'clock position and insert a paper clip through hole in plunger body and into hole in tensioner plunger.
c.Install balance shaft drive chain tensioner, then remove paper clip.
d.Install timing chain crankshaft sprocket and position timing mark at 5 o'clock position.
e.Timing chain has three colored links (2 pink and 1 blue).
f.Assemble intake camshaft actuator to timing chain and align timing mark with blue link on chain, then install and hand tighten new actuator retaining bolt.
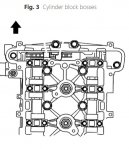
g.Lower timing chain through opening in cylinder head and ensure chain goes around both sides of cylinder block bosses, Fig. 3.
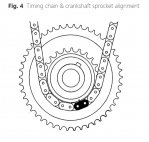
h.Route timing chain around crankshaft sprocket and align pink colored chain link to timing mark on sprocket, Fig. 4.
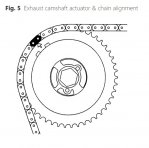
i.Install exhaust camshaft actuator, then install actuator bolt hand tight. Align actuator with last pink colored link on chain, Fig. 5.
j.Do not rotate either camshaft more than half turn in either direction with crankshaft at TDC. Turning camshaft more than half turn may result in piston to valve contact.
k.If camshaft is 180° out of time, turn intake camshaft until alignment feature on back of camshaft actuator seats in notch in front of intake camshaft. Turn crankshaft 45° in either direction and turn intake camshaft to appropriate location, then crankshaft back to TDC.
l.Ensure timing marks are aligned.